Installing Docker on Amazon Linux 2023 server system will allow users a seamless and efficient way to deploy and manage applications within isolated containers.
Docker doesn’t need an introduction because it has already been used by hundreds of administrators for deploying multiple applications on single hardware using virtualization. It also has simplified the process of packaging software packages and their dependencies into standardized units which ensures the consistency of them across different environments.
In this article, we will guide you through the steps to install Docker in Amazon Linux, so that you will be able to create light, portable, and self-contained containers.
Requirements
Nothing much just you need a working Amazon Linux 2023 with sudo rights to install packages and a working internet connection.
Step 1: Update AL2023 Packages
Once you have your Amazon Linux terminal access either directly or using SSH for the remote server, run the system update command. This will ensure all the installed packages on our system are up to date and also if there are some security updates available they will be downloaded as well. Besides all this, the DNF package manager will also rebuild its package index cache.
sudo dnf updateStep 2. Installing Docker on Amazon Linux 2023
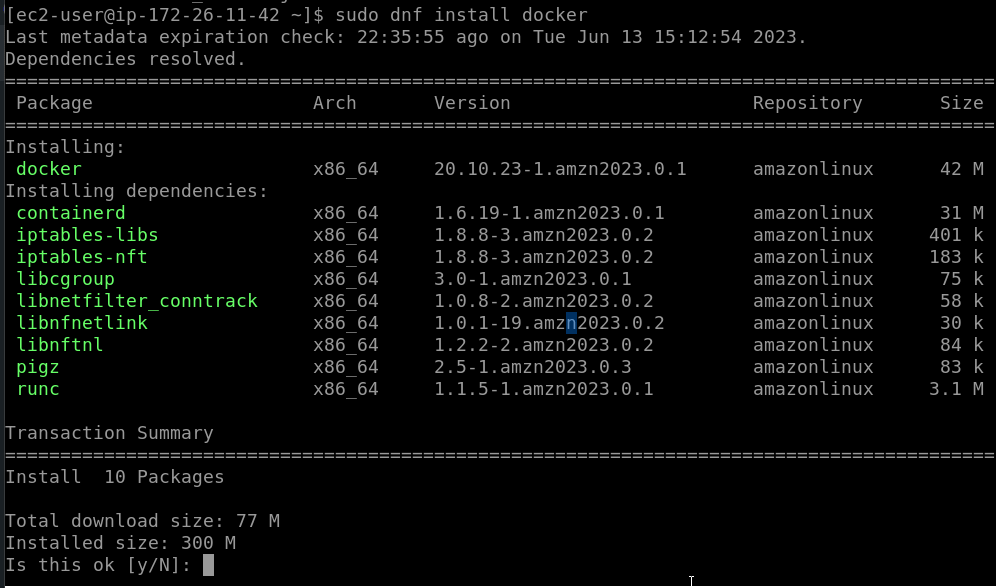
The next step is to use the default Amazon repository to download and install the Docker. Although, the version of the Docker available through the system repo will not be the latest one but the most stable. Therefore, we go for that.
sudo dnf install docker
Step 3: Start and Enable its Service
Docker service will not be started and enabled by default after you complete its installation. We have to do that manually, here is the command to start the Docker.
sudo systemctl start dockerNow, if you also want Docker to start automatically with system boot then use this command:
sudo systemctl enable dockerTo check and confirm the service is running absolutely fine, use:
sudo systemctl status dockerStep 4: Allow docker to run without sudo
The installation is completed but to run the commands of Docker every time you have to use sudo which can be annoying. So, to solve this, we have to add our current user to the Docker group. Use the given command to do that.
sudo usermod -aG docker $USERApply the changes we have done to Docker Group:
newgrp dockerStep 5: Create a Container – Example
Now, we can use Docker to create a Container. Let’s say you want to download and use the Ubuntu Docker image to create a Container. For that, here are the commands to follow:
docker pull ubuntuCreate container:
docker create -it --name demo ubuntuNote: Demo is our container name that is using downloaded Ubuntu Docker image. You can give any other name if you want.
Start container
docker start demoGet the command line of the installed container:
docker attach demoStep 6: Docker Uninstallation (optional)
In the future, if you don’t require Docker anymore on your Amazon Linux 2023 then to remove it you can use the given command:
sudo dnf remove dockerOther Articles:


