If you don’t want to install around 4GB or 9.5GB ISO file of CentOS 7 then, use the 900 MB ISO image to install the minimal version with only the base package on your server.
On one hand, where CentOS 8 Linux will stop getting further updates in December of this year, CentOS 7 Linux still has a long time to reach the end of its life that is stipulated in 2024. Thus, if you want to start with this server Linux distro then still you have enough time, and here will let you know how to install CentOS 7 minimal version on Server, PC, or VirtualBox.
Step by Step CentOS 7 Minimal server installation on PC or VertiuaBox
1. Download from the index of CentOS 7 Minimal ISO 64-bit
The option to download the minimal ISO of this server is available on CentOS 7 official index mirror page along with the full-fledged ISO and Net-installer version. Here is the official mirror links page, visit and select any of the available ones. After opening any link select the minimal version to download.

First, we prepare or set CentOS 7 minimal ISO as an installation medium. Go with as per your system…
2. CentOS 7 PC or Server installation
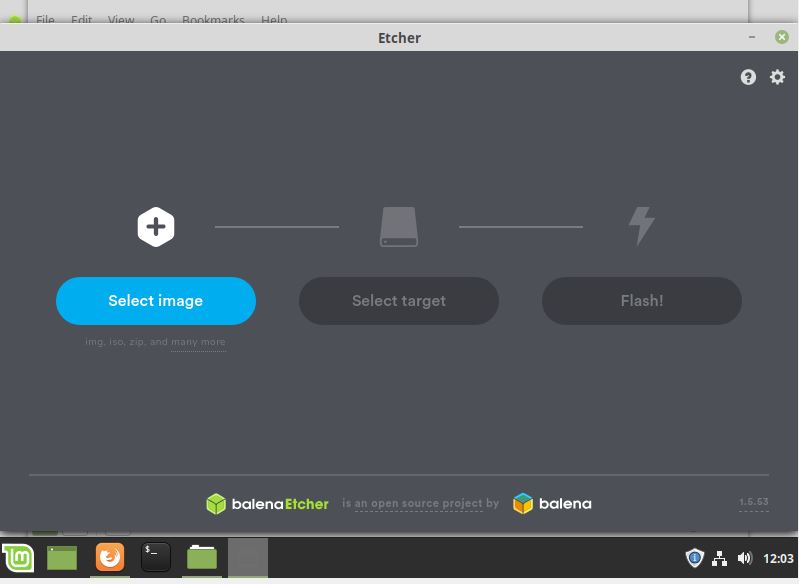
If you are planning to install CentOS 7 on a PC, laptop, or server machine then you need a bootable USB that contains its installation files. Thus, follow the below steps for Windows or Linux. For more details, you can see: How to install balenaEtcher on Linux
Here we are using Etcher that is available for macOS, Windows, and Linux. The installation of this software is any regular software just double click on its setup, even for Linux distros.
- Plug USB drive to the system
- Open Etcher bootable USB maker
- Select the ISO image and then the USB stick that you want to use
- Finally, click on the Flash button.
3. Create VirtualBox VM
Those who want to install CentOS 7 minimal version on VirtualBox, first need to create its VM and use its ISO files as the booting medium. Here are the steps to follow.
- Open VirtualBox
- Click on the New icon and then give some name to your machine. Select Type Linux and version– Redhat 64 bit.
- Assign the amount of RAM you want to use, 2GB will be good.
- Create a Virtual Hard disk. Leave all the default options as it is, just simply clicks on the Next button two times.
- At the “File location and size” set the disk to 20 GB or more as per your purpose of installing this Linux server.
4. Set ISO as a bootable medium
For PC or laptop: Insert the bootable USB you have created and restart your system to boot with it.
For VirtualBox: Once you have created the virtual machine, select it from the left side panel and then click on the Settings icon given in the VirtualBox menu.
- Select Storage and then the CD icon.
- After that again click on the CD/DVD icon given under Attributes and select “Choose/Create a Virtual Optical Disk“.

- Click Add, select the downloaded CentOS 7 ISO.
- Now, again select it from the file area and click on the Choose button.

- After this simply click on the Start button.
5. Select Install CentOS 7 boot option
As you boot the machine, there will be an option to run the installer for CentOS 7, select that to move forward.

6. Select Language
Set the language for the installation.

7. Installation Destinatuion
Click on the Destination option and select the hard disk where you want to install the operating system.


8. Network configuration & hostname
This is also important to set up otherwise later you have to enable it manually which will be a headache for new users. Thus, select it and then enable the toggle button given for Ethernet.

9. Begin installation
Finally, click on the blue color installation button to start the setup process.

10. Root & User
While the installation is going on select the Root options and set the password for it. In the same way, create a standard system user with sudo access as well.

Once done, Eject the ISO image for that go to Devices-> Optical Drive, and select the CentOS 7 image. This will give you a pop-up to force mount it. After that Reboot the system.
Insall GUI on CentOS 7 mininal server
In case you would like to have a Graphical user interface on CentOS 7 after its installation because in minimal version there will be a command-line interface then follow the below steps:
sudo yum install epel-release -y
sudo yum update
sudo yum groupinstall "server with GUI"
sudo yum groupinstall "cinnamon desktop" -y

sudo systemctl set-default graphical.target
Once done restart the system and login as Cinnamon…