GStreamer is a framework for developers dealing in multimedia applications. Because this framework helps in creating multimedia apps and pipelines for audio and video processing.
So, if you want to try it, we discuss the steps for installing GStreamer on Ubuntu systems in this article.
Note: We have performed this article on Ubuntu 22.04, however, it will be the same for 20.04 as well but the version of GStreamer through the default system repository would be different.
Step 1: Update System Packages
On your command terminal, start with the system update command to install newly available package updates. Also, rebuilding the APT package cache is necessary to get the info on new versions of packages, the given command will do as well.
sudo apt update && sudo apt upgradeStep 2: Install GStreamer on Ubuntu
GStreamer can easily be installed on Ubuntu Linux without adding any third repository using the APT package manager. Not only the core package but we can also install the necessary GStreamer components, including the tools, base plugins, good plugins, bad plugins, and ugly plugins.
Here is the command to follow:
apt-get install libgstreamer1.0-dev libgstreamer-plugins-base1.0-dev libgstreamer-plugins-bad1.0-dev gstreamer1.0-plugins-base gstreamer1.0-plugins-good gstreamer1.0-plugins-bad gstreamer1.0-plugins-ugly gstreamer1.0-libav gstreamer1.0-tools gstreamer1.0-x gstreamer1.0-alsa gstreamer1.0-gl gstreamer1.0-gtk3 gstreamer1.0-qt5 gstreamer1.0-pulseaudioStep 3: Check the Version
Once the installation is completed, we can check whether the GStreamer is installed correctly or not. For that, use the given command.
gst-inspect-1.0 --version
If in the output you see the version information, this means GStreamer is successfully installed.

Step 4: GStreamer Code Example
Let’s take an example in which we will use the GStreamer pipeline in Python using the Gst module.
Create a blank file with a Python extension:
nano video.pyNow, add the following code:
import gi
gi.require_version('Gst', '1.0')
from gi.repository import Gst

def main():
    # Initialize GStreamer
    Gst.init(None)

    # Create a pipeline
    pipeline = Gst.parse_launch("videotestsrc ! autovideosink")

    # Start the pipeline
    pipeline.set_state(Gst.State.PLAYING)

    # Wait for EOS (End-of-Stream) or error
    bus = pipeline.get_bus()
    msg = bus.timed_pop_filtered(Gst.CLOCK_TIME_NONE, Gst.MessageType.ERROR | Gst.MessageType.EOS)

    # Stop the pipeline
    pipeline.set_state(Gst.State.NULL)

if __name__ == '__main__':
    main()
Save the file by pressing Ctlr+X and then type Y after that hit the Enter key.
After that run the file:
python3 video.pyIf everything is correct, you will see a window with a video test pattern as shown in the given screenshot:
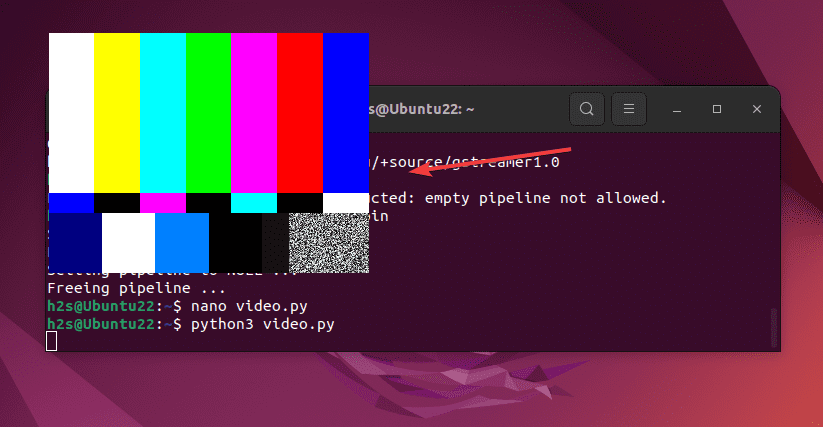
In the above-given example, a simple GStreamer pipeline generates a test video pattern (videotestsrc) and displays it in a window (autovideosink).
Here is the explanation of the code we have used to perform this example:
- First import the necessary modules from the
gi.repositorypackage and initialize the Gst module. - The
main()function is defined to contain our GStreamer code. - Inside
main(), is used to initialize GStreamer usingGst.init(None). - We create a pipeline using
Gst.parse_launch("videotestsrc ! autovideosink"). This pipeline consists of a video source element (videotestsrc) and a video sink element (autovideosink). - The pipeline will start by setting its state to Gst.State.PLAYING. After that, we wait for the pipeline to reach the end of the stream (EOS) or encounter an error using a message bus. Whereas, the
timed_pop_filtered()method will allow us to block until a specific message type is received. - Once the pipeline has finished or encountered an error, we set its state to
Gst.State.NULLto stop it.
To know more about the usage of GStreamer check out its documentation.
Other Articles:


I wonder how that is supposed to work on Ubuntu 20.04. There GST 1.16.3 is installed by default. You can’t install 1.20.3 the way you described.