EasyGUI is another library of Python that helps the developer to create simple GUI (Graphical User Interface) windows and dialogs with ease. It offers an intuitive and straightforward way to create interactive applications without complex code. So, here in this article, we learn the steps and commands to install the EasyGUI library for your Python project on Ubuntu Linux.
Step 1: Update Ubuntu Packages
It is important our Linux system is up to date before planning to install some new software. Therefore, on your command terminal, perform the system update command given below:
sudo apt updateThe above command will also update the cache built by the APT for packages available through the added repositories on the system.
Step 2: Install Python Tinkter
Although Ubuntu out of the box comes with Python3 installed, however, the same cannot be true for PIP3 – a Python package manager. Therefore, first let’s confirm, that Python and PIP are pre-installed on our system by running the following commands:
To check the Python version
python3 --versionFor PIP3:
pip3 --versionHowever, if you don’t see any output after running the above two commands then probably they are not on your system. So, to install them run the following syntax:
sudo apt install python3 python3-pipAfter that to use EasyGUI we also need the Python Tinkter library to be installed on our system because it is one which is going to provide GUI functions.
sudo apt-get install python3-tkStep 3: Install EasyGUI for Python on Ubuntu
Now, we know we have both Python and PIP on our system. Let’s use the PIP to download and install the EasyGUI library for our projects on Ubuntu from the Python Package Index (PyPI).
In your terminal run the following command:
pip3 install easygui --user
Step 4: Confirm EasyGUI Installation
We can verify whether the EasyGUI python GUI library is actually on our system or not. For that simply in your terminal run the given command, it will also provide a directory path where the system has configured the library files.
python3 -m pip show easygui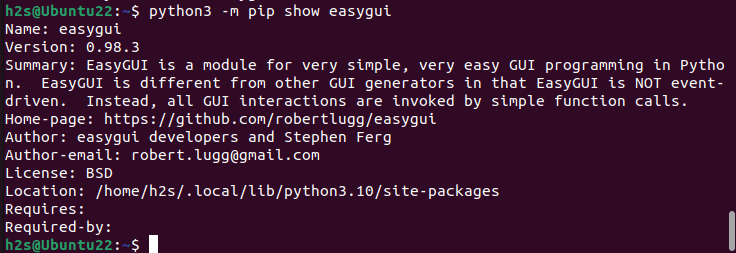
Step 5: Example to use EasyGUI in Python
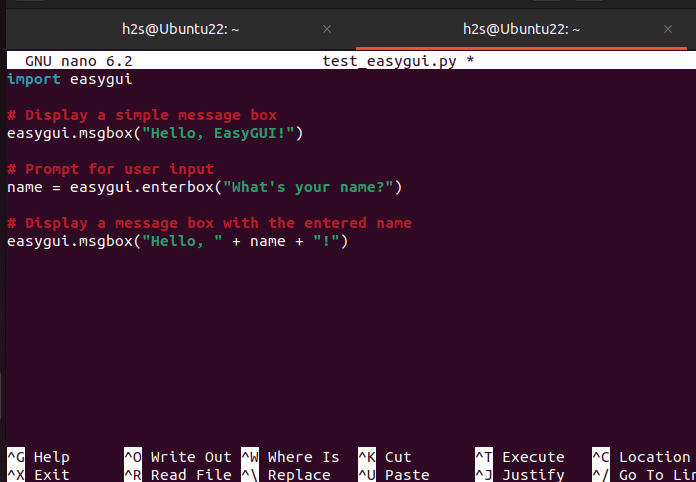
Let’s also see a simple example in which we create a Python file with some code to import the EasyGUI module and then use it to display a GUI window along with a message.
Open a text editor to create a new Python file, here we are using the popular NANO.
For example, let’s create a file named – test_easygui.py.
nano test_easygui.pyAdd the following code to the file:
import easygui

# Display a simple message box
easygui.msgbox("Hello, EasyGUI!")

# Prompt for user input
name = easygui.enterbox("What's your name?")

# Display a message box with the entered name
easygui.msgbox("Hello, " + name + "!")
Save the file by pressing Ctrl+X, type Y and then hit the Enter key.
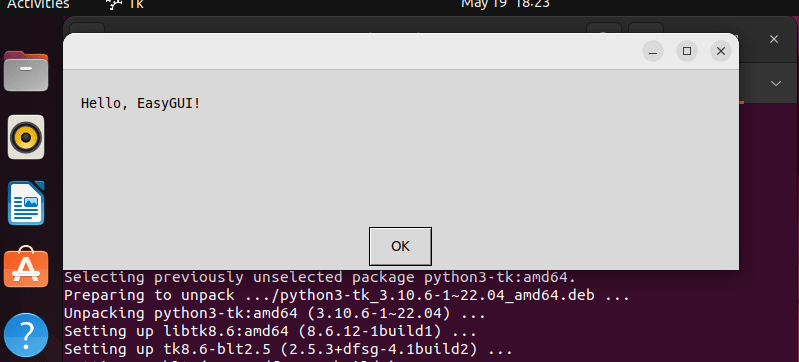
After that, execute the created file that imports EasyGUI using the Python interpreter.
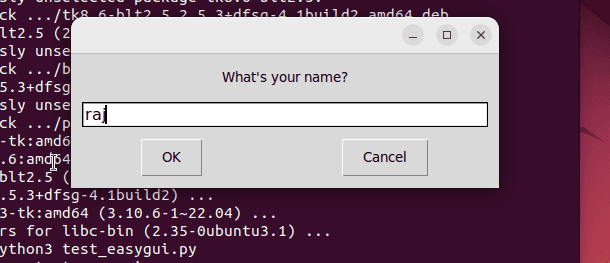
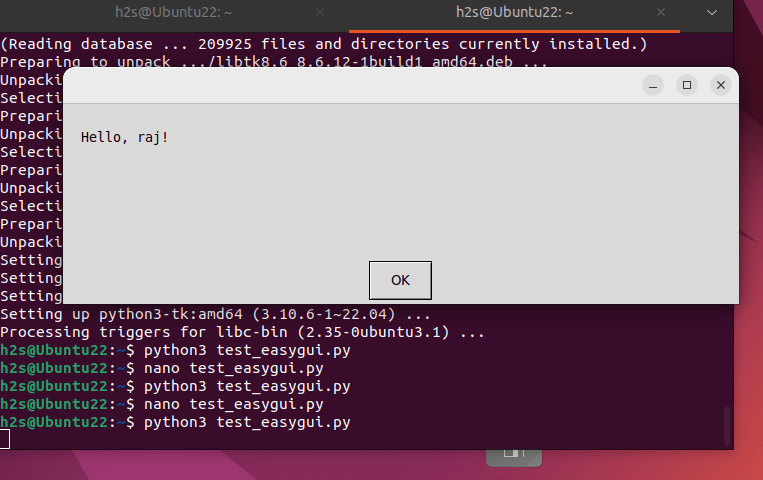
python3 test_easygui.pyAs you execute the create python script, if everything is installed correctly, you will see a GUI window displaying “Hello, EasyGUI!” followed by a prompt for your name. Enter your name and it will greet you with a personalized message.
How to Upgrade
In the future, if there is some new update available for the easygui library then to upgrade it use:
pip install --upgrade easygui --userUninstallation (optional)
In case after some time, you won’t need the easygui library of Python on your Ubuntu Linux system any more than to remove it, we can again use the PIP, here is the command:
pip uninstall easyguiSo, far in this article, we went through the simple steps to not only install EasyGUI but also Python, PIP, and Tinkter as well. Using EasyGUI you can start building interactive applications with graphical elements, such as message boxes, input dialogs, and more. Check out its documentation for more information.
Other Articles:


