Learn how to select a folder name to extract Tar or Tar.gz compressed archives, so that it automatically saves the files in our desired location while extracting them.
What is Untarring?
As we know Tar is a popular command utility in Linux systems for Archiving files and folders and the process of extracting files from a Tar archive file is known as “Untarring” or “untar“. A Tar Archive when compressed using Gzip known as Tar.GZ.
Tarball archives can contain single or multiple files in a big archive ending up with either .tar or .tar.gz, depending on whether it is compressed or not.
Hence, in short, Tar is a command line tool that is available almost on all Linux systems by default, and the process of extracting archived files created using it is known as “Untarring,” “Untarballing,” “extracting,” or “unarchiving.”
Command to extract a Tar archive in some particular folder
Extract TAR into some existing folder:
When untarring a compressed archive file, you can specify the directory name to use for the extracted files by using the “-C” or “–directory” option followed by the directory path.
For example, let’s suppose you already have an Archive file named – “myfile.tar.gz” and you want to extract it into a folder, let’s say “Testfolder“, you can do that using the -C option.
However, first, make sure the folder in which you want to extract the Archive file exists. And if not then create it using:
mkdir folder-nameSo, the Tar command to extract the files in some different folder is:
tar -xzvf myfile.tar.gz -C /path/to/myfolderReplace /path/to/myfolder with the exact folder where you want to extract the content. Let’s say we have a directory named – TestFolder inside /opt and want to extract the archive file in it, the command to do that will be like this:
sudo tar -xzvf myfile.tar.gz -C /opt/testfolderCommand Explanation:
- The “-x” option extracts the contents of the archive
- The “-z” option decompresses the archive (since it is in gzip format)
- The “-v” enables verbose output so that you can see what is happening during the extraction,
- The “-f” specifies the name of the archive file to extract.
- The “-C” option in the command is used to specify the directory to extract the files. Which can also be replaced with the –directory option.
In the given screenshot you can see we didn’t have any folder named “testfolder” under “/opt” so the extraction command gave the error for the same.

Extract Tar in the same directory but with renamed folder:
Those who want to extract the Tar file content in the same directory with some different folder name can use the given command.
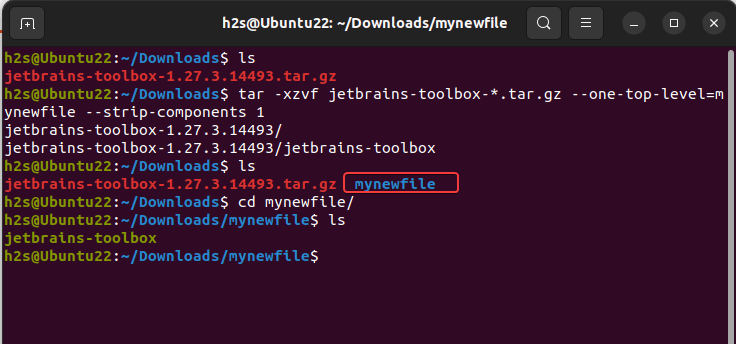
tar -xzvf myfile.tar.gz --one-top-level=new_name --strip-components 1
The above command follows the same regular process for extracting the files in the directory where your Archive is present, however with a slight alteration.
It will extract the content in a new directory named “new_name” while stripping the top-level directory from the extracted files.
In simple words, it will rename the main archive folder name to what you have set and then extract all the files of the archive in it.

Explanation of options used:
“–one-top-level=new_name“: This option is used to tell the Tar which directory it must be used to extract the files into, and if it doesn’t exist, it will create the one automatically. All the extracted files will be placed in the “new_name” directory, so, change it with whatever name you want to use for your extracted directory.
“–strip-components 1“: Another option we have used is to ask the Tar to remove the first directory component from the file names in the archive. This means the top-level directory that is containing the archive files will not be created instead the files will be placed directly in the “new_name” directory during the extracting process.


