Learn the steps to know the process of installing the Yaml package to use in Python3 using the PIP on Linux, Windows, or MacOS.
‘Yaml’ is a data serialization language that stands for “YAML Ain’t Markup Language”, as compared to JSON, it offers an easily human-readable format commonly used for writing configuration files. If you want to use YAML for creating files using its syntax in Python then we need to add a package that supports it; so, that we can parse, modify, and generate YAML files in your Python applications. The good thing is we can easily install it using PIP, a popular Python package manager.
Step 1: Check Python Version
You must have Python pre-installed on your Linux or any other system you are using before planning to install any package for it. To check for that and confirm the installed version of Python you can run the following command in the terminal:
python --versionStep 2: Install PIP, if not available
Once you are assured that your system has Python, the second thing we need is its package manager called ‘PIP‘. Although Python 3 would be already on your system but PIP may not.
So to check it, first run:
pip3 --version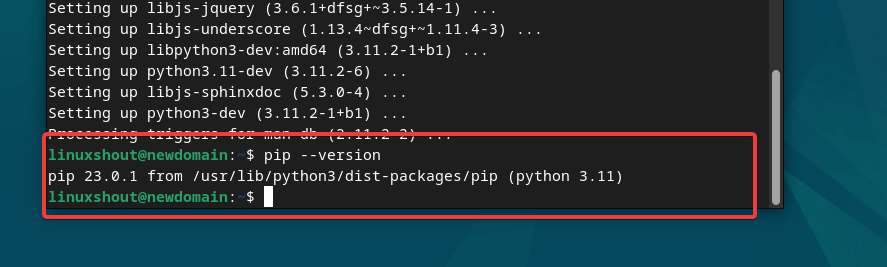
If you get nothing in return after running the above command then you need to install it. So, for that use the given command, if you are using Linux:
For Debian or Ubuntu-based systems.
sudo apt install python3-pipFor RHEL-based systems:
sudo dnf install python3-pip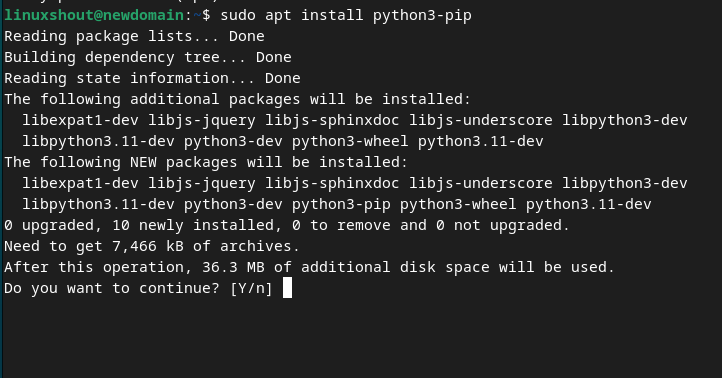
(optional) Also, it’s a good approach, if you use virtual environments to isolate your Python projects. You can create a virtual environment using tools like virtualenv or venv to install WordCloud within that environment.
So, those who want to set up a virtual environment can follow these steps otherwise move to the next one:
Install the Virtualenv package:
sudo apt install python3-venvUse the given command and create a new Python virtual environment:
python3 -m venv testenvOnce the virtual environment is created, to activate it run:
source testenv/bin/activateNote: testenv is our environment name you can give something else if you want:
Step 3: Install the ‘pyyaml’ Package
Now, we have both Python and PIP on our system, let’s install a package named- ‘pyyaml’ that offers YAML functionality in Python. Run the following command.
pip3 install PyYamlThis command will download and install the ‘pyyaml’ package, which provides the ‘yaml’ functionality for Python.
(optional) Or alternatively, users can use the Python3 command as well, those who don’t want to use PIP:
For Debian systems
sudo apt install python3- yamlFor RHEL systems
sudo dnf install python3-yamlStep 4: Verify Installation
Once the installation is completed, you can verify if the ‘yaml’ package is installed correctly. Open a Python interactive shell by running the following command in the terminal:
pythonThen, import the ‘yaml’ module by typing the following command in the Python shell:
import yamlIf no errors occur, the ‘yaml’ package is installed successfully.
Step 5: Start Using the ‘yaml’ Package
Let’s say you have a YAML file named data.yaml with the following content:
name: John Doe
age: 30
occupation: Developer
Now, let’s see how you can read and modify this YAML file using the yaml package:
import yaml

# Reading YAML File
with open('data.yaml', 'r') as file:
    data = yaml.safe_load(file)

print("Original Data:")
print(data)

# Modifying Data
data['age'] = 31
data['occupation'] = 'Senior Developer'

# Writing YAML File
with open('data_updated.yaml', 'w') as file:
    yaml.dump(data, file)

print("\nUpdated Data:")
print(data)
In this example, the yaml.safe_load() function is used to load the YAML content from the file into a Python dictionary. After modifying the dictionary, the yaml.dump() function is used to write the updated data back to a new YAML file named data_updated.yaml.
Remember to adjust the file paths according to your project’s file structure.
Make sure you have the data.yaml file in the same directory as your Python script for this example to work.
Other Articles: