AML 2 is an RPM-based Linux to run on the AWS cloud; if you want to install and try out Amazon Linux 2 on WSL – Windows Subsystem for Linux, follow the steps in this tutorial.
Amazon Web Services (AWS) provides a default open-source Amazon Linux 2 OS to run Linux applications on Elastic Compute Cloud (EC2) and Elastic Container Service (ECS). It is based on Red Hat Enterprise Linux (RHEL) and is equal to RHEL 7 or CentOS 7. Hence the command we use on Redhat 7 are also applicable to it. YUM is the default package manager to install packages. It also includes a few additional repositories and tools optimized for use on the AWS platform.
Start with Amazon Linux 2 on WSL 1 or 2
AL2022 is the latest version of Amazon Linux 2, which is still not publicly available while writing this article; however, once it is, the steps given here will be the same to experience that as well.
Step 1: Enable Windows Subsystem for Linux
If you already have the WSL enabled on your Windows 10 or 11 system, move to the next steps. Otherwise, click on the Start button and select PowerShell (Admin) or Terminal (admin), whatever is available. After that, type the following command:
wsl --install
Wait for some time. The above command will enable the features required to use Windows Subsystem for Linux. Once done, restart your system to integrate the WSL properly.
Step 2: Download Amazon Linux 2 WSL
Amazon Linux for WSL is unavailable to install through the Microsoft Store or the WSL command line. Therefore, we manually import this Linux container image to run on WSL. However, to make things easy, a project on GitHub offers a one-click installation of AWS Linux for Windows Subsystem for Linux.
Here is the Link to the GitHub AWS release; get the Amazon2.zip file.
Step 3: Extract the Zip file
Once you have downloaded the Amazon2.zip, place it somewhere so you won’t delete it accidentally. Then right-click on the file and exact it.
Step 4: Register Amazon Linux 2 WSL Distribution
Inside the folder of Amazon2, you will find the Amazon2.exe file; double-click on it to install and register this new Linux on your WSL system.
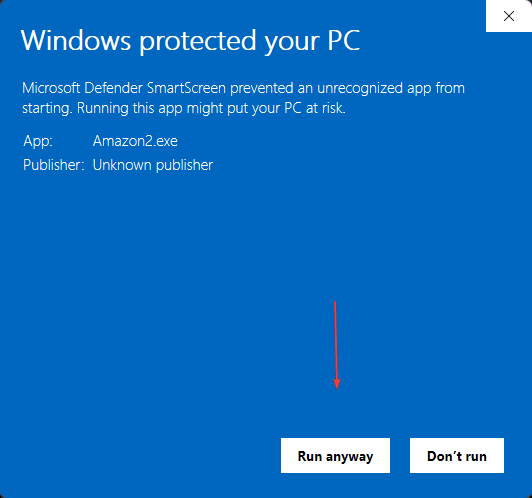
As you run the executable file, this system will give a warning; click on More info and select Run Anyway.
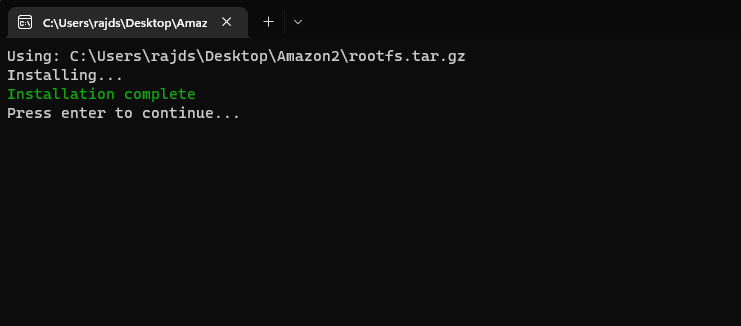
The installation will start by extracting the “Roofts” Tar file of the Linux distro. Once done, press the Enter key.
Step 5: Access Amazon Linux 2 WSL
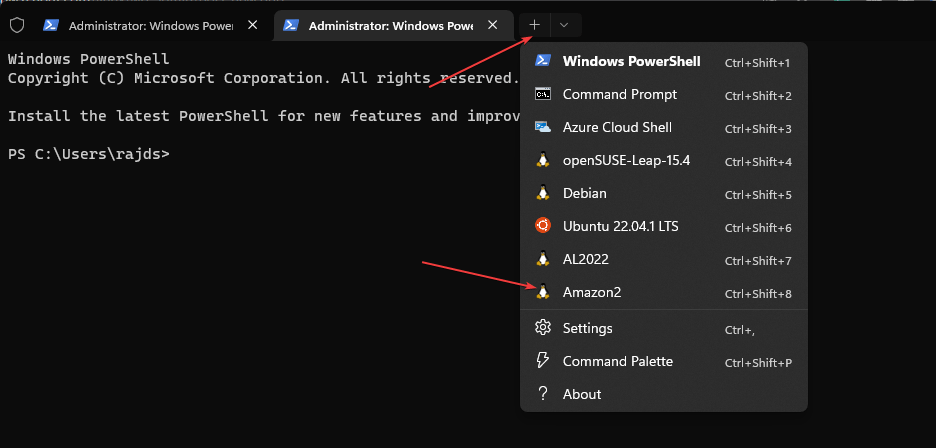
Open the Command terminal or Powershell, and click on the Drop icon on the top right side of the Tab to select Amazon2.
Alternatively, we can use the command:
wsl -d Amazon2
or
Step 6: Run YUM Update
To ensure we have the latest packages of system updates and kernel on our system, run the given commands:
yum update && yum upgrade
amazon-linux-extras install -y kernel-ng
Step 7: WSL1 to WSL 2 Distro (optional)
Those who are using WSL 2 and wish to switch Amazon Linux 2 to that can use:
wsl --set-version Amazon2 2
Learn – Enable WSL 2 Windows Subsystem for Linux
Step 8: Uninstallation
If something went wrong and you need to remove the installed WSL instance of Amazon Linux from your Windows 10 or 11 system altogether, then go to the Powershell or Command prompt to run:
wsl --unregister Amazon2
Other Articles:
- How to upgrade Kali Linux running on WSL
- How to Upgrade WSL 2 or 1 Ubuntu 20.04 to 22.04 LTS
- How to install GUI File Manager Nautilus on WSL
- How to install Podman on Ubuntu 20.04 WSL2
- How to start WSL services automatically on Ubuntu with Windows 11 or 10 startup
