Conky system monitor is a simple but advanced application to install on a Linux system for getting a Desktop widget with details of the system process, Memory consumption, CPU load, and more…
Users who have shifted from Windows to Linux platforms will always have some Task Manager in the form of a system monitor, however, as we know Linux platforms are full of possibilities, thus you will love Conky. It is a small lightweight and highly configurable Linux system monitor that can show all information in one place in a beautiful widget.
Although running the Conky system monitor is not difficult, the configuration would be easy especially for beginners, but with a little training you can create very nice “system monitors”.
Conky system monitor installation on Linux
Ubuntu
The installation is very easy, let’s install it completely with all functions:
sudo apt-get install conky-all
If you want a slimmed-down version, you can use the standard version.
sudo apt-get install conky-std
Then it’s time to create a configuration file. Here we are using its ready-made standard configuration and store it hidden in the home directory with the name ” .conkyrc ” to edit later.
cp /etc/conky/conky.conf ~/.conkyrc
RHEL or CentOS 7 or 8
Visit this URL- https://github.com/brndnmtthws/conky/releases/latest and download
the latest version of Conky App Image.
Files downloaded through browser go to Downloads directory, thus switch to that-
cd Downloads
And run the below commands one by one.
chmod +x ./conky-x86_64.AppImage
#Create a configuration file
./conky-x86_64.AppImage -C > ~/.conkyrc
#copy AppImage to /opt directory for safety.
sudo cp conky-x86_64.AppImage /opt
Start:
./conky-x86_64.AppImage &
Start Conky with the boot as Autostart application
Once the installation is completed to start this tool, the user just needs to type conky & in the Terminal whereas on CentOS to RHEL type- ./conky-x86_64.AppImage &
However, to start Conky automatically with system boot up, we need to set it as a startup application. For that we can use the below command:
In Ubuntu or Debian based system:
sudo nano ~/.config/autostart/conky.desktop
Copy-paste below lines:
[Desktop Entry]
Name=Conky-system monitor
GenericName=Conky
Comment=System Monitor
Exec=conky
Terminal=false
Type=Application
X-GNOME-Autostart-enabled=true
To Save the file press Ctrl+X then type Y and hit the Enter Key.
In CentOS, Fedora, or RHEL systems
sudo nano /etc/xdg/autostart/conky.desktop
Copy-Paste below entries
[Desktop Entry]
Name=Conky-system monitor
GenericName=Conky
Comment=System Monitor
Exec=/opt/./conky-x86_64.AppImage
Terminal=false
Type=Application
X-GNOME-Autostart-enabled=true
To Save the file press Ctrl+X then type Y and hit the Enter Key.
Interface
Conky can use over 300 integrated objects to display various information or values such as for CPU, RAM and hard drives, email accounts, various music players, processes, network traffic, and much more. It is not just limited to this, furthermore, the user can also access third-party scripts, programs, and websites. For example, you could show sports results or news about certain keywords.
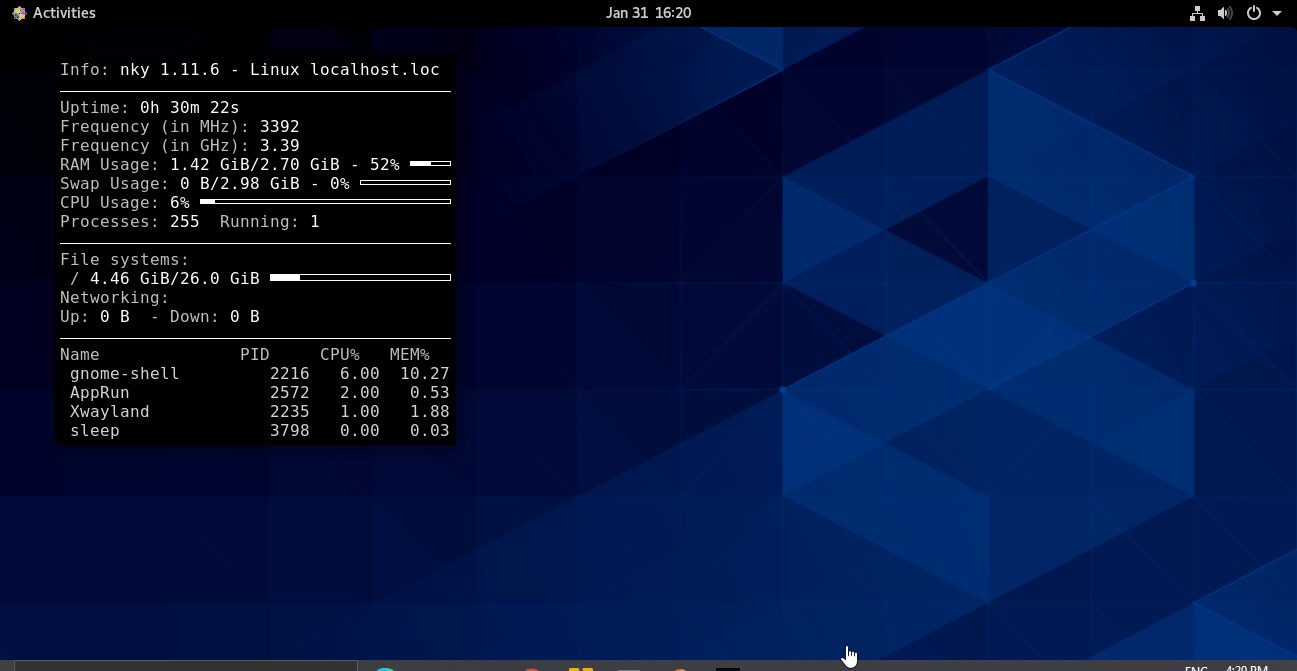
However, after install in the standard configuration, you will see the Conky system monitor on the left side of the screen in black and white color which could be dull and boring for some users. Well, we can configure it further to change its location, appearance, and more…
Conky system monitor Configuration
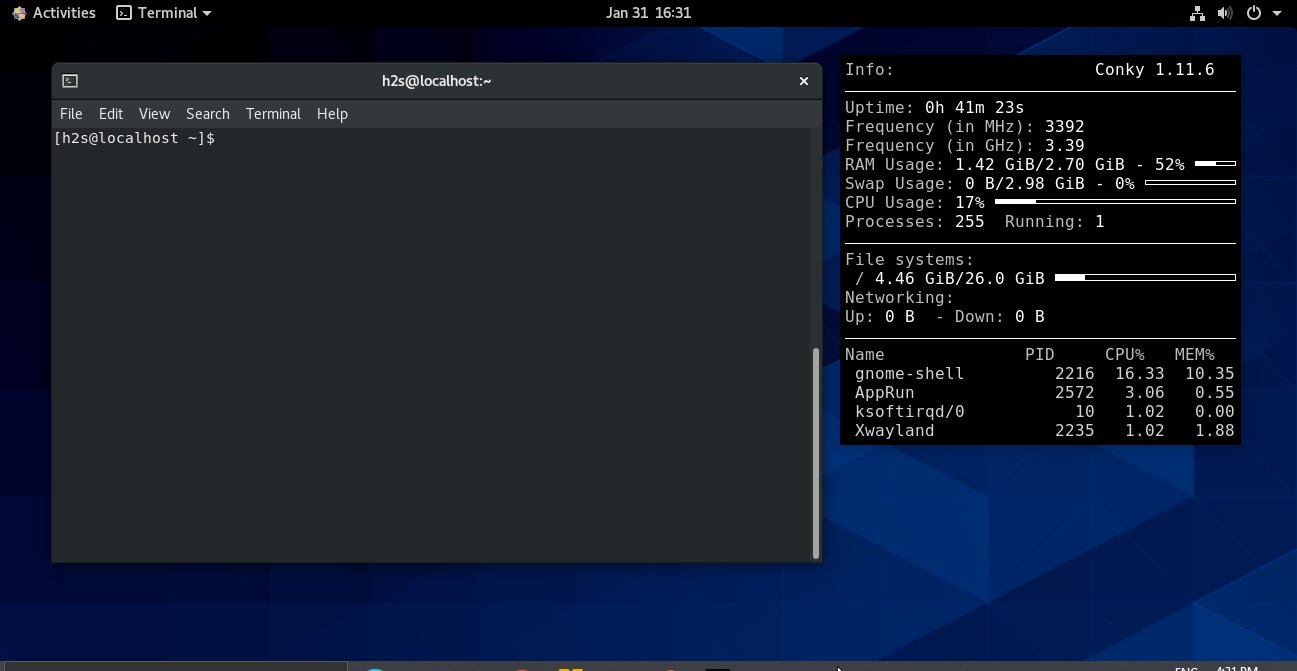
In the above screenshot we can see the Conky placement on the left side by default, thus to move to to right and perform further configuration we will edit its configuration file.
nano .conkyrc
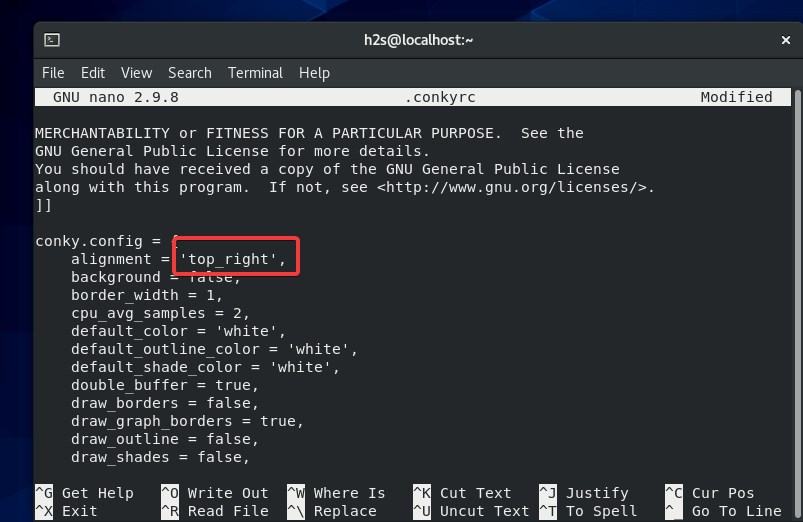
In the file, change the alighment='top_left‘ value to right as shown in the below screenshot. And save the file using Ctrl+X, Y and press the Enter key.
In the same way with “ alignment” we can now adjust the position of Conky to top, bottom, center in short wherever we want. The options to use with alignment are top_right, bottom_left, bottom_right, middle_left, middle_middle for Center potiton, middle_right for center right.
Besides, we can further adjust the distance of the Conky widget from the edge of the screen with the help of “gap_x = Pixel” (left, right) and “ gap_y = Pixel” (above, below).
In the configuration file find- gap_x and gap_y and adjust the values of them accordingly. By default it will be:
gap_x = 5,
gap_y = 60,
You can change X value 60 to 50 or something else to adjust Conky’s horizontal position and Y for vertical.
Make Conky widget Transparent
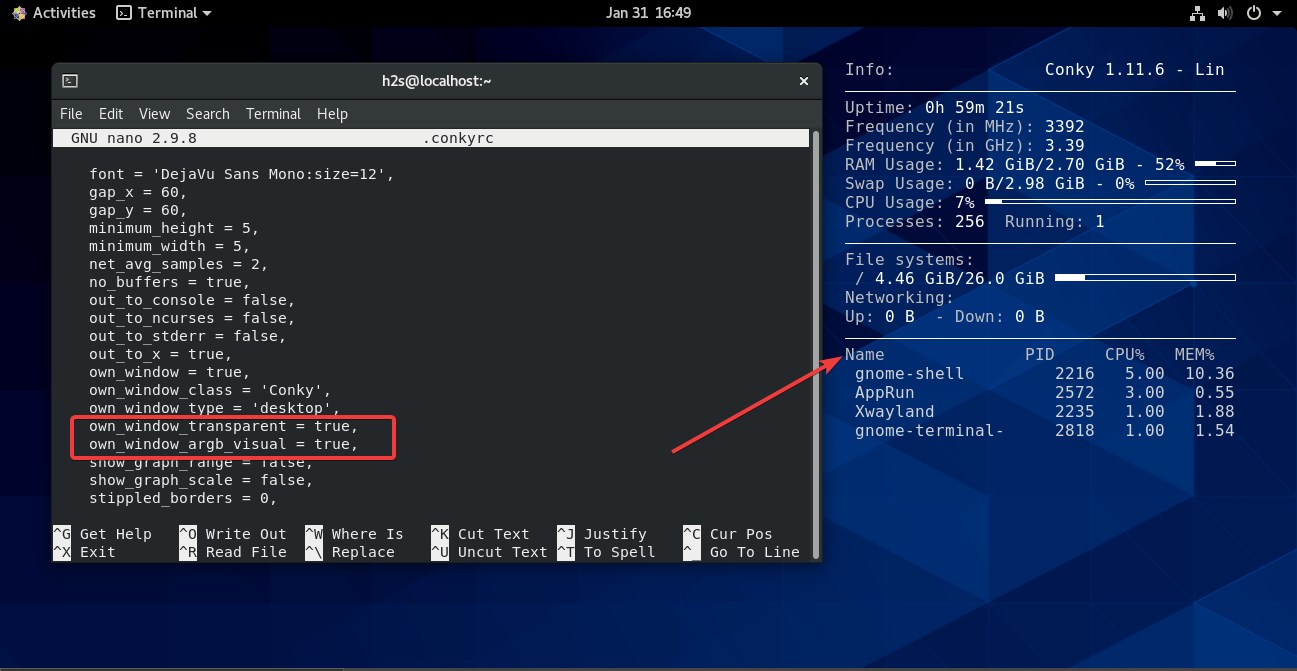
By default, the widget will be in black color, and in case you want to make it transparent to merge well in your Linux Desktop then add the following lines in the configuration file as shown in the screenshot.
own_window_transparent = true,
own_window_argb_visual = true,
Enable Conky Widget Top panel
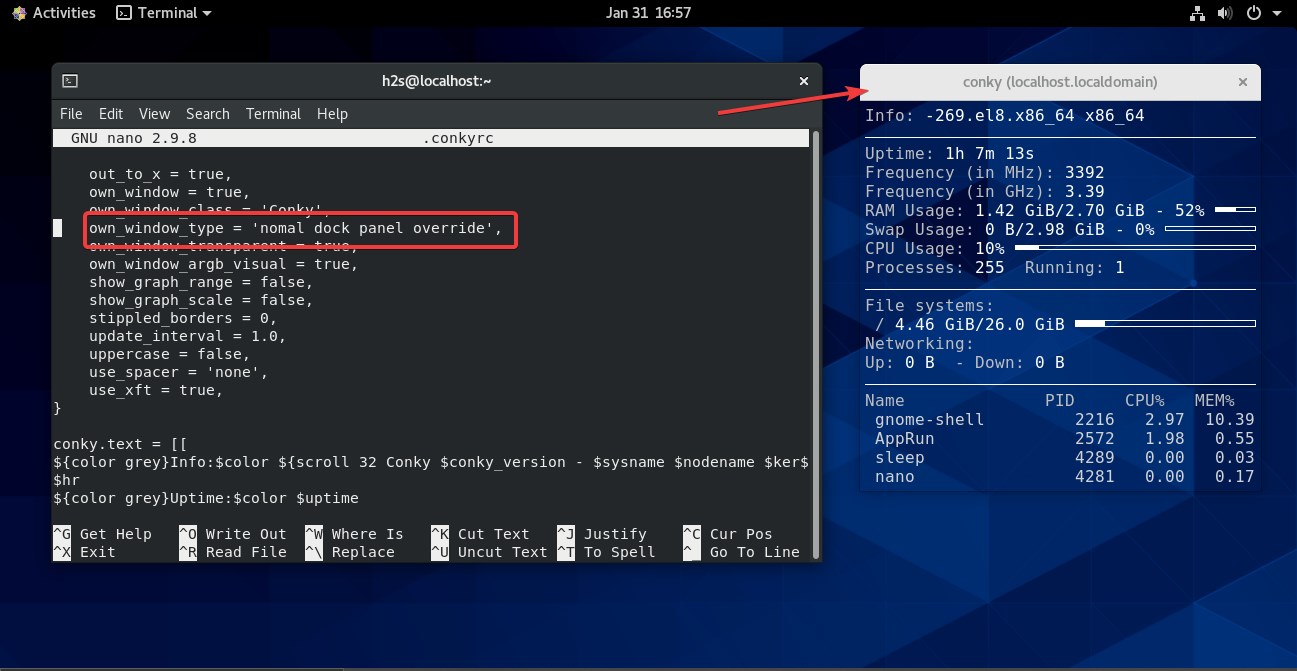
You will notice that you cannot move the Conky widget using mouse point because it sticks to the screen so that it won’t hinder the normal desktop operations of users and appear like a part of the current desktop wallpaper. However, in case you want to use it as a normal widget that can be closed and moved using a mouse, then find the line-
own_window_type = 'desktop',
And replace desktop with nomal dock panel overrideas shown in the below screenshot with the result. After that, we can drag to change the widget position, expand its size, and even close it.
Networking
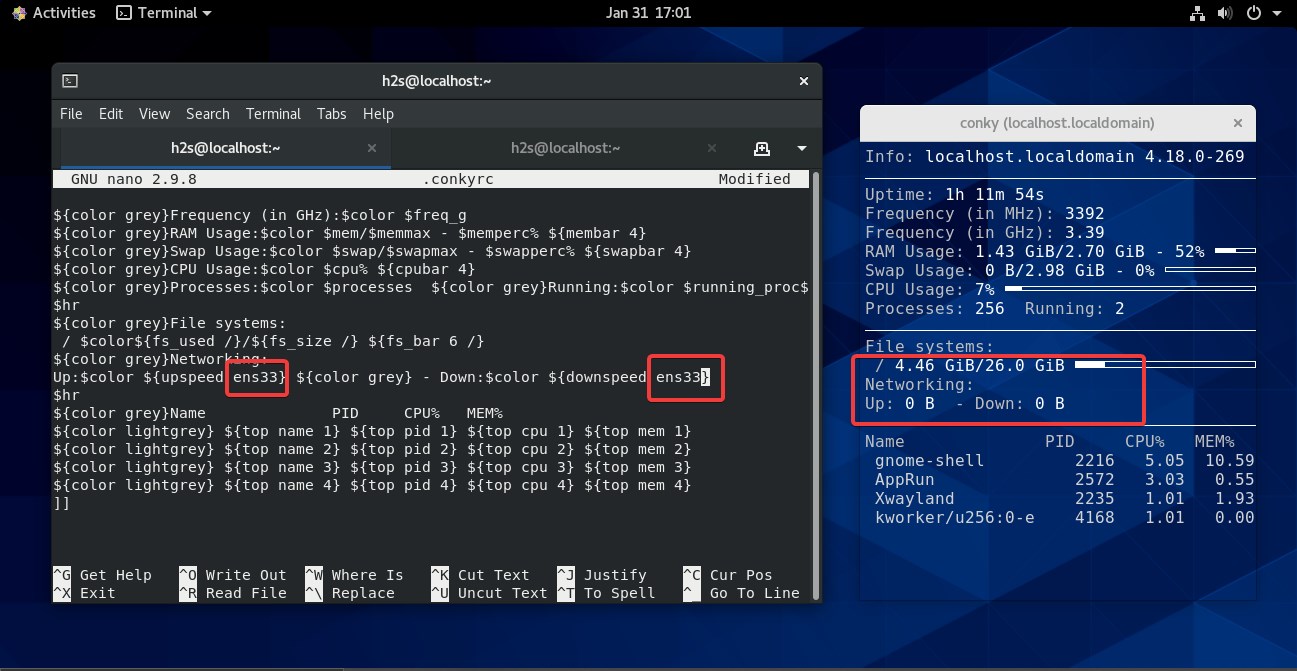
One thing I noticed that the Conky Widget was not displaying the network upload and download speed, it is because the Ethernet interface has not been defined in its configuration file.
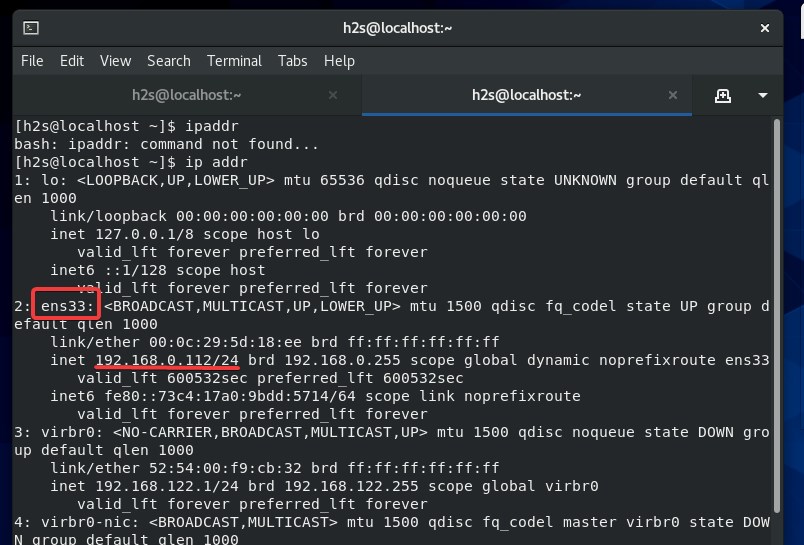
First, find out your Linux system’s network interface name. For that simply, in the terminal, type:
ip addr
You will have your current IP address and in front of the same the name of the network interface. For example, here our network interface name is ens33, in the same way, you will have one.
Now, again open the Conky configuration file and find out the Network display setting line:
${color grey}Networking:
Up:$color ${upspeed} ${color grey} - Down:$color ${downspeed}
In front of upseed and downspeed add your network interface name. For example, in our case the interface name is ens33, thus the above Network configuration line will be like this:
${color grey}Networking:
Up:$color ${upspeed ens33} ${color grey} - Down:$color ${downspeed ens33}
If you have multiple network interfaces and want to show all of them in this Linux performance monitor widget then simply add one more line with the interface name. For example, we have one extra network interface with eth0 name, then simply add one more line in the above-given configuration settings:
Up:$color ${upspeed eth0} ${color grey} - Down:$color ${downspeed eth0}
After adding the interface, save the file.
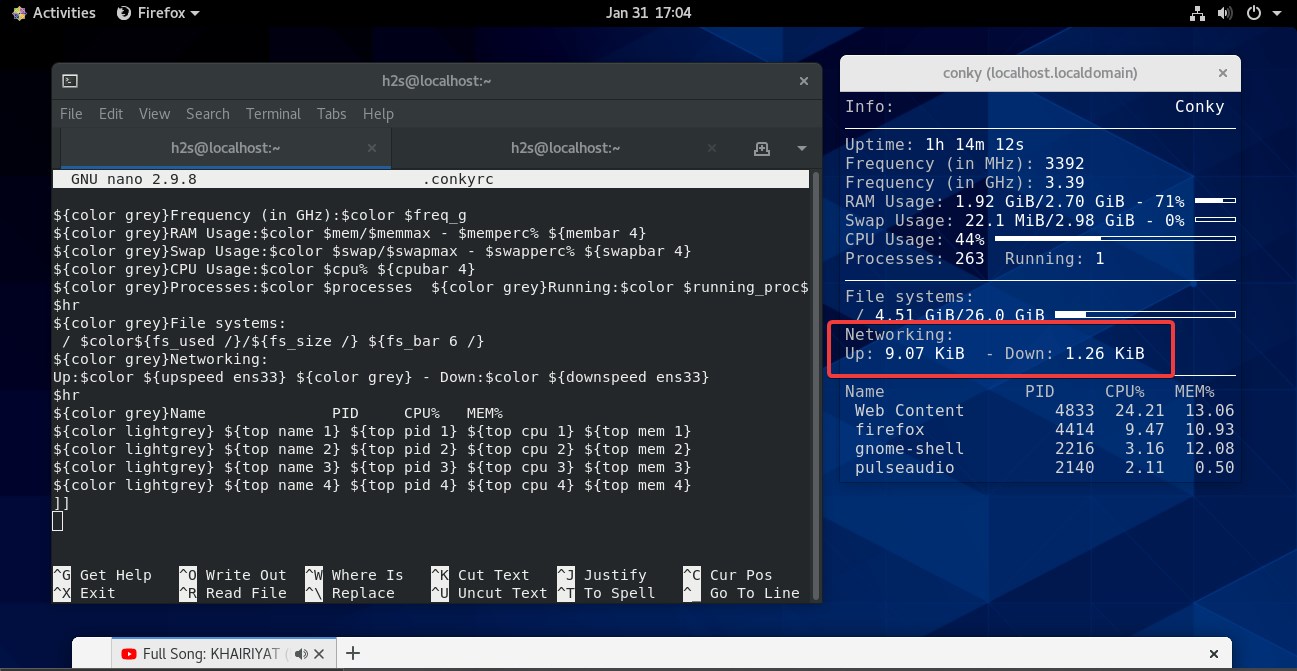
Now, you will see the Conky Widget will display the correct upload and download speed of the Network.
Display Network Speed Graph
Well, those who want to go a little bit further to have more information, can use a Network upload and download speed graph instead of just a plain value.
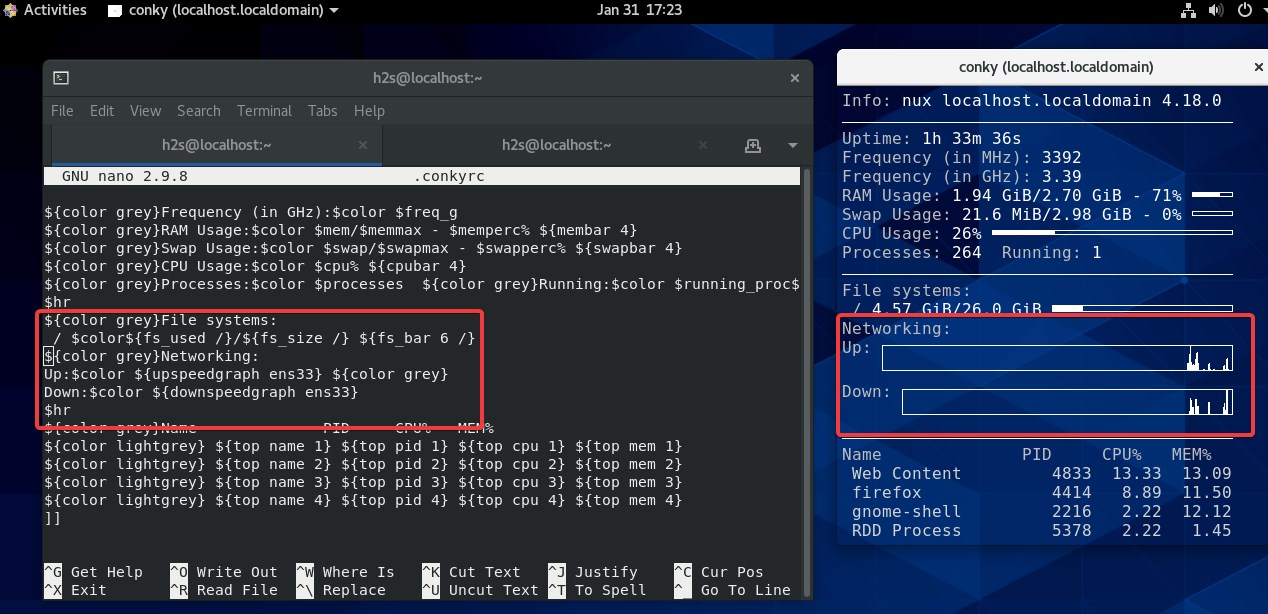
Just in the Network configuration replace “upspeed” with “ upspeedgraph” and “downspeed” with “downspeedgraph” and put both in extra lines to get a space on the widget:
${color grey}Networking:
Up:$color ${upspeedgraph ens33} ${color grey}
Down:$color ${downspeedgraph ens33}
The colors can also be adjusted, for example:
${color grey}Network:
Upload:${color red} ${upspeedgraph ens33} ${color grey}
Download:${color green} ${downspeedgraph ens33}
Pre-built Conky Configuration files
As we all are not technically sound and familiar with all this editing stuff to change the look of Conky, thus in such case we can use a pre-built or configuration file of the Conky System monitor to give it a perfect look.
Here is the Github page link to find some pre-built options, however, before using them make sure to backup your original configuration file. OR just use some of the existing codes in this config to create your own widget better.
Hence, this was a quick overview of the Conky system monitor and how to use it on Linux systems along with the steps to create a minimal configuration to monitor Linux hardware resources performance. This tool has been developing by Bunsenlabs. For details, you can visit Sourceforge and its Github Wiki Page.
Also, See:
