Use the tutorial commands to install Parse Server and Dashboard on Ubuntu 20.04 Focal Fossa using the terminal.
What is Parse Server?
Parse Server is an open-source Backend As A Service (BAAS) platform that can be deployed to any infrastructure that can run Node.js. It uses MongoDB or PostgreSQL as a database to develop and test your app locally using Node. Whereas to manage the Parse server backend graphically using the web interface, the developers of this platform also offer Parse Dashboard. That provides a single GUI dashboard to add and manage more than one Parse server.
Here in this tutorial, we will learn the simple commands to install and use parse server and dashboard applications on the Ubuntu 20.04 system.
Steps to install Parse Server & dashboard on Ubuntu 20.04
1. Requirements
To perform this tutorial we need the following things:
• Ubuntu Server
• Node 8 or newer
• MongoDB version 3.6
• Python 2. x
• A non-root user with sudo rights
• Terminal Access
2. Node.js Installation
Parse Server is developed in NodeJs language, hence, we need it to be on our system, first. Therefore follow the given commands to set up the latest available version of Node on your Linux.
sudo apt install curl -y
curl -fsSL https://deb.nodesource.com/setup_current.x | sudo -E bash -
sudo apt-get install -y nodejs
Along with this get the Yarn as well that we required to install the dependencies required by the node modules.
sudo npm install -g yarn
3. Use MongoDB as a Database
Parse server supports MongoDB as well as PostgreSQL Databases to store data. Here we are going for MongoDB, hence, just use the given command in your system using the APT package manager to get it.
echo "deb [arch=amd64,arm64] https://repo.mongodb.org/apt/ubuntu focal/mongodb-org/6.0 multiverse" | sudo tee /etc/apt/sources.list.d/mongodb-org-6.0.list
curl -sSL https://www.mongodb.org/static/pgp/server-6.0.asc -o mongoserver.asc
gpg --no-default-keyring --keyring ./mongo_key_temp.gpg --import ./mongoserver.asc
gpg --no-default-keyring --keyring ./mongo_key_temp.gpg --export > ./mongoserver_key.gpg
sudo mv mongoserver_key.gpg /etc/apt/trusted.gpg.d/
sudo apt update
sudo apt install mongodb-server
Start MongoDB service
sudo systemctl enable --now mongod
4. Install Parse Server on Ubuntu 20.04 LTS
Now, our system has all the things we required for the installation of the Parse server on Ubuntu 20.04. Therefore, use the Yarn package manager because Parse is available as a Nodejs module.
sudo yarn global add parse-server
Once the installation is done, create the configuration file:
nano config.json
Add the following lines:
{
"appName": "ParseServer",
"databaseURI": "mongodb://localhost:27017/parsedb",
"appId": "any-random-number-of-strings",
"masterKey": "any-random-number-of-strings",
"serverURL": "https://localhost:1337/parse",
"publicServerURL": "https://0.0.0.0:1337/parse",
"port": 1337
}
Start the Parse Server:
nohup parse-server config.json &
5. Configure Parse Dashboard
To get a Graphical user interface for the Parse server, we can go for the web-based Dashboard available for it.
sudo yarn global add parse-dashboard
Once the installation is completed, create a configuration file:
nano parse-darshboard-config.json
Now, add the given lines. Don’t forget to set the same appID and masterkey values used while setting up the Parse server.
{
"apps": [
{
"serverURL": "http://192.168.17.131:1337/parse",
"appId": "same-string-used-in-server",
"masterKey": "same-string-used-in-server",
"allowInsecureHTTP": "true",
"appName": "MyApp1"
}
],
"users": [
{
"user":"admin",
"pass":"password"
}
],
"iconsFolder": "icons"
}
Save the file by pressing Ctrl+O, press Enter key, and then exit using Ctrl+X.
Note: Replace 192.168.17.131 in the above code with your actual parse server ip-address where you have installed it. Also, don’t forget to change the user and pass values to set username and password to login Parse Dashboard.
Start the Parse Dashboard in the background:
nohup parse-dashboard --dev --config parse-darshboard-config.json &
6. Allow ports in firewall used by Parse
The Parse server uses port number 1337 whereas the web Dashboard works on 4040, there to access them outside your local system using any other system, we need to open them. Here are the commands to follow:
sudo ufw allow 1337
sudo ufw allow 4040
7. log in to the Parse Dashboard
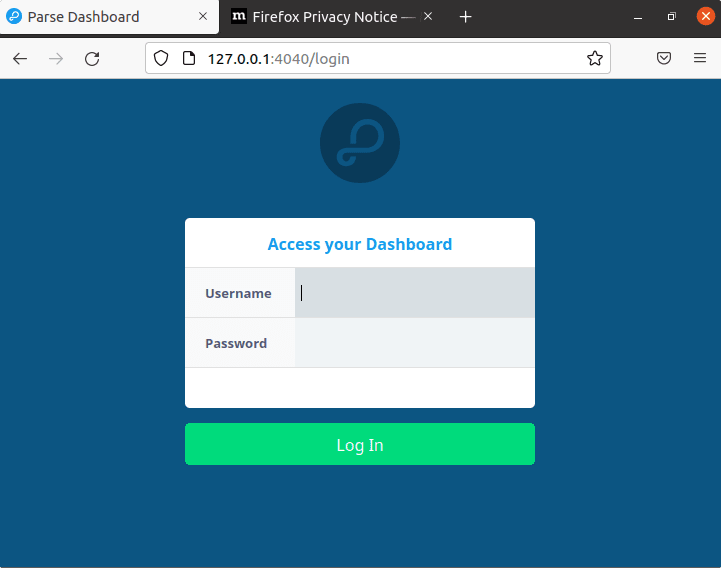
Once you are done with all the commands, the parse server and dashboard will be running in the background. To access the Web UI open your system browser that can access the IP address of the server where you have installed them. And point it in the following way:
http://server-ip-address:4040/parse
Note: Replace server-ip-address with your actual address.

Other Articles:
• Steps to Install MongoDB on Rocky Linux 8 or AlmaLinux
• How to install MongoDB Server on Linux mint 18 | 19 | 20
• How to install MongoDB 5.0 Server on Debian 11 Bullseye
• Install Tor Browser on Ubuntu 22.04


You forgot to start the MongoDB run this command before starting the parse-server
sudo service mongod start
Also sudo apt install mongodb-server installs an outdated version of the database that is nolonger supported by Parseserver