Apache Module mod_ssl is available to install for getting SSL support in our HTTP server. Here we let you know how to enable mod_ssl & mod_http2 for Apache webserver on Almalinux or Rocky Linux 8 (RHEL based).
To get SSL v3 and TLS v1.x support on Apache, this article is here that helps in generating the required SSL certificate including the associated private key.
Steps to install mod_ssl on Almalinux 8 / Rocky Linux 8
Install Apache webserver
The first thing you must have on your Linux is the working Apache webserver. It can be installed using single command i.e:
sudo dnf install httpd
Whereas to know more about it, you can see our tutorial – Apache webserver configuration on AlmaLinux or Rocky Linux 8 server
Install mod_ssl on Rocky or AlmaLinux
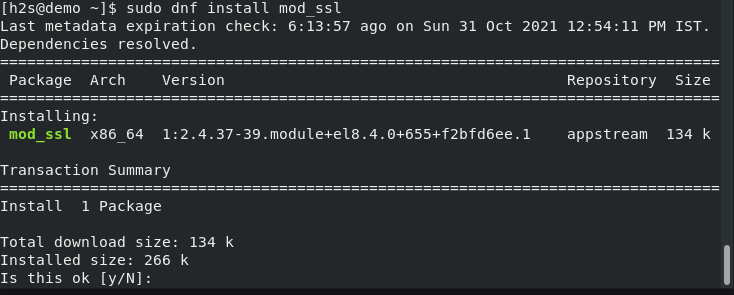
Once you have the Apache webserver, we can easily install the mode_ssl module using the DNF package manager because it is available through the default repository of these RHEL based Linux systems:
sudo dnf install mod_ssl

Enable mod_ssl on Rocky Linux or AlmaLinux 8
Well, using the above command, in a few seconds, the module will be installed on your server, however, we have to enable it. For that simply restart the httpd/Apache webserver. So, that it could recognize the same.
sudo systemctl restart httpd
After restarting your web server, confirm that the mod_SSL has been successfully enabled for Apache.
apachectl -M | grep ssl
The output will be:
ssl_module (shared)

Open port 443 in the firewall for Apache
As SSL (HTTPS) runs on port 443, hence to access it outside the server, we have to open it first in the Almalinux or Rocky Linux 8 firewall.
sudo firewall-cmd --add-service={http,https} --permanent
sudo firewall-cmd --reload
Now, you will be able to access the Apache webserver test page or any active running website on it using https protocol but with a certificate warning.
Add your bought SSL certificate or Generate a self-signed certificate
Now, there are two scenarios, one is that you have bought an SSL certificate from some third party and you have the two files with extension- .CRT and .Key. If you already have the SSL certificate then add that in /etc/httpd/conf.d/ssl.conf.
Whereas, the second scenario is you don’t have an SSL certificate and want to generate a self-signed one to use at least for local usage using OpenSSL.
Note: you can replace the server text in the below command with whatever you want to easily identify the keys.
sudo openssl req -newkey rsa:2048 -nodes -keyout /etc/pki/tls/private/server.key -x509 -days 365 -out /etc/pki/tls/certs/server.crt
Once you have executed the above command you will have two SSL files:
SSLCertificateFile /etc/pki/tls/certs/server.crt
SSLCertificateKeyFile /etc/pki/tls/private/server.key
—————————————————————————————————-
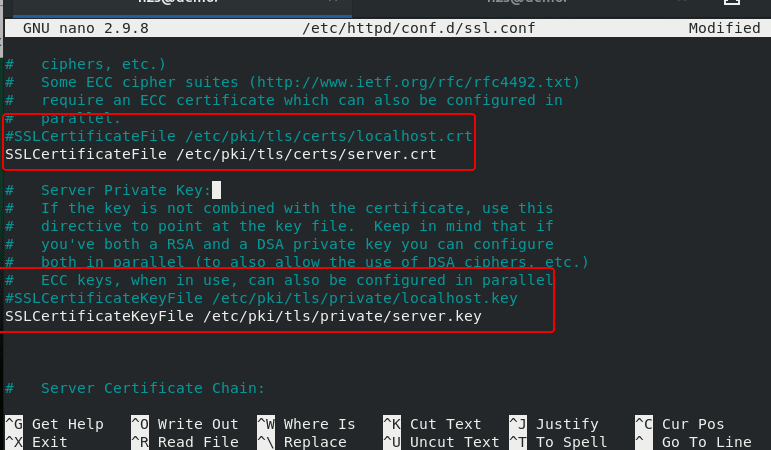
Now, edit the SSL configuration file
sudo nano /etc/httpd/conf.d/ssl.conf
and replace it with the following two file paths either with the SSL certificate you bought or generated by yourself using the above command.
SSLCertificateFile /etc/pki/tls/certs/localhost.crt
SSLCertificateKeyFile /etc/pki/tls/private/localhost.key
Here I am assuming that you want to use a self-generated certificate then
SSLCertificateFile /etc/pki/tls/certs/localhost.crt
#with
SSLCertificateFile /etc/pki/tls/certs/server.crt

#And

SSLCertificateKeyFile /etc/pki/tls/private/localhost.key
#with
SSLCertificateKeyFile /etc/pki/tls/private/server.key
Save the file by pressing Ctrl+O and hitting the Enter key to exit the file Ctrl+X.
Screenshot:

Restart your webserver:
sudo systemctl reload httpd
Now, you will be able to access the Web server running websites over HTTPS SSL protocol:

Redirect all http traffic to https
Those who want to redirect their all http (port80) traffic to https (443) by default can create the redirect configuration file:
sudo nano /etc/httpd/conf.d/redirect_http.conf
Copy-paste the following line and change the website Domain or URL
<VirtualHost _default_:80>
        Servername you-server
        Redirect permanent / https://yourserver.com/
</VirtualHost>
Save the file by pressing Ctrl+O and hitting the Enter key to exit the file Ctrl+X.
To make the changes into effect, reload the webserver:
sudo systemctl reload httpd
Now, all the http traffic will redirect to HTTPS by enabling mod_ssl on AlmaLinux or Rocky Linux 8; however, the thing to keep in mind the self-generated certificate will still get a certificate error. It is because the Self-signed certificates aren’t trusted by browsers as it was generated by you, not by a CA (Certificate Authority, an entity that issues digital certificates.).
Other Articles:
• How to Install CloudPanel Control Panel on Debian 10 Server
• Install & configure Lighttpd web server on Ubuntu
• How to connect AlmaLinux 8 via Windows RDP
• Install Rocky Linux 8 on Amazon AWS EC2…


