Apache Tomcat is an open-source web server that allows you to run web applications written in Java. Just like the popular Apache web server, Tomcat is also developed and maintained by a free community of developers.
requirements
- 64-bit RHEL Linux Server or the one based on it such as Rocky, CentOS or AlmaLinux
- 2GB of Memory or more as per your requirements
- Access to a user with
sudorights - SSH access for CLI server, so that you can easily copy-paste the commands
Steps to install and configure Apache Tomcat on AlmaLinux 8
Update your AlmaLinux system
Run system update command to get the latest stable state for all the installed packages on your AlmaLinux system. Here is the command-
sudo dnf update
Install JAVA
Opensource Java JRE and JDK both are available in the repository of AlmaLinux and the same is true for other similar Linux server distros. Here we will install OpenJDK 11, you can also go for version 8 if you want.
Command for OpenJDK 11
sudo dnf install java-11-openjdk.x86_64
Developers can also install OpenJDK 11 Development Environment
sudo dnf install java-11-openjdk-devel.x86_64
———————————optional————————————–
Those don’ want OpenJDK 11 then can use the previous version OpenJDK 8
sudo dnf install java-1.8.0-openjdk.x86_64
For OpenJDK 11 Development Environment
sudo dnf install java-1.8.0-openjdk-devel.x86_64
———————————optional————————————–
Check Java Version
Once the installation of any of the above-given versions is completed, check it using the below command to confirm the installation.
java --version
Create a non-root user for Tomcat
Let’s create a group and user that will have access to Tomcat only and cannot be used for other purposes such as login to the system to install or delete anything.
Add Tomcat group-
sudo groupadd tomcat
Create a directory to save Apache Tomcat files
sudo mkdir /opt/tomcat
Add user and set the above-created directory its home folder and also disable its login rights using the below command-
sudo useradd -s /bin/nologin -g tomcat -d /opt/tomcat tomcat
Download the latest Apache Tomcat 10 on AlmaLinux 8.x
Multiple versions of Tomcat are available such as Tomcat 8, 9, and 10. All these three support Java 8 and later versions. Thus, you can download the one as per your choice. However, here we are downloading the latest Apache Tomcat 10 version, which was available while writing this article. Get the one from the official website.

Select the version of Tomcat you want to download then right-click on the Tar.gz file and copy its link. After that paste that with wget command to download it directly using the terminal.
wget paste-link
For example- here we are downloading Tomcat 10, thus we copy the link available for that.
wget https://downloads.apache.org/tomcat/tomcat-10/v10.0.5/bin/apache-tomcat-10.0.5.tar.gz
Extract and move files
Once the downloading is completed, extract the Tar file and copy it to /opt/tomcat directory, we have created earlier.
sudo tar -zxvf apache-tomcat-*.tar.gz -C /opt/tomcat --strip-components=1
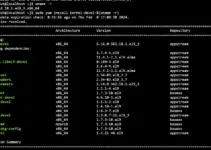
To check whether it has been extracted and copied successfully type-
ls /opt/tomcat
Output:

Set Permission
As we already have created a dedicated user for Tomcat, thus we permit it to read the files available in it.
sudo chown -R tomcat: /opt/tomcat
Also, allow the script available inside the folder to execute.
sudo sh -c 'chmod +x /opt/tomcat/bin/*.sh'
Create Apache Tomcat service file
By default, we won’t have a Systemd unit file for Tomcat like the Apache server to stop, start and enable its services. Thus, we create one, so that we could easily manage it.
sudo dnf install nano -y
sudo nano /etc/systemd/system/tomcat.service
Paste the following code in it-
[Unit]
Description=Tomcat webs servlet container
After=network.target

[Service]
Type=forking

User=tomcat
Group=tomcat

Environment="JAVA_HOME=/usr/lib/jvm/jre"
Environment="JAVA_OPTS=-Djava.awt.headless=true -Djava.security.egd=file:/dev/./urandom"

Environment="CATALINA_BASE=/opt/tomcat"
Environment="CATALINA_HOME=/opt/tomcat"
Environment="CATALINA_PID=/opt/tomcat/temp/tomcat.pid"
Environment="CATALINA_OPTS=-Xms512M -Xmx1024M -server -XX:+UseParallelGC"

ExecStart=/opt/tomcat/bin/startup.sh
ExecStop=/opt/tomcat/bin/shutdown.sh

[Install]
WantedBy=multi-user.target
To save the press Ctrl+X, type –Y and hit the Enter Key.
Start, Enable and Check Service status
After successfully creating systemd unit file for tomcat, start its service using the below-given commands-
Start
sudo systemctl start tomcat
Enable
sudo systemctl enable --now tomcat
Check Status
sudo systemctl status tomcat
Open port 8080 in AlmaLinux Firewall
To access the Apache Tomcat web interface outside the localhost, we need to open port 8080 in the firewall of AlmaLinux, CentOS, or Rocky you are using.
sudo firewall-cmd --zone=public --permanent --add-port=8080/tcp
sudo firewall-cmd --reload
Access web interface
Open browser, if you are using the browser on the same system where you have installed the Tomcat then simply use-
http://localhost:8080
However, the browser on any other system that can access the Ip-address of your server where you have installed the Apache Tomcat and type the address with port number 8080.
Example- Our server IP address is http://192.168.189.171/ with port number 8080, it will be like this-
http://192.168.189.171:8080
Note– A 403 error will appear while using it on any other PC to access the management interface.

403 Access Denied on Tomcat 10/9/8 error
As we click on “Server Status“, “Manager App” and “Host Manager” you will see a 403 Access Denied error. Something like given below will appear.
Error-
403 Access Denied
You are not authorized to view this page.
By default the Host Manager is only accessible from a browser running on the same machine as Tomcat. If you wish to modify this restriction, you'll need to edit the Host Manager's context.xml file.
............................

To solve this error perform the following given steps…
1. Add Username and password to Tomcat User XML file.
sudo nano /opt/tomcat/conf/tomcat-users.xml
At the end just before </tomcat-users> tag copy and paste the following lines.
Note– Change the username and password, with whatever you want to set for your Tomcat.
<role rolename="admin"/>
<role rolename="admin-gui"/>
<role rolename="manager"/>
<role rolename="manager-gui"/>

<user username="h2s" password="pwd" roles="admin,admin-gui,manager,manager-gui"/>
Save the file and exit- Ctrl+X, type- Y, and hit the Enter key.
2. Edit Manager Conext XML file
Edit the Context file
sudo nano /opt/tomcat/webapps/manager/META-INF/context.xml
In the file, scroll and go to the end and comment out the following block of text-
<Valve className="org.apache.catalina.valves.RemoteAddrValve"
allow="127\.\d+\.\d+\.\d+|::1|0:0:0:0:0:0:0:1" />
Just add <!-- at the beginning and --> in the end, after that, this will look like something this-
<!-- <Valve className="org.apache.catalina.valves.RemoteAddrValve"
allow="127\.\d+\.\d+\.\d+|::1|0:0:0:0:0:0:0:1" /> -->
Save the file and exit- Ctrl+X, type- Y, and hit the Enter key.
It should look the way it has shown, in the below screenshot…

3. Edit Host-Manager Context.XML file
sudo nano /opt/tomcat/webapps/host-manager/META-INF/context.xml
Just like above, also add <!-- at the beginning and --> in the end of the text given below in the file, after that, this will look like something this-
<!-- <Valve className="org.apache.catalina.valves.RemoteAddrValve"
allow="127\.\d+\.\d+\.\d+|::1|0:0:0:0:0:0:0:1" /> -->
Save the file and exit.
Note-: By commenting out, the Tomcat will not be able to read this and let the user access the Manager backend using a remote PC.
4. Restart Tomcat service-
sudo systemctl restart tomcat
Access Tomcat web management interface
Finally, refresh your browser and when you click on the Manager App button to access the backend, the browser will ask for the username and password that you have set in the Tomcat User XML file. Just furnish that and login to access it.

Add username and password

Server Status

Web Application Manager

Tomcat Virtual Host Manager
So, this was a complete tutorial to install and access Apache Tomcat on RHEL based Linux Rocky, AlmaLinux, and CentOS.
Other Tutorials:
- Install Dig on AlmaLinux
- How to install Apache, MySQL, and PHP on AlmaLinux 8
- Steps to Install MongoDB on AlmaLinux
- How to install WHM Cpanel on AlmaLinux 8…


Good evening,
I wanted to thank you for this post, it worked perfectly on my new installation.
I’d like to point out, though, that all of your instructions, up to and including opening the firewall ports works PERFECTLY for Apache Hbase, too!