Let’s learn the GUI and a command-line way to set the DNS server address in your Ubuntu 22.04 LTS Jammy JellyFish.
Well, whenever we visit some website such as how2shout.com in a browser, to find the website the browser needs the Ip-address of it. Here, the DNS comes into the picture. The Domain Name System, or DNS for short, is a system that converts Internet addresses or computer names into IP addresses and vice versa.
A browser request for the IP address will be sent to the DNS server. For private individuals, this is usually the case with the associated Internet provider. The DNS server then returns the IP address.
There are numerous DNS servers connected and always inform each other about changes. If a DNS server does not find a name or an IP address, it asks the other DNS server.
The DNS is therefore responsible and necessary for us to be able to access websites via Internet addresses or IP addresses.
Steps to change the DNS Nameserver on Ubuntu 22.04 LTS Linux
Although the DNS server address supplied by your internet service provider automatically gets configured, however, if you want to change it manually then follow this guide.
#1st Method Using GUI
1. Open Ubuntu Settings
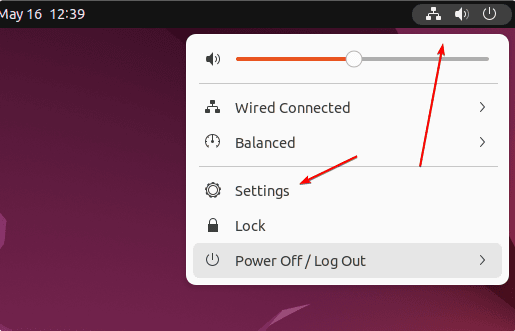
On your Ubuntu 22.04, click on the Power icon given on the right top side of the Taskbar. A pop-up will appear there select the “Settings” option to open it.
2. Go to Network Settings
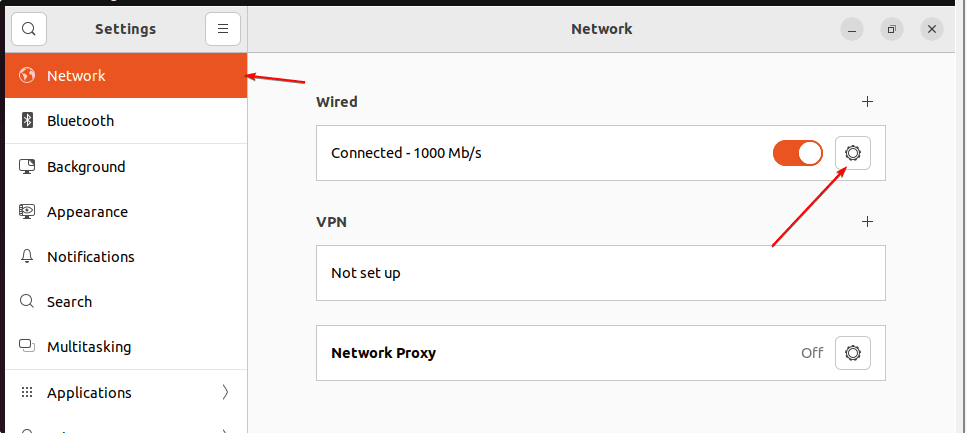
Once you are on the Settings page, go to the Network menu given on the left sidebar and then click on the Gear icon given for Wired or Wireless connection.
3. Set DNS Server on Ubuntu 22.04
Now, you will have a window to configure IP addresses and other settings related to the network. However, to configure DNS Server Ip-address, select IPV4 Tab and then click on the Toggle button given in front of DNS. This will disable the automatic fetching of DNS Server addresses from your Internet provider. After that enter the IP address of the DNS server you want to set on your Ubuntu 22.04. Here we are using the address of the Google DNS server to perform this tutorial, you can set whatever you want to. After that click on the “Apply” button to save the configuration.
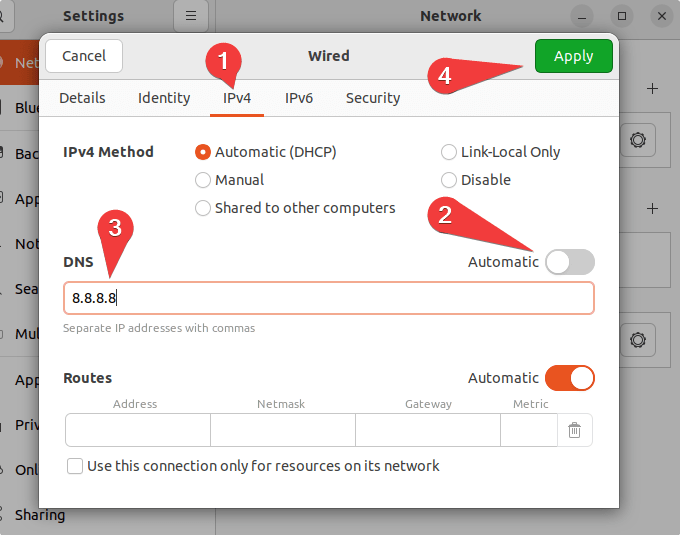
From now onwards to resolve some domain names, the system will check it with the Google DNS server or the one you have set.
Note: Don’t forget to Turn the Network Off and On to get the immediate effect or else the same will reflect on your next system boot-up.
#2nd method using CLI
4. Open Command terminal
Those who are not using the GUI Desktop of Ubuntu 22.04 or prefer to use the command line, can go for the Netplan configuration file. First, open the command terminal, those who are on the server version already have terminal access, whereas the Desktop user can use the keyboard shortcut – Ctrl+Alt+T.
5. Edit Netplan Confgiuration file
Ubuntu has a command-line Netplan tool that uses a YAML configuration file; we can use it to set our network configuration.
Switch to Netplan directory:
cd /etc/netplan
List the available file:
ls
Edit it:
Before editing the file, find out your ethernet adapter name and also the IP address of the PC in your network range. To find it, you can use the command ip a
sudo nano 01-network-manager.yaml
Add the following lines, however, make sure the space should be as given in the block of code because YAML is an indent-sensitive language. And don’t forget to replace ens160 with your adapter and Ip-address + Gateway as well. After that move to the nameservers section and set whatever DNS server address you want on your system to use for resolving domain names.
network:
  version: 2
  renderer: NetworkManager
  ethernets:
    ens160:
      dhcp4: no
      addresses:
        - 192.168.17.100/24
      gateway4: 192.168.17.2
      nameservers:
          addresses: [1.1.1.1, 8.8.8.8, 4.4.4.4]
Save the file by pressing Ctlr+O, hitting the Enter key, and then exiting using Ctrl+X.
Before applying your Netplan configuration file, let’s test it by issuing the following command:
sudo netplan try
Hit the Enter key, if the Configuration you have done in the Netplan file is valid, you will have an output saying- Configuration accepted.

Now, Apply the configuration:
sudo netplan apply
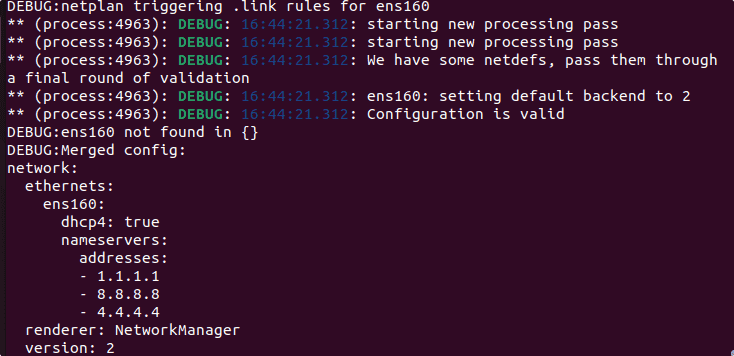
If you want also want to see what is happening while applying the new Netplan configuration, use:
sudo netplan --debug apply
With the help of the Domain Name System, the assignments between IP addresses and domain names can be resolved in the outward and backward directions. Since DNS is very important for the functioning of an IP network, there are numerous security extensions such as DNSSEC, DNS over TLS, or DNS over HTTPS.
Other Articles:
• How to get IP Address in Linux using Command terminal
• Steps to Install MySQL on Ubuntu 22.04 LTS Jammy…
• How to install Webmin on Ubuntu 22.04 LTS…




I followed the steps above but dns still did not change to my desired DNS server. The output with the command nslookup is still 127.0.0.53. I searched for a lot of information that said to change /etc/systemd/resolved.conf, by command resolvectl to view, the GLOBAL field below the DNS server is changed, but my wifi is still using the original DNS server 127.0.0.53. How does it work?
Have you restarted the system or network (disconnect & connect again) after changing the DNS because without that it will not reflect the changes made by you…
sudo resolvectl status | grep “DNS Serv”
As suggested above I have set my DNS server to 8.8.8.8. However I have only had to do this recently. Previously the DNS option was set to AUTOMATIC, but this has failed. How can see what went wrong?
`gateway4` has been deprecated, use default routes instead.
routes:
– to: default
via: 192.168.1.1
replace gateway4 by the above three lines.