Zulu Java is also an open-source Java development kit (JDK) distributed by Azul Systems. Being a build of OpenJDK (Open Java Development Kit), it is not much different from the OpenJDK available by default on our Linux systems to install via the official repositories; expect the enterprise behind the Zulu java that provides commercial support and time security updates.
Difference between OpenJDK from Zulu and Ubuntu
Zulu JDK:
- Zulu JDK is a certified build of OpenJDK distributed by Azul Systems.
- Azul offers regular and times updates and security patches to its Zulu JDK
- Provides long-term support (LTS) for specific versions, even after the official end of public updates by Oracle, and provides extended support periods.
OpenJDK from Ubuntu Repository:
- Provided directly by the Ubuntu community, with packages sourced from the official OpenJDK project.
- Updates and security patches are maintained according to Ubuntu’s release schedule, which may lag slightly behind other distributions.
- LTS support aligns with Ubuntu’s support cycle rather than the extended periods offered by Azul.
Key Features of Zulu Java:
- It is fully open source and adheres to the Java SE (Standard Edition) specifications.
- Supports a wide range of platforms, including Linux, Windows, macOS, and many cloud environments
- Offers multiple Versions, including older Long-Term Support (LTS) versions like Java 8 and 11
- Zulu Java is updated regularly with the latest security patches.
- Commercial support options for enterprises
Steps to install Zulu Java on Ubuntu Linux
The steps of this tutorial can be used to install Zulul Java 17,18,21, or any other available versions on Ubuntu 24.04, 22.04, 20.04, or any other latest version.
1. Terminal and Update
Visit the command terminal on your Ubuntu desktop or server and execute the system update command. It will update the existing packages and apply the security updates.
sudo apt update && sudo apt upgradeAlso, install a few standard but required packages to follow this tutorial:
sudo apt install gnupg ca-certificates curl2. Add Zulu Java APT Repository
As we already have OpenJDK through the default system repository of Ubuntu but not the Zulu Java, hence, to get it, we need to add the Zulu Java official repository using the commands given below:
First, add the GPG key that is required to verify the packages coming through the Zulu repository:
curl -s https://repos.azul.com/azul-repo.key | sudo gpg --dearmor -o /usr/share/keyrings/azul.gpgAfter adding the GPG key, run this command to add the Debian stable package repository of Zulu Java
echo "deb [signed-by=/usr/share/keyrings/azul.gpg] https://repos.azul.com/zulu/deb stable main" | sudo tee /etc/apt/sources.list.d/zulu.list3. Update package repository
Once you have added the repository, we need to refresh the package repository cache so that it can recognize the packages available through the newly added repo.
sudo apt update4. Installing Zulu Java on Ubuntu Linux
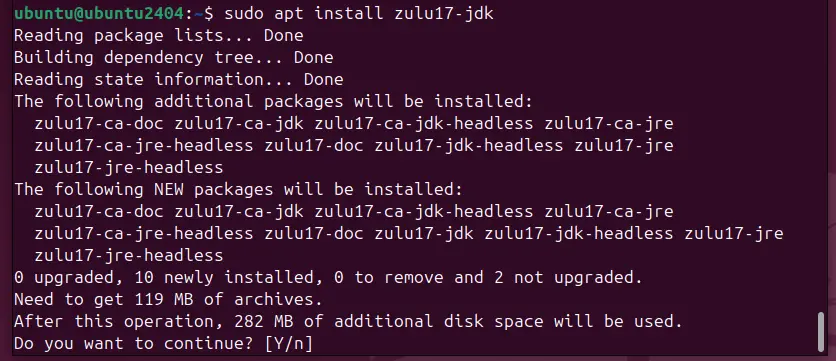
As we have the Zulu APT repository on our Ubuntu system, we can now use the default APT package manager to install the available versions of Zulu Java (e.g., Zulu 17 for Java 17).
Install Zulu Java 17 (Latest LTS version):
sudo apt install zulu17-jdk -yAlternatively, for other versions, replace “zulu17-jdk” with the desired version in the above command. Example:
- For Zulu 11 (LTS) use: zulu11-jdk
- For Zulu 8 use: zulu8-jdk
- For Zulu 21 use: zulu21-jdk
5. Check the Version to verify the installation
Check the Java version to ensure that Zulu Java has been installed correctly. The output should show the Zulu Java version we have installed, confirming the installation.
java -version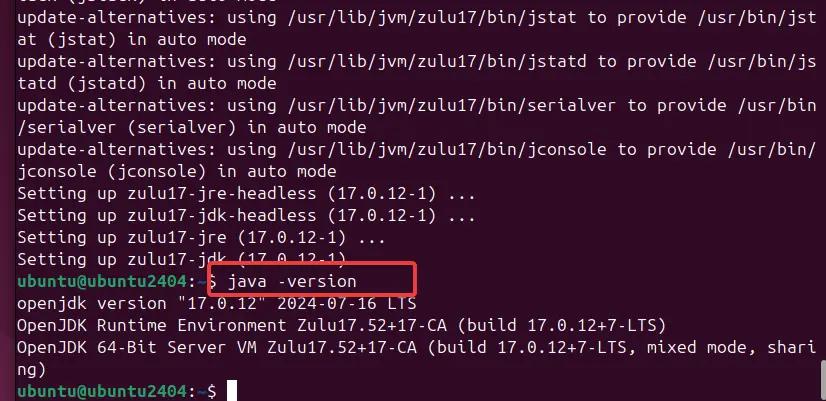
6. Set Zulu Java as the default version
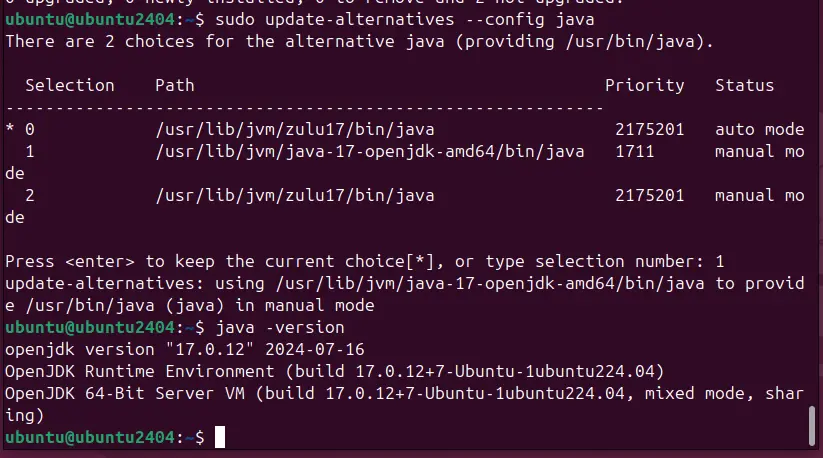
You may have multiple versions of Java, such as one from Ubuntu OpenJDK and the other from Zulu. If you want to compile and run Java applications using a particular version, you can set the required Java version as a system-wide default.
Setting Zulu Java as the Default Java Version
If you have multiple Java versions installed, you may need to set Zulu as the default:
sudo update-alternatives --config javaSelect the Zulu Java version from the list or any other required one. Just enter the selection number and hit the Enter key when the above-given command asks for it.
Conclusion
Installing Azul’s Zulu Java on Ubuntu is easy; add its repository, and you are done. However, the system default OpenJDK will be enough to perform Java development and run applications; nevertheless, if your app requires Zulu specifically, this tutorial will help you.
Other Articles:
- How to install and use NoMachine on Ubuntu 24.04 or 22.04 Linux
- Install Java 17 on Amazon Linux 2023
- How do you detect mouse wheel events in Javascript?
- How to install Oracle Java 8 64-bit Ubuntu 22.04 | 20.04 LTS
- How to install Oracle Java 8 on AlmaLinux or RockyLinux 8/9