Well, we can install phpMyadmin by manually downloading and setting its files along with Apache on Ubuntu. However, it could be difficult for a few users to go through various steps to configure phpMyAdmin, instead of that we can automate its installation using the phpMyadmin repository on Ubuntu 20.04 LTS Focal Fossa.
phpMyAdmin is an open-source web platform developed in PHP to manage MariaDB or MySQL database server via a graphical web interface. Most of the hosting platforms come with this database web-based management application, already, however, if you are using some private virtual server or cloud hosting then you may need to install it manually. And here in this article, we learn that.
Steps to install phpMyAdmin using PPA repository on Ubuntu 22.04|20.04
1. Run system update
Let’s first run the Ubuntu/Debian update command to refresh the system repository cache.
sudo apt update
2. Install MariaDB or MySQL (optional)
If you already have the database server installed on the server or localhost where you are installing the phpMyAdmin or just want to use the PHPMyAdmin to manage some Database server available on a remote server then you can skip this step.
Install the one as per your choice.
For MariaDB
sudo apt install mariadb-server
or
For MySQL
sudo apt install mysql-server
3. Command to install phpMyAdmin on Ubuntu 20.04 | 22.04 LTS
Now, use the APT package manager to install and configure phpMyAdmin automatically, we can run the following single command. It will download, install and configure phpMyAdmin along with the Apache webserver.
The given command will install PHP & its extension along with Apache or Lighttpd web server.
Install PHP:
sudo apt install php
Now, PHPMyAdmin
sudo apt install phpmyadmin
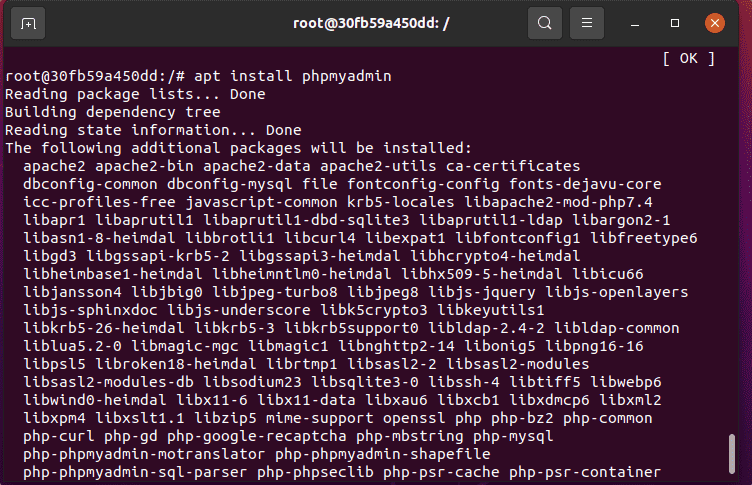
Configure Database (only for localhost):
If you are using a Database server on your localhost where you are installing the phpMyAdmin then type the Yes option to create a database user to use with phpMyAdmin. Whereas, those who have a Database server on some other remote machine should go for NO. See: How to access remote MySQL database in local phpMyAdmin
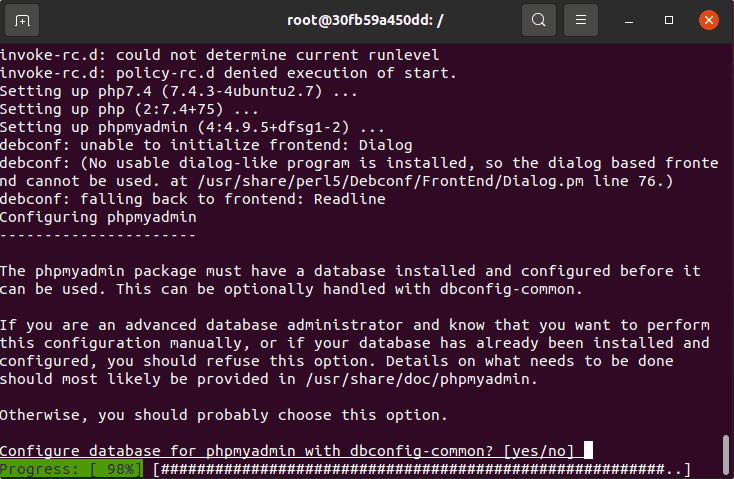
Select Apache or Lighttpd
The PHPMyAdmin automation process will also ask you to select Apache or Lighttpd as a default web server. Type 1 and hit Enter to go for Apache. However, if you already have an Apache server installed then it will automatically configure it to use.
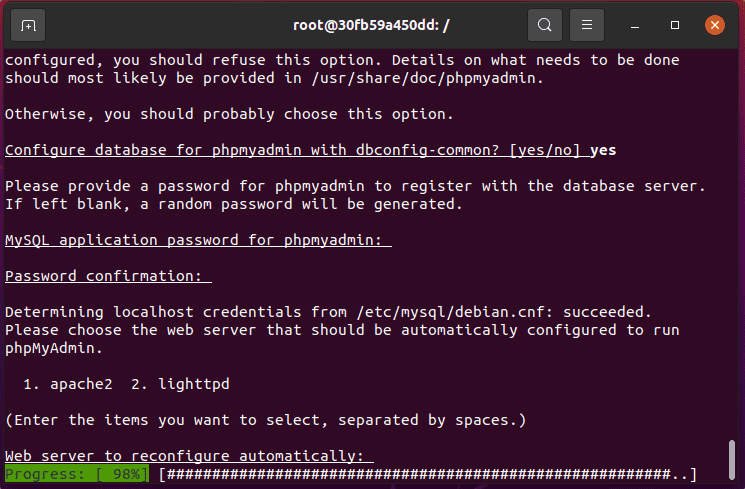
4. Check or Start the Web server on Ubuntu 20.04
First, check your Webserver whether it is Apache or Lighttpd, is working fine or not. Here we are using Apache hence we go for that.
service apache2 status
If it is not running already then execute the below two commands:
sudo service apache2 start
sudo service apache2 enable
5. Access the phpMyAdmin web interface
Now, open a browser on any system that can access your Server Ip address or domain where you have installed the phpMyAdmin.
http://your-server-ip/phpmyadmin
or
http://your-domain.com/phpmyadmin
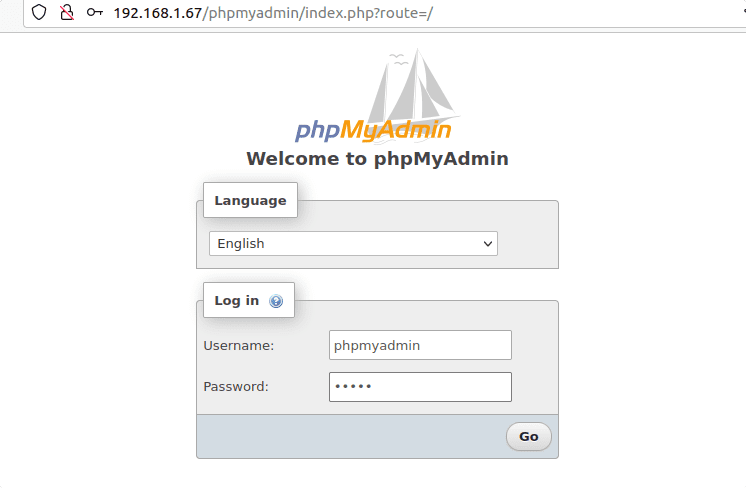
To log in use username – phpmyadmin and the password is the one you set during the phpMyAdmin dbconfig setup.
Note: If you want to manage all Database accounts the phpMyAdmin then login with the root user of MySQL or MariaDB.
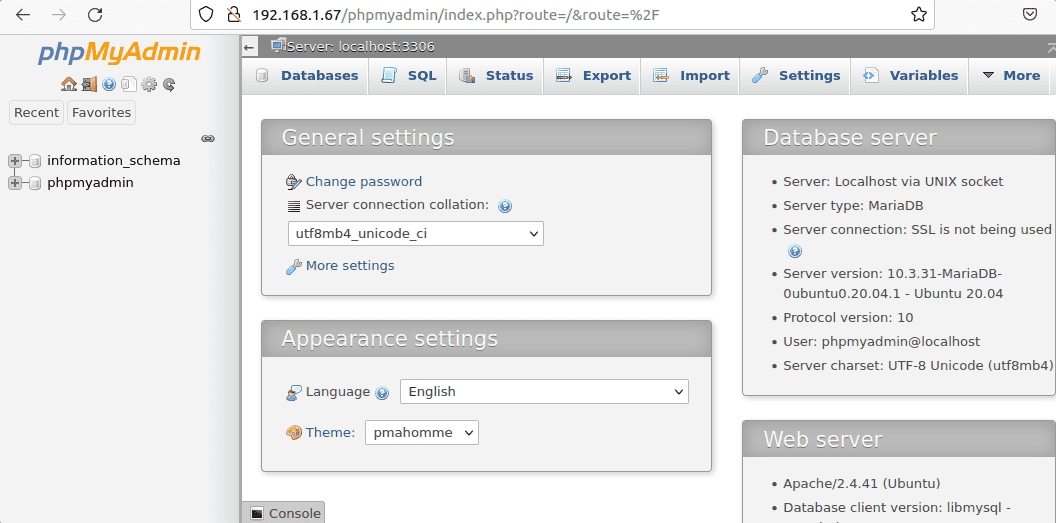
6. Recover the password, if forget
Note: If you forgot which user has been used to access phpMyadmin and what is its password? Then simple edit a file:
sudo nano /etc/phpmyadmin/config-db.php
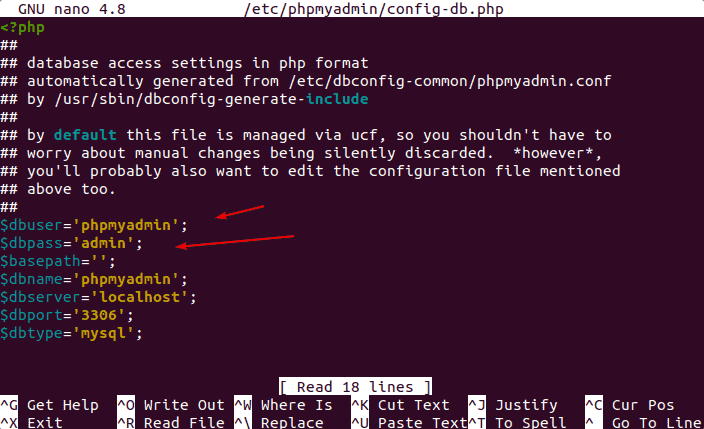
7. Add a PPA repository for phpMyAdmin (optional)
Although there is no need to add an additional repository to install phpMyAdmin on Ubuntu 20.04, it is because we already have its packages available in the Ubuntu official repository. However, the version will not be the latest one. Hence to get the newer version, we have to add the PPA repo manually. Here are the steps to follow, for those who want.
sudo add-apt-repository ppa:phpmyadmin/ppa
sudo apt update
sudo apt upgrade
In the future, if you want to install any new updates just run the above-given upgrade command.
Other Articles:
• Install PhpMyAdmin on Docker to manage MariaDB or MySQL
• How to Install phpMyAdmin on Debian 11 Bullseye (Apache)
• Install phpMyAdmin on AlmaLinux 8 with Apache
• How to install phpMyAdmin on Rocky Linux 8 with Apache



Very cool tutorial !
I am glad to see someone did a tutorial to use the package and PPA I maintain !
William from the phpMyAdmin team