Learn the steps to install MongoDB version 7.0/6.0/5.0 or 4.4 on Amazon Linux 2023 using the YUM repository to receive future updates by running the system update command.
Amazon Linux 2023 is the latest version of AWS Linux and a popular choice for users to deploy RPM-based applications for hosting apps and databases on Amazon Web Services (AWS). So, if you are new to this Linux and looking to set up MongoDB, a widely used NoSQL database, on Amazon Linux, this step-by-step guide will walk you through the installation process. This Database server is available in enterprise and community editions and is well known for its flexibility and scalability, making it an excellent choice for a variety of applications.
Step 1: Access Amazon 2023 Linux Instance
We need Amazon Linux 2023 Instance to perform this tutorial, hence, if you already have that then move to the next step otherwise create one through the AWS Management Console or by using the AWS Command Line Interface (CLI). Also, the server instance should have sufficient resources for your MongoDB workload.
To connect the AMI2023 server you can either use direct SSH from your local PC or access it directly from the AWS Dashboard.
Step 2: Start with the Server update
After having the access to Amazon 2023 Linux server, run the system update command which will install the latest available security patches and updates.
sudo dnf updateStep 3: Add the MongoDB YUM Repository
There are multiple versions of MongoDB Database server available to install on the Amazon 2023 Linux server, now it’s upon your project requirements which version you want to use. Here we are proving the repository as per the version, add the only one you require.
Note: To install MongoDB on Amazon Linux, you’ll need to add the official MongoDB repository. Hence, copy and paste the code of the repository version you want and not all.
For MongoDB version 7.0
sudo tee /etc/yum.repos.d/mongodb-org-7.0.repo<<EOL
[mongodb-org-7.0]
name=MongoDB Repository
baseurl=https://repo.mongodb.org/yum/amazon/2023/mongodb-org/7.0/x86_64/
gpgcheck=1
enabled=1
gpgkey=https://www.mongodb.org/static/pgp/server-7.0.asc
EOL
For MongoDB version 6.0
sudo tee /etc/yum.repos.d/mongodb-org-6.0.repo<<EOL
[mongodb-org-6.0]
name=MongoDB Repository
baseurl=https://repo.mongodb.org/yum/amazon/2023/mongodb-org/6.0/x86_64
gpgcheck=1
enabled=1
gpgkey=https://www.mongodb.org/static/pgp/server-6.0.asc
EOL
For MongoDB version 5.0
sudo tee /etc/yum.repos.d/mongodb-org-5.0.repo<<EOL
[mongodb-org-5.0]
name=MongoDB Repository
baseurl=https://repo.mongodb.org/yum/amazon/2023/mongodb-org/5.0/x86_64
gpgcheck=1
enabled=1
gpgkey=https://www.mongodb.org/static/pgp/server-5.0.asc
EOL
For MongoDB version 4.4
sudo tee /etc/yum.repos.d/mongodb-org-4.4.repo<<EOL
[mongodb-org-4.4]
name=MongoDB Repository
baseurl=https://repo.mongodb.org/yum/amazon/2023/mongodb-org/4.4/x86_64/
gpgcheck=1
enabled=1
gpgkey=https://www.mongodb.org/static/pgp/server-4.4.asc
EOL
Step 4: Install MongoDB on Amazon Linux 2023
With the repository added we can easily install the MongoDB server and other packages such as MongoDB-org server, MongoDB-database-tools, mongosh, mangos, and more.
We just need to run the following command:
sudo dnf install mongodb-org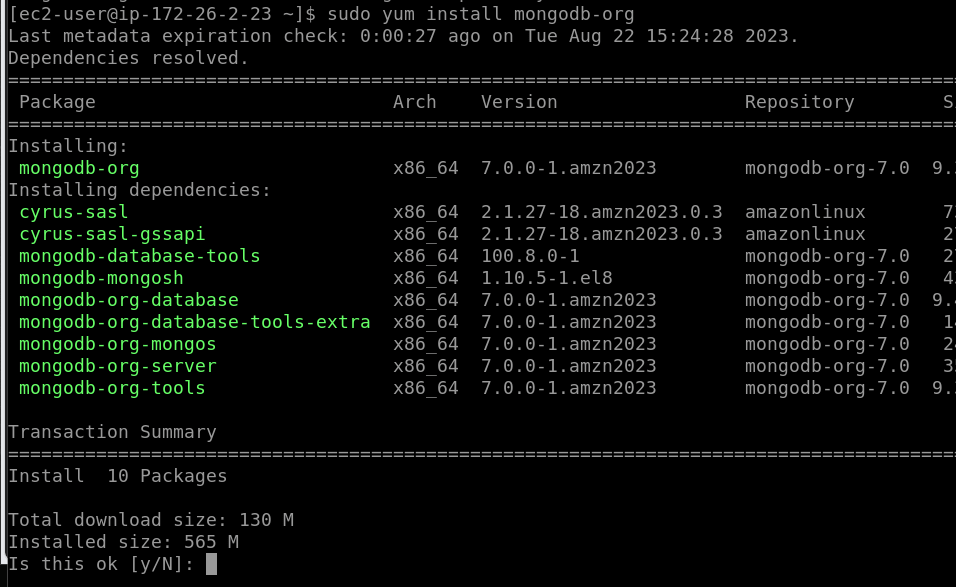
Step 5: Start the Service and enable it
MongoDB Database service will not get started automatically after installation. We manually need to start it and mark the MongoDB service enabled, so that it can get started with the system boot automatically.
sudo systemctl enable --now mongodTo ensure MongoDB is running, check its status:
sudo systemctl status mongod --no-pager -lStep 6: Secure MongoDB (Optional, but highly recommended)
For production environments, it’s crucial to secure your MongoDB installation. The first step is to set up authentication. To do this, create an admin user:
Note: MongoDB 6.0 and 7.0 versions can use mongosh to get the command interface of the Database whereas the users before these two versions could use mongo.
mongoshAfter that use the Admin account and set a password.
use admindb.createUser({ user: "admin", pwd: "your-admin-password", roles: ["root"] })
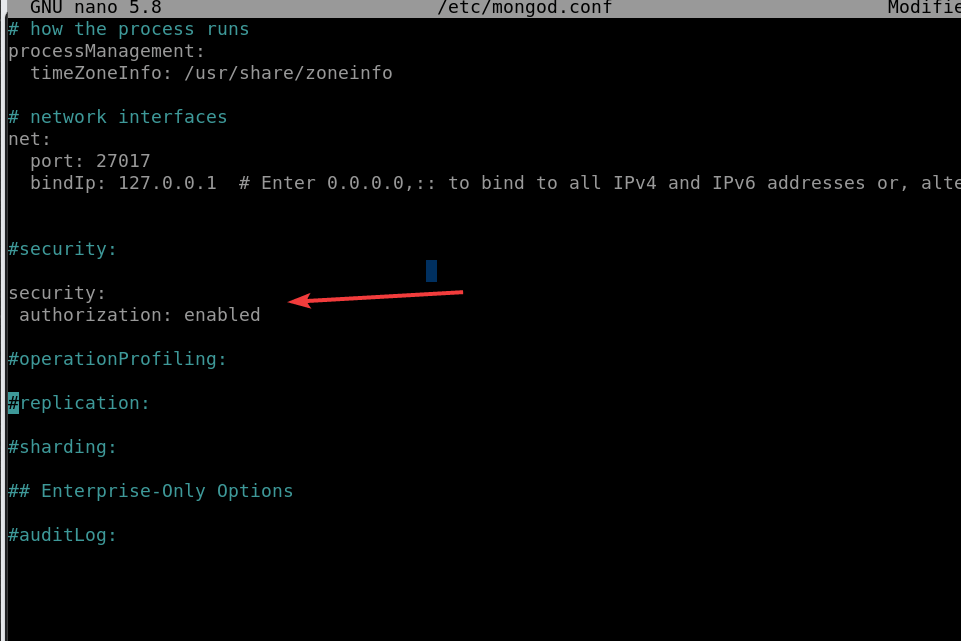
Step 7: Configure MongoDB to Require Authentication
Edit the MongoDB configuration file to require authentication. Open the MongoDB configuration file:
sudo nano /etc/mongod.confFind the security section and add the following lines:
security:
  authorization: enabled
Save the file and exit by pressing Ctrl+X, after that Y, and then hit the Enter key…
Step 8: Restart MongoDB
After enabling the security or authentication for MongoDB, restart it to apply the changes we have made.
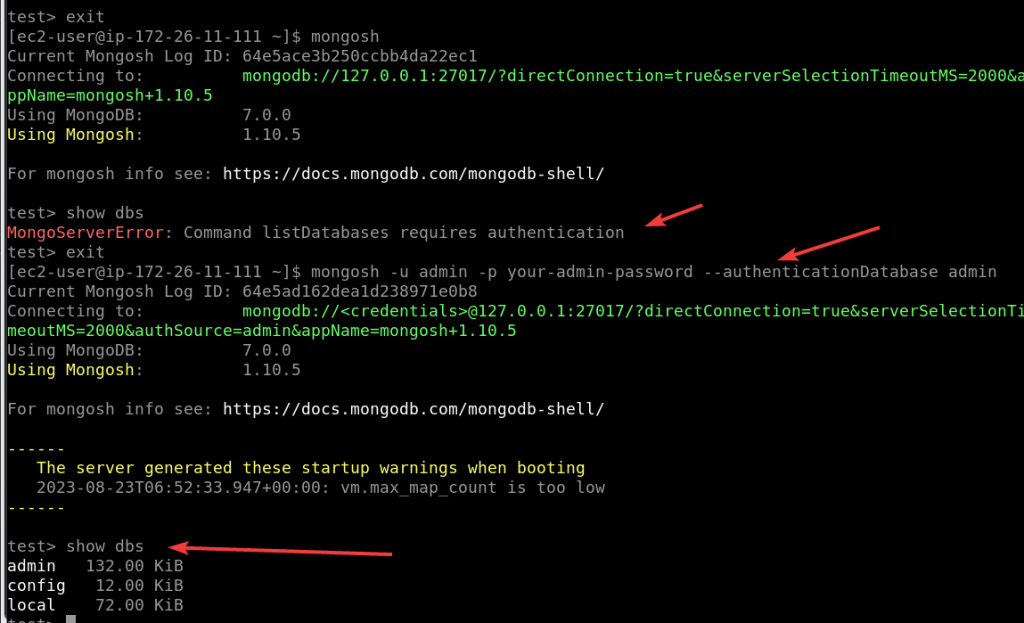
sudo systemctl restart mongod Step 9: Connect to MongoDB with Authentication
To connect to MongoDB with authentication, use the following command, replacing your-admin-password with the admin password, you set earlier:
mongo -u admin -p your-admin-password --authenticationDatabase admin
After that run any common command to see whether you have access to execute the commands or not:
for example:
show dbsyou will see the list of available databases, whereas without authenticating MongoDB will give you an error…
Conclusion
We have successfully installed the MongoDB NoSQL database on Amazon Linux 2023 and also secured it with authentication. Now, you’re ready to use MongoDB for your data storage needs on AWS.


This only works for MongoDB 7.0 in production. MongoDB 7.x is available in development repo for Amazon Linux 2023. For MongoDB 4.4,5.0.6.0 there is no packages available within the repos for these installation.