Learn the steps to install the Linux kernel 5.19 version on Ubuntu 20.04 LTS Focal fossa or Ubuntu 22.04 Jammy Jelly Fish to change the default one using the command terminal.
The kernel is the core program of any Linux -based operating system that offers mediation between the software and hardware of the computer system. That implies on any hardware device running with some software. And when we wrap it with a layer of graphical user interface and other applications around the kernel, we have a full-fledged Linux operating system such as Ubuntu. Well, Kernel keeps work in the background and takes care that the operating system works and that hardware and software can be put into operation.
Steps to change default Kernel in Ubuntu 22.04 | 20.04 LTS
1. Current Kernel version
Before changing the default kernel of your Ubuntu Linux, let’s first check what exactly the current version is running on our system. For that open your command terminal, if you are using the GUI desktop version, then it can be opened using the keyboard shortcut – Ctrl+Alt+T.
uname -r
![]()
2. Update & install wget
Let’s first make sure everything on our system is up to date and then we will move to the next step. Hence, first, run the apt update & upgrade command plus also install wget a tool as well.
sudo apt update && sudo apt upgrade
sudo apt install wget
3. Script to change the kernel
Although, the user can directly download the Kernel Deb binary package from Ubuntu’s Linux repository; however, to easily install, update and uninstall Kernels on Ubuntu 22.04 | 20.04 LTS, we can use the script available on GitHub. Use the given command to download the script on your Ubuntu system.
wget https://raw.githubusercontent.com/pimlie/ubuntu-mainline-kernel.sh/master/ubuntu-mainline-kernel.sh
Once the script is on your system, make it executable and move it to /usr/local/bin to easily use it in the future to get the latest version of the kernel.
chmod +x ubuntu-mainline-kernel.sh
sudo mv ubuntu-mainline-kernel.sh /usr/local/bin/
4. Check available Kernel versions to install
We have the script in its place, now we can use it to check what are versions available to install in addition to the one already existing on our system.
To find the latest version available to install:
ubuntu-mainline-kernel.sh -c

Whereas to list all the available Kernel versions that you can install are:
ubuntu-mainline-kernel.sh -r
5. Install Linux 5.19 Kernel on Ubuntu 22.04 | 20.04
Well, now we can install Linux 5.19 using a simple command of the downloaded script, here it is:
sudo ubuntu-mainline-kernel.sh -i v5.19.1
(optional) To install the latest available:
sudo ubuntu-mainline-kernel.sh -i
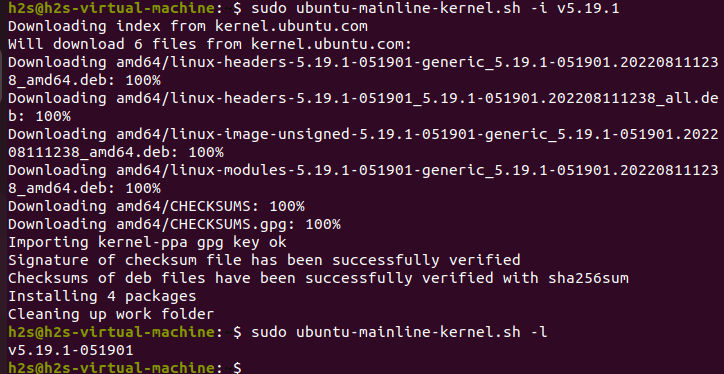
Once the installation is completed, we can use the same script to list what are the available versions of Kernel on our system:
sudo ubuntu-mainline-kernel.sh -l
6. Reboot your system
Restart your Ubuntu to let your system use the latest installed kernel version.
sudo reboot
After the system reboots, check your current version by using:
uname -r
This time you will see the latest one.
7. Change or Set the Default Kernel Version
By default, Ubuntu will pick the latest installed version of Kernel automatically but if you want to set some other version then, edit the Grub file.
sudo nano /etc/default/grub
Add the following two lines, to get an idea you can see the screenshot.
GRUB_SAVEDEFAULT=true
GRUB_DEFAULT=saved
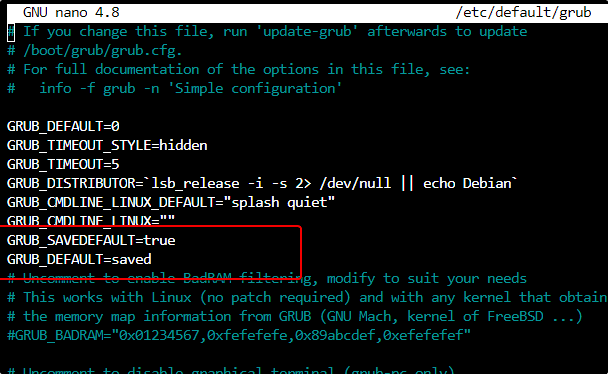
Save the file Ctrl+O, hit the Enter Key, and then exit it Ctrl+X.
Update Grub:
sudo update-grub
Now reboot your system:
sudo reboot
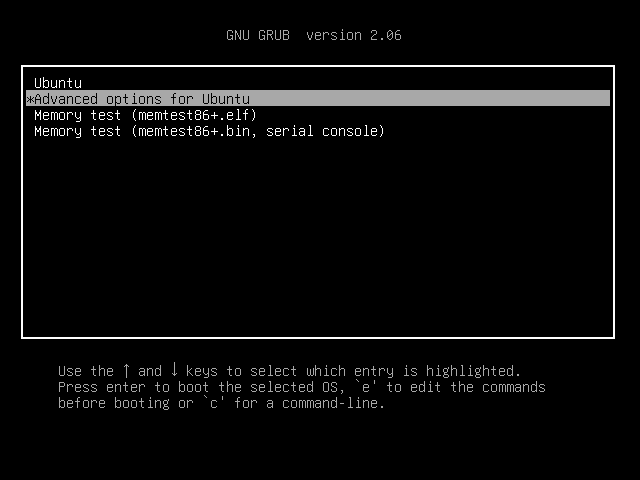
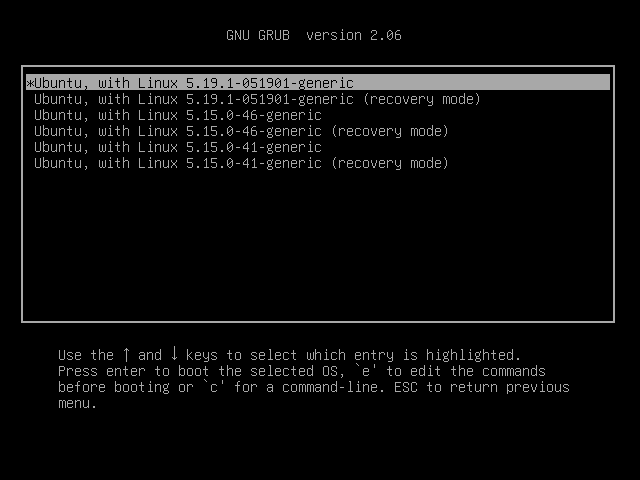
And as you start your system, press the Esc button to get the Grub menu. Select “Advanced options for Ubuntu” and then select the Kernel version you want to set as the default one on your system.
8. Uninstall or Remove kernel v5.19.1
To remove any existing kernel from your system, run:
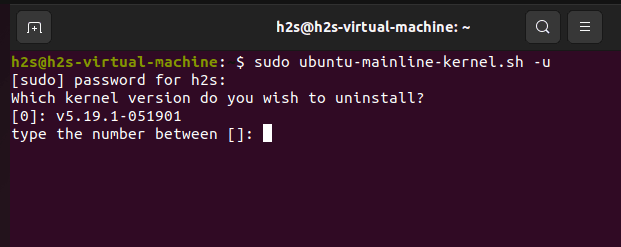
sudo ubuntu-mainline-kernel.sh -u
Select the serial number of the version you want to completely remove from your system.
