Docker offers users the ability to quickly create virtual containers on Ubuntu Linux. However, those who don’t want to manage the containers using the command line can install Docker Desktop GUI on Ubuntu 24.04 LTS, this tutorial will provide commands for setting up the graphical user interface for Docker…
Docker Desktop is an easy-to-use, integrated container management environment that provides a graphical user interface (GUI) for Docker.
Do we require something special to follow this tutorial?
Well, to follow this tutorial we need Ubuntu 24.04 Noble Linux or any other version such as Ubuntu 22.04, 20.04, 18.04… Apart from that, the user must have sudo access to install packages or permission to access the root user. While downloading the packages, an active internet connection must be there.
Step 1: Ubuntu 24.04 Package Update
On your Command terminal which can be accessed by pressing the Ctrl+Alt+T shortcut, run the system update and upgrade command for upgrading the existing packages and installing the latest available security updates.
sudo apt update && sudo apt upgradeAlso, install a few common dependencies:
sudo apt install apt-transport-https ca-certificates curl software-properties-common -yNote: if you don’t have Docker already installed on your Ubuntu 24.04 then only follow Steps 2nd, 3rd, and 4th, whereas the rest of the users looking to install only the Docker Desktop GUI can jump to Step 5th.
Step 2: Add Docker’s Official GPG Key
The latest version of Docker is not present to install through the default system repository of Ubuntu 24.04. Therefore, we have to add the official repo of Docker but before that add its GPG key to your system:
curl -fsSL https://download.docker.com/linux/ubuntu/gpg | sudo gpg --dearmor -o /usr/share/keyrings/docker-archive-keyring.gpgStep 3: Set Up the Docker Repository
After adding the GPG key, let’s add the Docker repository to our Ubuntu 24.04 APT sources:
echo "deb [arch=$(dpkg --print-architecture) signed-by=/usr/share/keyrings/docker-archive-keyring.gpg] https://download.docker.com/linux/ubuntu $(lsb_release -cs) stable" | sudo tee /etc/apt/sources.list.d/docker.list > /dev/nullRun the system update command to refresh the package list.
sudo apt updateStep 4: Install the Docker Engine
Now, we can use the default APT package manager to fetch and install packages for the installation of Docker on Ubuntu 24.04 Linux.
sudo apt-get install docker-ce docker-ce-cli containerd.io docker-buildx-plugin docker-compose-pluginCheck the service status of the Docker Engine:
After completing the previous command, check and confirm the Docker service is running without producing any error:
systemctl status docker --no-pager -lStep 6: Install Docker Desktop in Ubuntu 24.04
Unlike the Engine, the Docker Desktop GUI tool is not available to download through the repository that we have added in Step 3, therefore, we need to download the .deb package from Docker’s official website, visit the link and click on “Debian“.

Once you have the Docker Desktop Deb binary, go to your command terminal, and there first switch to the Downloads directory. It is because whatever we get from the browser goes into that.
cd DownloadsNow, check whether the downloaded Docker Desktop file is there or not.
lsIf the file is present run the given command to install it.
sudo apt install ./docker-desktop-*-amd64.deb(optional) Once the installation is completed, you can delete the downloaded Debian binary file to free up storage.
rm docker-desktop-*-amd64.deb
Ignore this warning and move to the next step:
N: Download is performed unsandboxed as root as file '/home/linuxshout/docker-desktop-4.30.0-amd64.deb' couldn't be accessed by user '_apt'. - pkgAcquire::Run (13: Permission denied)
Step 7: Start Docker Desktop
To start the Docker Desktop on Ubuntu 24.04, click on the “Show Apps” icon given on the Dock or press the Window key on your keyboard. All the Applications installed on your Ubuntu will appear, search for Docker Desktop, as you see its shortcut icon, and click to run it.
However, there is one problem: Ubuntu 24.04 is not yet supported by Docker while writing this article, hence Docker Desktop will fail to start. It is because of the changes done by the developers of Ubuntu in the latest 24.04 Noble version. In this latest Ubuntu release, it restricts the unprivileged namespaces.
So, to solve this we have to run the given command at least once:
sudo sysctl -w kernel.apparmor_restrict_unprivileged_userns=0 After that restart the Docker Desktop service:
systemctl --user restart docker-desktopNow, either start Docker Desktop from the Application area or use the given command:
systemctl --user start docker-desktop
To ensure Docker Desktop starts on login, enable it:
systemctl --user enable docker-desktopWhereas to stop the service:
systemctl --user stop docker-desktop——————————————————–{Optional}—————————————————-
{Optional} Well, one more thing whenever you reboot your system then you have to run “sudo sysctl -w kernel.apparmor_restrict_unprivileged_userns=0” once again, until Docker developers give an update to support Ubuntu 24.04. Alternatively, you can create a systemd service file to make the system execute the AppArmor command to let unprivileged namespaces be used.
It is optional:
sudo nano /etc/systemd/system/set-apparmor-restrict.service
Add the following content:
[Unit]
Description=Disable AppArmor Restriction on Unprivileged User Namespaces

[Service]
Type=oneshot
ExecStart=/sbin/sysctl -w kernel.apparmor_restrict_unprivileged_userns=0
RemainAfterExit=true

[Install]
WantedBy=multi-user.target
Reload systemd and enable the service:
sudo systemctl daemon-reload
sudo systemctl enable set-apparmor-restrict.service
sudo systemctl start set-apparmor-restrict.service
For disabling and deleting the service file in case you don’t require it in the future:
To disable:
sudo systemctl disable set-apparmor-restrict.service
sudo systemctl daemon-reload
Remove the service file:
sudo rm /etc/systemd/system/set-apparmor-restrict.service
sudo systemctl daemon-reload
Step 8. Sign in to Docker Desktop (HUB)
To sign into your Docker Hub account from the Docker Dashboard or the Docker menu, the Docker Desktop app relies on a pass to store credentials in gpg2-encrypted files. Hence, we first need to initialize the pass otherwise we keep getting warnings on the Dashboard for it.
Note: Make sure you already have a Docker Hub account before following the given steps.
Go to your Terminal and type:
gpg --generate-keyAfter that just give some name to use as a User ID and then an email address.
Once you have done that, the system will ask you to set the password.
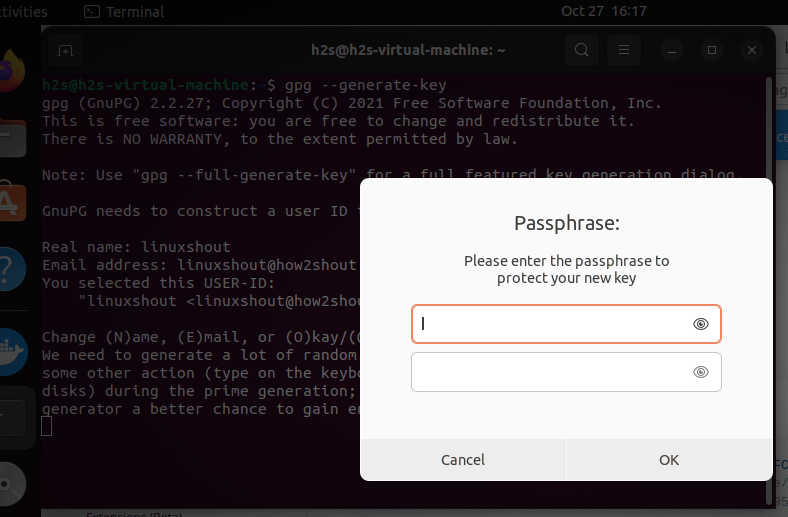
Copy the generated key and use it with the pass.
Now, you will see a PUB key, copy that and use the given command to initialize it.
pass init paste-your-keyHit the Enter key after pasting the key.
Here is the screenshot to give you a clear idea.
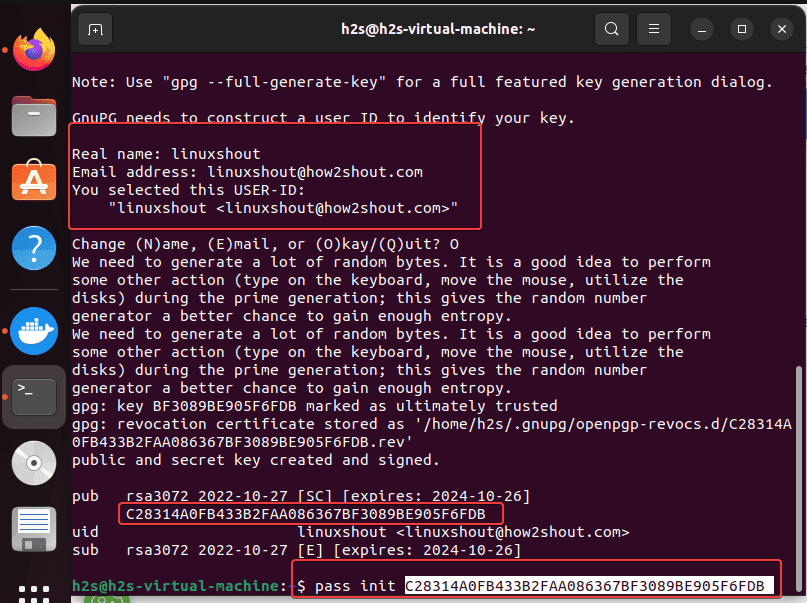
Now, go to your Docker Desktop Dashboard and click on the Sign in button.
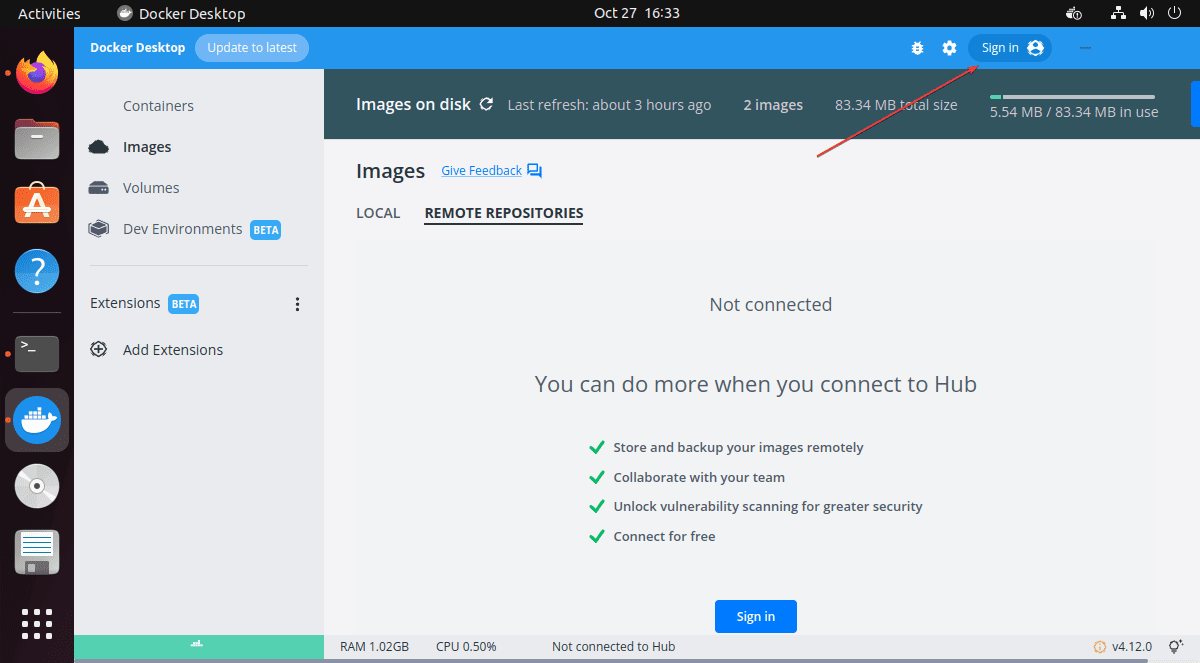
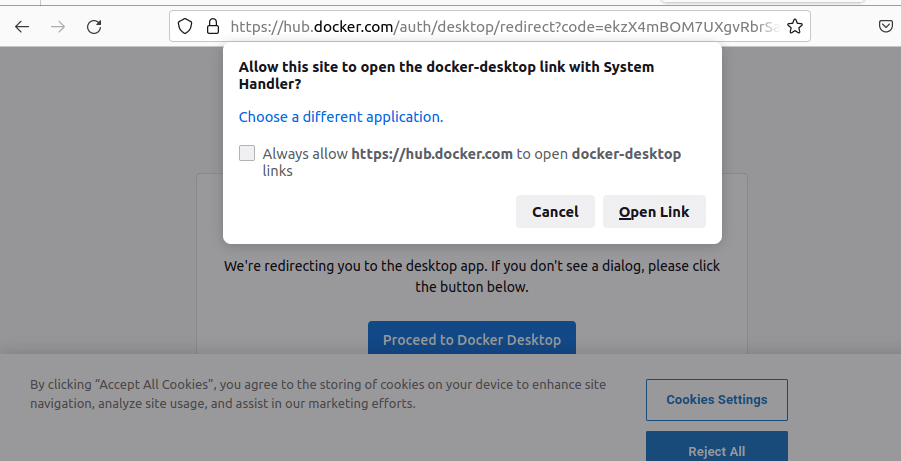
As you click on it, the browser will open the Docker Hub page to log in. Enter your official credentials and then click on the Open Link that will automatically log you into Hub in the Desktop App.
Step 9. How to Download Docker Images
Well, if you are already using the Docker CLI then you will see all your images and containers on the Docker Desktop Linux App. However, those who are completely new to it can use the given commands to pull the images and start a container.
To pull Images on your Ubuntu command terminal run:
docker pull image-nameFor example, if you want to pull Ubuntu Image, the command l will be:
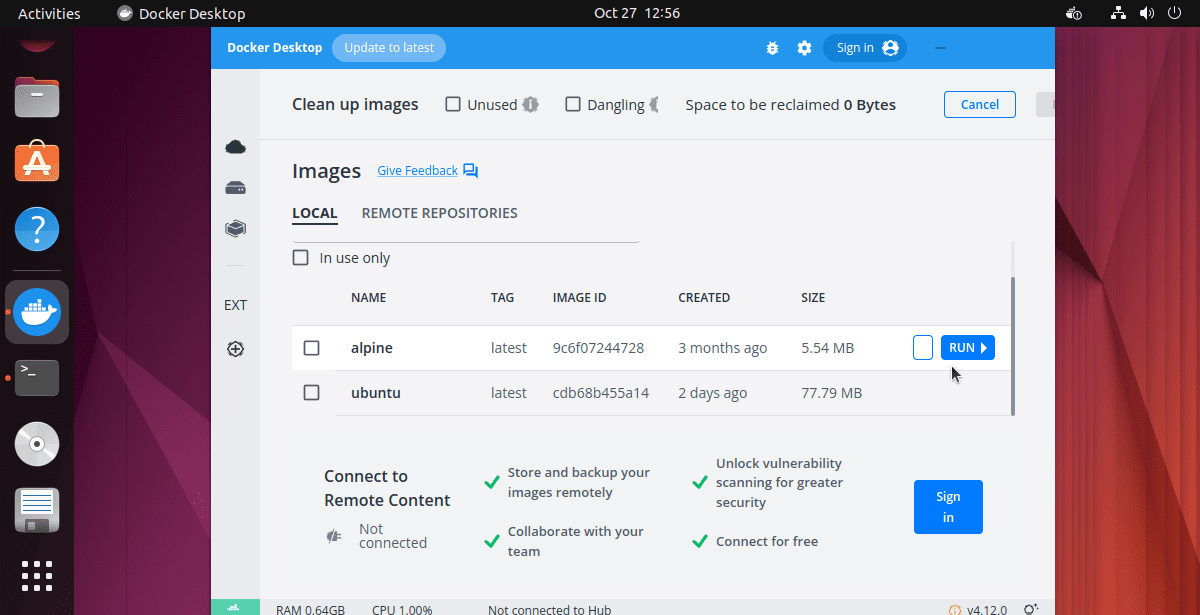
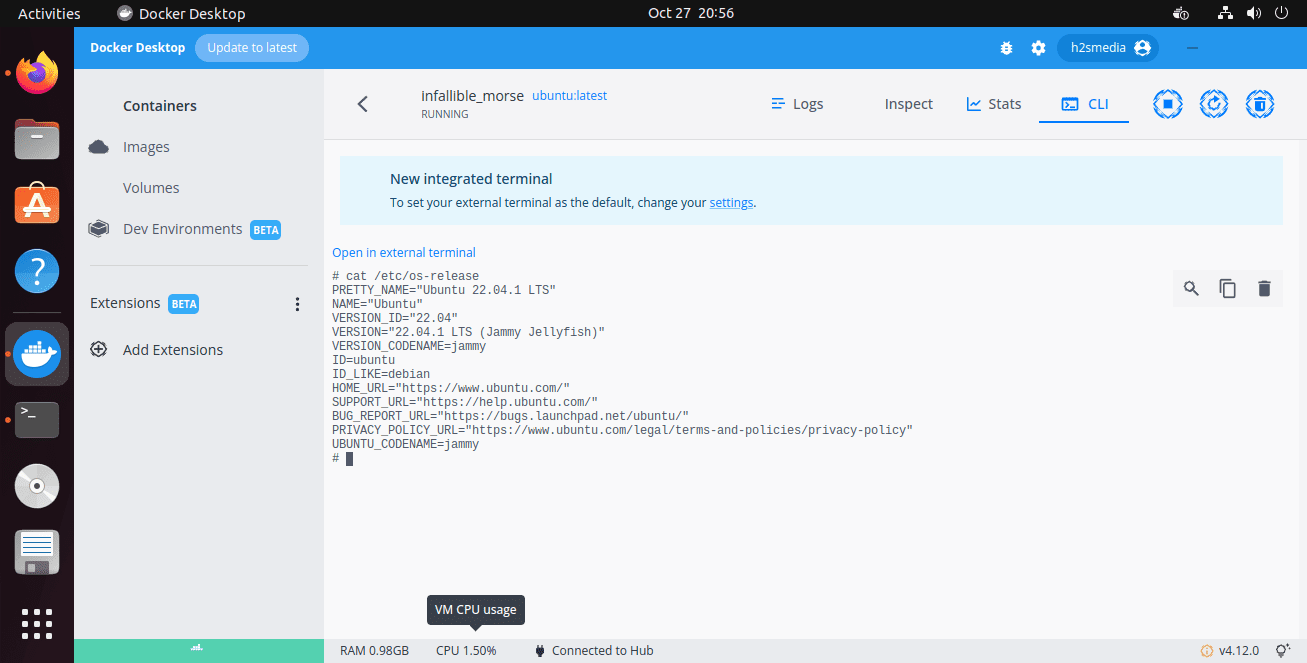
docker pull ubuntuNow to manage it we can use the Graphical User Interface of Docker Desktop. Select the Images section, and to create a container click on the Run button given in front of the downloaded Image.
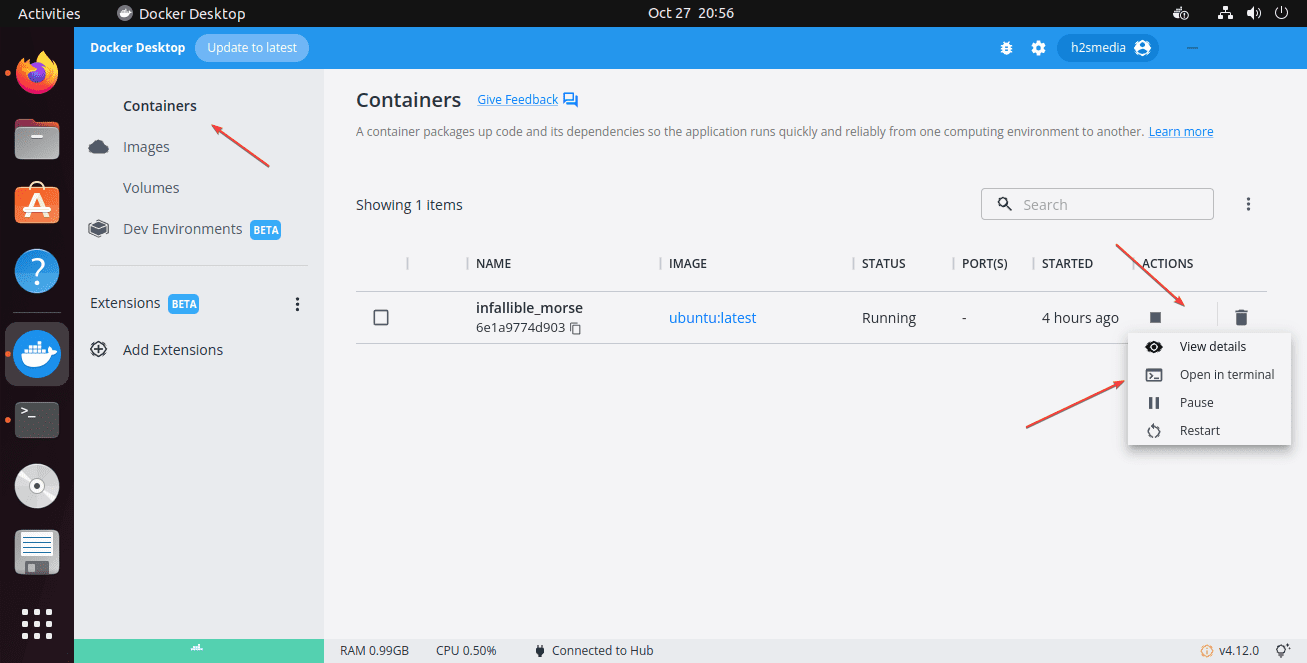
After that to have the terminal issue commands, click on the Containers and then on the three dots given in front of your Active container. From the pop-up menu select “Open in Terminal”.
Conclusion
These were the steps to not only install the Docker Desktop on Ubuntu 24.04 but also how to handle images and containers along with the Docker Hub signing process. Now, you can use the Docker Desktop Dashboard GUI to simplify tasks such as container creation, management, and monitoring.
Other Articles:


