Learn the commands to install Consul by HashiCorp on Ubuntu 20.04 LTS Focal Fossa using the terminal to solve the networking and security challenges of operating microservices.
Consul is an open-source multi-networking tool that offers a fully-featured service mesh solution that solves the networking and security challenges of operating microservices and cloud infrastructure (multi-cloud and hybrid cloud).
Consul manages services and nodes in the form of a “directory service”, i.e. in the form of what runs where? Access is via DNS or HTTP(s). Consul operates in either Server or Agent mode. The servers store the data, if several are used, the data is automatically synchronized.
The data can be accessed directly on the servers via DNS or HTTP(s) or via the required agent anyway. Any node or host logs on to Consul via the agent and is registered as a node. Services can also be registered. A web server, for example, registers as a new cluster member to an existing service. In addition, tags can also be set, which then display themselves as aliases via DNS query.
Steps to Install Consul on Ubuntu 20.04 Server
The command given here can be used for other operating systems based on Ubuntu or Debian such as Linux Mint, POP OS, and more…
1. Update the server
Access your command terminal directly or using SSH. After that run the system update command to make sure it is in its latest state.
sudo apt update && sudo apt upgrade
2. Add Hashicorp GPG Key
To fetch and install the packages of the Consul, we need a GPG key used by the Hashicorp developers to sign the packages of the Consul. The public key helps our system to ensure the packages we are getting are as they were released.
wget -O- https://apt.releases.hashicorp.com/gpg | gpg --dearmor | sudo tee /usr/share/keyrings/hashicorp-archive-keyring.gpg
3. Add Consul repository in Ubuntu 20.04
The packages to install Consul on Ubuntu 20.04 Linux are not available to download using the default system repository. Hence, add the one provided officially by the Hashicorp to install the Consul.
echo "deb [signed-by=/usr/share/keyrings/hashicorp-archive-keyring.gpg] https://apt.releases.hashicorp.com $(lsb_release -cs) main" | sudo tee /etc/apt/sources.list.d/hashicorp.list
Rebuild APT packages index cache:
sudo apt update
4. Install Consul on Ubuntu 20.04
Once you have followed the all above given steps, we can easily install the Consul using the APT package manager like any other application. Here is the command:
sudo apt install consul
5. Verify the installation
To check the installation is done successfully on the system, let’s check the version of Consul using its command line tool.
consul version
Other Consul options:
h2s@VMe: consul
Usage: consul [--version] [--help] <command> [<args>]

Available commands are:
acl          Interact with Consul's ACLs
agent        Runs a Consul agent
catalog      Interact with the catalog
config       Interact with Consul's Centralized Configurations
connect      Interact with Consul Connect
debug        Records a debugging archive for operators
event        Fire a new event
exec         Executes a command on Consul nodes
force-leave  Forces a member of the cluster to enter the "left" state
info         Provides debugging information for operators.
intention    Interact with Connect service intentions
join         Tell Consul agent to join cluster
keygen       Generates a new encryption key
keyring      Manages gossip layer encryption keys
kv           Interact with the key-value store
leave        Gracefully leaves the Consul cluster and shuts down
lock         Execute a command holding a lock
login        Login to Consul using an auth method
logout       Destroy a Consul token created with login
maint        Controls node or service maintenance mode
members      Lists the members of a Consul cluster
monitor        Stream logs from a Consul agent
operator      Provides cluster-level tools for Consul operators
reload         Triggers the agent to reload configuration files
rtt                 Estimates network round trip time between nodes
services      Interact with services
snapshot     Saves, restores and inspects snapshots of Consul server state
tls                Builtin helpers for creating CAs and certificates
validate      Validate config files/directories
version       Prints the Consul version
watch         Watch for changes in Consul
6. Enable Server and GUI Dashboard
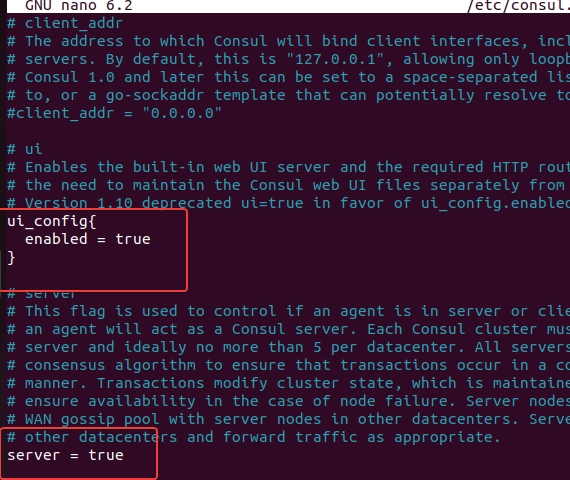
If you want to access the GUI Dashboard of the Consul then we need to enable the same in its configuration file. Also, those who want to use the Consul in server and agent architecture can enable that as well using the same file.
Just edit:
sudo nano /etc/consul.d/consul.hcl
Scroll and remove the # tags from the following lines:
ui_config{
enabled = true
}
server = true

Save the file using Ctrl+O, hit the Enter key, and then exit the editor using Ctrl+X.
Now, restart the service of the Consul:
sudo systemctl restart consul
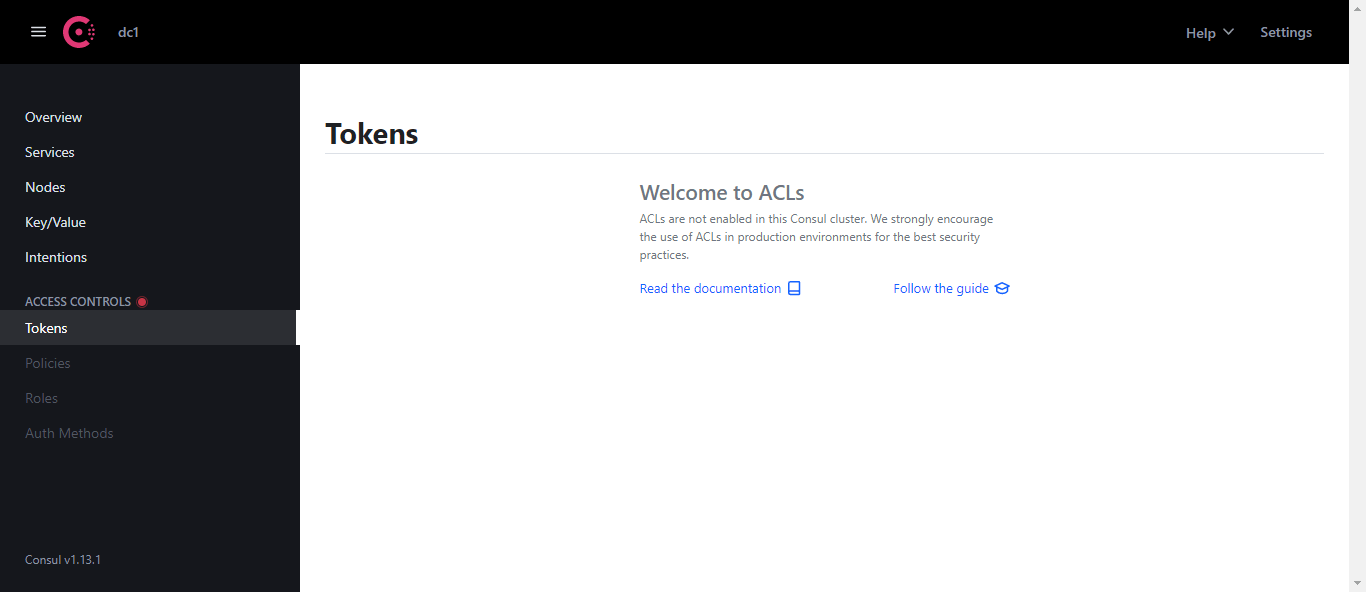
To access the Dashboard, open your browser and point it to:
Note: For localhost only
http://127.0.0.01:8500
7. Access Remotely
To access Consul Dashboard using some other system that can access the Ip-address of the server where you have installed the Consul, create a configuration file for that:
sudo nano /etc/consul.d/ui.json
Add the following lines:
{
"addresses": {
"http": "0.0.0.0"
}
}
Save the file.
Restart the Consul service:
sudo systemctl restart consul
Now, use the server IP address and port to access the Dashboard:
http://server-ip:8500
If you’re using UFW or any other firewall then don’t forget to open port 8500. However, UFW users can use:
ufw allow 8500/tcp
For more information refer to the official documentation:

8. How to update
In the future, to update the installed consul tool, the users just need to run the system update command. It is because we have used the packages repository to install it.
sudo apt update && sudo apt upgrade
9. Remove or uninstall Consul
In case due to some reasons you want to completely remove the Consul from your Ubuntu 20.04 LTS system, then here is the command to do that.
sudo apt autoremove --purge consul
Remove GPG key and repository, if needed:
sudo rm /usr/share/keyrings/hashicorp-archive-keyring.gpg /etc/apt/sources.list.d/hashicorp.list
Other Articles:
⇒ How to install Zabbix Agent on Debian 11 Bullseye
⇒ Install Sensu Go Monitoring on Ubuntu 22.04 or 20.04 LTS
⇒ Install Checkmk on Ubuntu 20.04 Server (Linux Nagios Monitoring)- Tutorial
⇒ How to Install Checkmk on Ubuntu 22.04 LTS Jammy Linux
⇒ Install Puppet Server & Agent on Rocky Linux or AlmaLinux 8


