ClickHouse can easily be installed on Ubuntu 22.04 Linux for getting column-oriented DBMS (columnar database management system). It is developed by Yandex, a popular technology company for online analytical processing (OLAP).
This DBMS is used to generate analytic reports in real-time for non-aggregated data and can generate reports from petabytes of raw data without any significant latency. It uses SQL queries.
Let’s learn the commands for installing ClickHouse on Ubuntu 22.04 LTS Jammy Linux.
Steps to Install ClickHouse on Ubuntu 22.04
Before following the given steps, ensure you have sudo or root user access to run the commands using the Terminal.
1. Update Ubuntu 22.04 System
The first thing we perform on our system is running the update command. Also, along with that, we will install some other packages that need to add repositories.
sudo apt update && sudo apt upgrade -yHere is the next command that needs to be run:
sudo apt install dirmngr ca-certificates software-properties-common apt-transport-https curl2. Import ClickHouse GPG Key
The packages of ClickHouse (analytic DBMS for big data) are signed using a public key by its developers and we need that on our system. It is because then only our system could verify the packages we are getting, are from the source as they were released by its developers. And have not been modified by anyone in between. This allows the system to install the packages only associated with the GPG key identified repository, not from other unknown sources.
GNUPGHOME=$(mktemp -d)sudo GNUPGHOME="$GNUPGHOME" gpg --no-default-keyring --keyring /usr/share/keyrings/clickhouse-keyring.gpg --keyserver hkp://keyserver.ubuntu.com:80 --recv-keys 8919F6BD2B48D754
sudo rm -rf "$GNUPGHOME"
sudo chmod +r /usr/share/keyrings/clickhouse-keyring.gpg3. Add APT repository to Ubuntu 22.04
In this step, we add the officially issued repository by the ClickHouse developers for Debian-based Linux. We are doing this because the packages to install this DBMS are not present through the system repo of Ubuntu. Hence, on your command terminal run the given command:
echo "deb [arch=amd64 signed-by=/usr/share/keyrings/clickhouse-keyring.gpg] https://packages.clickhouse.com/deb stable main" | sudo tee \
    /etc/apt/sources.list.d/clickhouse.list
After adding the repository, it is important to run the system update command again to rebuild the APT cache.
sudo apt update4. Installing ClickHouse Server & Client – Ubuntu 22.04
Once you have followed the above steps correctly, your Linux system becomes eligible to install the ClickHouse packages.
sudo apt install clickhouse-server clickhouse-clientWhen it asks you to Enter a password for a newly created ClickHouse user, then type whatever you want to set.
5. Star the Server and check the status
The Clickhouse server will be installed with a background service on your Ubuntu 20.04. So, that we can start, stop, or enable it whenever we want.
Let’s first check the status of its service after the installation.
sudo systemctl status clickhouse-server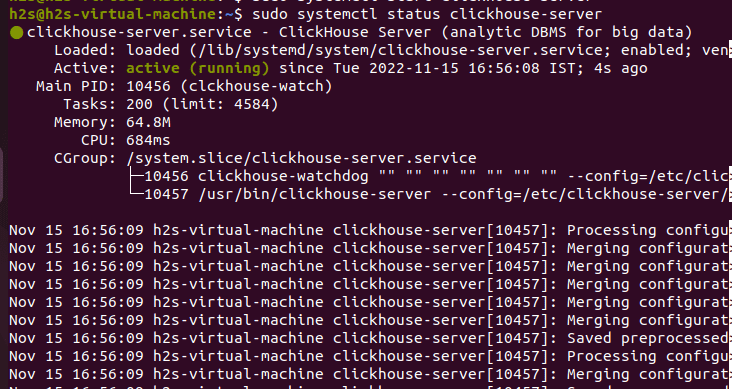
If the server is running without any error, you will have output as shown in the above screenshot. However, if the service is stopped, then to run it we can use:
sudo systemctl start clickhouse-serverWhereas to stop/restart/enable the service in the future, use:
To stop:
sudo systemctl stop clickhouse-serverTo restart:
sudo systemctl restart clickhouse-serverTo enable ClickHouse so that its service starts with system boot:
sudo systemctl enable clickhouse-server6. Clickhouse Client
We can use the Client part of this DBMS to manage/create/delete/alter the databases available on the Clickhouse Server. To start it type- clickhouse-client along with the password you have created for the default user of Clickhouse during its installation.
clickhouse-client --password your-password --user default
Note: Don’t forget to replace “your-password” in the above command with the one you have set.
The error appears if you won’t declare the password in the above command:
If you have installed ClickHouse and forgot password you can reset it in the configuration file.
The password for default user is typically located at /etc/clickhouse-server/users.d/default-password.xml
and deleting this file will reset the password.
See also /etc/clickhouse-server/users.xml on the server where ClickHouse is installed.

Code: 516. DB::Exception: Received from localhost:9000. DB::Exception: default: Authentication failed: password is incorrect or there is no user with such name. (AUTHENTICATION_FAILED)
7. Create a database and table
After logging into the server using the client, let’s have an example to learn how to create a database and table in the ClickHouse Database server.
Create Database:
CREATE DATABASE IF NOT EXISTS myfirstdbTo create a Table.
Let’s say you want to create a Table name – myfirsttable in Database myfirstdb, the command will be:
CREATE TABLE myfirstdb.myfirsttable
(
 user_id UInt32,
 message String,
 timestamp DateTime,
 metric Float32
)
ENGINE = MergeTree()
PRIMARY KEY (user_id, timestamp)
The above command will create a MergeTree table with four columns:
user_id: it is used to assign a 32-bit unsigned integer
message: a String data type, which replaces types like VARCHAR, BLOB, CLOB, and others from other database systems
timestamp: a DateTime value to represent time
metric: a 32-bit floating point number
Let’s Insert some data into our created Table:
INSERT INTO myfirstdb.myfirsttable (user_id, message, timestamp, metric) VALUES
(101, 'Hello, MyFirst Database!', now(), -1.0 ),
(102, 'Yesterday the database was not here', yesterday(), 1.41421 ),
(102, 'I have installed it today', today(), 2.718 ),
(101, 'smallest chunks of data read', now() + 5, 3.14159 )
To see if the data has been inserted into the table successfully or not.
SELECT * FROM myfirstdb.myfirsttable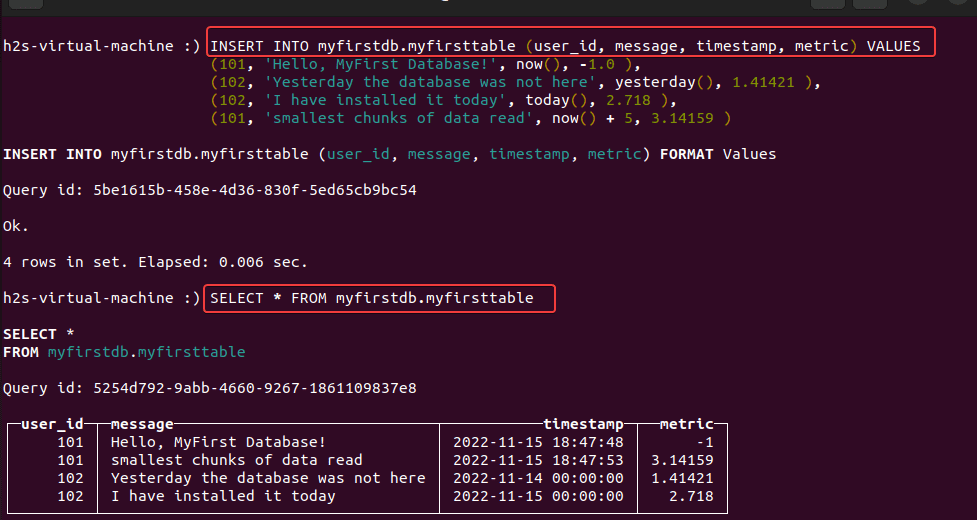
8. How to Update
We have used the official APT repository of ClickHouse to install it. Therefore, to get the future updates for this Database client and server, we just need to run the system update command.
sudo apt update && sudo apt upgrade9. Uninstall ClikHouse from Ubuntu 22.04
To completely remove the Database system from your Ubuntu 22.04 along with all its data, run the given command.
sudo apt autoremove --purge clickhouse-server clickhouse-clientIn this way, you can start with ClickHouse on Ubuntu 22.04 Linux, to know more about this Database system, follow the official documentation.
Other Articles:
⇒ How to install MySQL 8.0 Server on Debian 11 Bullseye
⇒ Add a repository to Install MySQL 5.7 on Ubuntu 20.04 LTS Linux
⇒ How To Install InfluxDB on AlmaLinux or Rocky 8 to create a database
⇒ Install Microsoft SQL Server 2022 preview on Ubuntu 20.04 LTS
⇒ 5 Best htop alternatives to monitor Linux systems



Kindly revise the setup instruction as it’s referring to deprecated setup instructions and that route failed to install the setup on sudo apt-get install -y clickhouse-server clickhouse-client.
Thansk, for pointing we have updated the article…