Learn the simple steps to install free RedHat-based AlmaLinux 8 Server GUI on VirtualBox Virtual Machine, PC, or Laptop along with its repository URL to get a CentOS alternative Linux distro.
AlmaLinux from CloudLinux is the open-source replacement for the CentOS 8 which is not anymore a long-term supported OS version. Thus, to provide an alternative to CentOS 8, the AlmaLinux project has been launched by the CloudLinux developers, who are already known for their stable hosting operating system.
While writing this AlmaLinux installation article on VirtualBox, this Linux was still in the Beta stage, however, the steps will be the same for upcoming versions as well…
What we learn here:
- Where to Download free RedHat-based AlmaLinux ISO file?
- How to install AlmaLinux Minimal on VirtualBox virtual machine?
- Step to set AlmaLinux 8 repository for Network Install ISO
Install and Setup AlmaLinux 8 on VirtualBox VM
Of course, you don’t want to start your main server on this relatively new Linux, although it is based on the popular RedHat code. Thus, creating a virtual machine would be the best idea to start to experience it before actually using it for some commercial purpose.
1. Download AlmaLinux 8 ISO
The first thing which we need to set up this CentOS 8 Linux alternative server OS is its DVD ISO file which is available on the Offical website. However, there will be two types of three files available for AlmaLinux one is Network Install CD; the second is Minimal (without extra packages) ISO, and the third one is the full DVD ISO with GNOME GUI desktop and other packages, this one is best for offline installation. Thus, if you are planning to use AlmaLinux on Desktop for general purpose use then standard full ISO (with extra packages) will be a good option while the server users who want lightweight and selected package ISO can go for minimal or network version. Here is the link to download. Here we are downloading the Network CD ISO.
| Type | Description | Size |
| Network Install CD | Need Internet to download packages | ~ 650 MB |
| Minimal install | Comes without any extra packages | ~ 1.8 GB |
| Full DVD | With all packages and popular Desktop environments for offline installation | ~ 8 GB |
2. Minimum system requirements for AlmaLinux
- 2 GB System RAM for GUI, however minimal ISO or CLI can go for 512 MB.
- 2 GHz Processor or higher
- 20 GB free hard Disk space
- 64-bit x86 System
3. Create a Virtual Machine on VirtualBox
- Run Virtualbox on Windows, Linux, or macOS
- Click on the New Menu option to create VM
- Give some name to your machine and then select Linux as OS type.
- Set RAM for AlmaLinux, here we are using the GUI version thus use 2GB or more.
- Create Virtual hard disk storage
- Select Storage type VDI or VHD, if you are planning to use it later in VMware, then go for VMDK.
- Dynamically allocated.
- Set the storage space as per your requirement, however, 20GB will be an ideal one to start.
See the below screenshot to get an idea for the above-given steps.


4. Start Virtual Machine
The virtual machine of AlmaLinux has been created, it’s time to start it. For that, select it from the left side panel of VirtualBox and then click on the Start button.

5. Add AlmaLinux 8 ISO in VirtualBox
As we start the virtual machine, the “Select the startup disk” window will appear. Here we need to add the ISO file of this Linux, downloaded at the beginning of this article. Therefore, click on the folder icon as shown in the below screenshot.

Click on the Add icon which will in return open the file explorer, now navigate to the AlmaLinux ISO file and select the same.

Select the added file followed by the Choose button.

Finally, hit the Start button to boot the Virtual machine with AlmaLinux 8 ISO.

5. Install AlmaLinux 8
Using the arrow keys, select the first boot menu option. from here onwards, the installation process will be the same for the virtual machines and physical servers, PC or laptops.

6. Select Langauge
Being a Redhat-based system, you will see the same familiar interface. The first thing is the selection of language that you want to use during the installation process of this CentOS 8 alternative Linux.

7. Turn ON Ethernet Connection
From the Installation Summary area, select the Network and Host Name option and turn ON the toggle button.


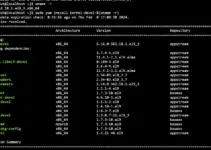
8. Set Repository for AlmaLinux 8 for Network Install CD
(Optional step) If you are using Network Install CD then we need to set the “Installation source manually“. For that go Installation Source and enter the below-given link in the repository URL box. After that hit the Done button.
https://repo.almalinux.org/almalinux/8.3/BaseOS/x86_64/os/
Note: If you are using Minimal ISO or a Full DVD of 8GB then you don’t need to change the Installation Source that is Local, because all the necessary package are already there.


9. Software Selection
To install the setup of software including graphical user interface, we have to select “Software Selection” then as per your choice opt for the packages you want to install on your Linux while setting it up.

For example, if you want a command-line AlmaLinux without GUI then simply select Minimal Install whereas for GUI one can go for options like “Server with GUI” and “Workstation“. Here we are selecting Workstation one with GNONE Graphical user interface only. You can also select other software along with it such as Office Suite and Internet Applications.

10. Installation Destination
Use this option to select the available Virtual or Physical hard drive of the system.


11. Set Root password
Make sure to set a root user password and also create another user and remember to check the option “make administrator” if you want to give it sudo rights. That’s it, now you can click on the Begin Installation button.

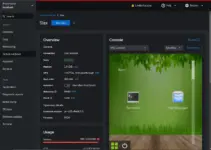
12. Login with GUI
The system will automatically show the user account, enter the password you set for it and log in to this free Redhat-based Linux distro.