Creating your media server using some open-source software like Jellyfin is surely going to help you manage and stream a collection of media across various devices. This can be useful especially when you have a closed community.
What is a Jellyfin media server?
Jellyfin media server as its name suggests is an open-source software that allows users to share their media collection with others either using a local network or the internet. Also, unlike other proprietary Media servers, Jellyfin is completely free and self-hosted, providing complete control over your media library without subscription fees or privacy concerns. So, it will be a choice to mull for those who want to set up their own home media server.
What do we need?
- To follow this tutorial and install Jellyfin, we need Ubuntu 24.04, but you can also use other versions such as Ubuntu 22.04 or 20.04.
- Apart from that, a user account with administrative access to install and configure packages.
- To download the necessary packages and updates, we also need a stable and active internet connection.
Step 1: Update Ubuntu 24.04 and install Dependencies
On your Ubuntu 24.04 server, first run the system update command to install the latest available security and other package updates.
sudo apt update && sudo apt upgradeInstall common dependencies:
sudo apt install -y ffmpeg curl apt-transport-https ca-certificates gnupg2Step 2: Add JellyFin Repository
Even though JellyFin is an open-source package but not something we need in our daily tasks, hence not available to install directly using the default Ubuntu system repository. Hence, let’s add the official repo of JellyFin by following the given commands:
Add GPG key:
curl -fsSL https://repo.jellyfin.org/ubuntu/jellyfin_team.gpg.key | sudo gpg --dearmor -o /etc/apt/trusted.gpg.d/jellyfin.gpgAdd Repository:
echo "deb [arch=$( dpkg --print-architecture )] https://repo.jellyfin.org/$( awk -F'=' '/^ID=/{ print $NF }' /etc/os-release ) $( awk -F'=' '/^VERSION_CODENAME=/{ print $NF }' /etc/os-release ) main" | sudo tee /etc/apt/sources.list.d/jellyfin.listRun the system update to refresh the APT repo cache:
sudo apt updateStep 3: Installing Jellyfin on Ubuntu 24.04
Now, we can install the Jellyfin media server using the APT package manager on Ubuntu 24.04 like any other common package. Execute the given command and you will be done with the installation process.
sudo apt install jellyfin
Step 4: Start JellyFin service and mark it enabled
Once the installation is completed, let’s start the Jellyfin Media server service on Ubuntu 24.04 and enable the same, so that it could automatically get started with system boot.
sudo systemctl enable jellyfin

sudo systemctl start jellyfin
You can also check whether everything is running properly or not by using :
sudo systemctl status jellyfin --no-pager -lStep 5: Allow media server port in the firewall
The default port used by the Jellyfin media server is 8096 and if you are using some firewall such as UFW or those who are using cloud hosting to run Ubuntu 24.04, open this port number in their cloud service firewall.
If you are using an active UFW firewall then use the given command:
sudo ufw allow 8096Step 6: Access Jellyfin media server GUI
As everything is in position, our open-source media server is up and running, thus it is time to let’s access the Jellyfin web interface using the browser. If you are using a command-line server to set it up, then use some other local machine available to access the remote server where you have installed the Jellyfin.
In the browser, type the IP address of the server where Jellyfin has been installed along with port number 8096. Whereas if you are using the Jellyfin installed server in GUI with browser access then we can use localhost or 127.0.0.1.
Example:
127.0.0.1:8096
0r
ip-address:8096
Note: Replace the IP address with your server address.
You will get the welcome screen to set up Jellyfin further.
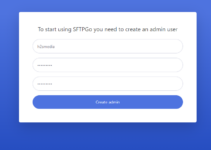
Step 7: Set Username and Password
Click on the Next button to start the Jellyfin media server setup. The next screen will appear for setting up the username and password for Admin and will have all the access to add/remove content and other settings.

Step 9: Add Library
Click on the + button, first select the category type, for media content files such as music, videos, and images, and then type the path of the folder where you have to save the media you want to play on Jellyfin. For example, I selected the Music category and then entered the path of the folder where I have saved my music files.
You can add multiple folders to your library right here or after whenever you want.

In case you want to use a smartphone and other devices to remotely connect Jellyfin using the internet then enable the “Allow remote connections to this Jellyfin Server” option. However, to access the server residing behind a local router and using a local IP address, to access it via the internet, the user has to forward its Jellyfin port manually.

Step 10: Log in to Jellyfin Server
Enter the username and password to log in, and then you will have the Interface of Jellyfin in your browser to access the music, videos, and other media files.


In case you want to add some more Library or media folders in Jellyfin, then go to Dashboard, select libraries, and then “Add Media library”.

Options to restart and shut down the server are also present under Dashboard.

Step 11. How to Update/Upgrade
As we have used the official JellyFin repository to install it, we can use the system update and upgrade command to get the latest available updates.
sudo apt update && sudo apt upgradeStep 12. Uninstall Jellyfin Media Server
Those who are not interested in this open-source media server anymore and want to completely remove it from their Ubuntu 24.04 server, can execute the given commands.
sudo autoremove install jellyfin --purgeTo remove the repository as well.
sudo rm /etc/apt/sources.list.d/jellyfin.listJellyFin Clients
This open-source media server supports multiple client applications to stream music and videos from the server. Thus, for the same, we can download Jellyfin Client as per our devices such as Firestick, Android TV, iPhone, Kodi, Roku, and more.
Other Articles: