Changing the current desktop environment or adding a new one on Ubuntu 24.04 is not a difficult task. Most popular Linux desktop environments including XFCE are available to install using the default Ubuntu 24.04 LTS system repository. So, here in this tutorial, we learn how to use the Tasksel tool to install and configure XFCE on Ubuntu Linux.
Access Terminal and run System update
Yes, we need to access the command terminal to install the packages and tools we require to install for XFCE. However, before that run the system update command given below. The shortcut to access their command terminal on Ubuntu Desktop is Ctrl+Alt+T.
sudo apt update && sudo apt upgrade -yInstall Tasksel
Ubuntu repository offers a tool called Tasksel, it is a command line utility available in Debian-based Linux, hence in Ubuntu as well. Tasksel offers group packages known as tasks, which we can install easily using its text-based package selection system. Among various packages, most of them are to install different popular desktop environments.
sudo apt install taskselInstalling XFCE on Ubuntu 24.04
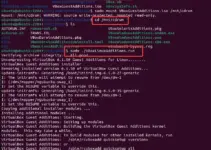
Once you have Tasksel installed, run it as shown in the given command to open a text-based package selection area.
sudo taskselNow, use the arrow keys and go to the package called XFCE, it is the desktop environment with all the necessary dependencies we want to install on Ubuntu 24.04 to get XFCE. To select it, press the “Space bar” key and then the “Tab” key to select OK, after that hit the Enter key to start the installation process.

Once the installation of XFCE is started in between the process it will ask to select the Display manager. You can select the default gdm3, however, if you want a lightweight display manager, which you might be, that’s why you are installing XFCE, therefore select “lightdm“, press Tab to move to OK, and hit Enter key.

Switch to XFCE Desktop Environment
As your Ubuntu 24.04 is done with the XFCE installation process, restart your system. For that, you can use the command – sudo reboot
After rebooting, on the login screen, click on the Username, and then before entering the password, click on the Gear icon given on the right bottom side. There select the “XFCE session” and now type the password to log in.

Use XFCE on Ubuntu 24.04 LTS
Finally, after login, you will see the XFCE interface instead default Ubuntu 24.04 GNOME. Well, the user still can switch back to the GNOME interface in the same way we have switched to XFCE in the previous step.

Uninstall XFCE
If you are planning to remove the XFCE from your Ubuntu 24.04 then first switch to the default Gnome Interface after that open the command terminal and run the given command
sudo taskselJust uncheck the XFCE from the list using the Spacebar key and then use Tab to select the OK button.
Other Articles: