Commands to install Seige Benchmarking tool on Ubuntu 20.04 LTS focal fossa for testing HTTP or HTTPS web server terminal.
Siege is a free web server stressing tool to install on Linux operating systems such as Ubuntu 20.04 using a command terminal for HTTP load testing and benchmarking. We can use it for stress testing by defining single or multiple URLs for simulated users. The result of the load test gives complete details of the number of hits recorded, bytes transferred, response time, concurrency, and return status. Siege supports HTTP/1.0 and 1.1 protocols, the GET and POST directives, cookies, transaction logging, and basic authentication.
Steps to install Siege web server benchmark on Ubuntu 20.04
The steps are given here to install Siege HTTP and HTTPS load testing and the web server benchmarking utility will also be applicable for other Ubuntu versions such as 20.04 or 18.04 including other Debian-based systems. Get the source code for this tool on GitHub.
1. Requirements
To perform this tutorial we need Ubuntu Linux along with a non-root user with sudo access. And internet connection to download and install the Siege.
2. Update Ubuntu 20.04 LTS Linux
This benchmark tool is available to install using the base repository of Ubuntu, therefore before going further let’s first run the system update command.
sudo apt update && sudo apt upgrade
3. Install Siege Benchmarking Tool
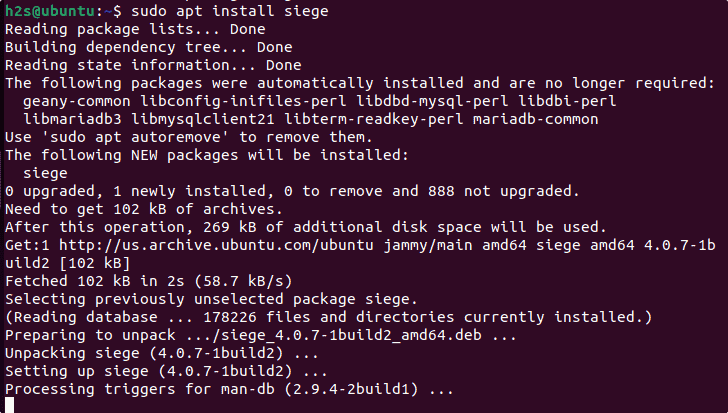
Once you are done with updating, next use the APT package manager and install the Siege Benchmarking tool on your Ubuntu 20.04 system without adding any additional repository.
sudo apt install siege
4. How to use Siege on Ubuntu 20.04
It is a command-line tool, therefore after installing it we can directly start testing our webserver using the terminal.
Here are the usage options available for its command-line tool- siege
Usage example:
siege options URL
Options:
-V,               --version VERSION, prints the version number.
-h,               --help HELP, prints this section.
-C,               --config CONFIGURATION, show the current config.
-v,               --verbose VERBOSE, prints notification to screen.
-q,               --quiet QUIET turns verbose off and suppresses output.
-g,               --get GET, pull down HTTP headers, and display the transaction. Great for application debugging.
-p,               --print PRINT, like GET only it prints the entire page.
-c,               --concurrent=NUM CONCURRENT users, default is 10
-r,               --reps=NUM REPS, number of times to run the test.
-t,               --time=NUMm TIMED testing where "m" is modifier S, M, or H
ex:               --time=1H, one hour test.
-d,               --delay=NUM Time DELAY, random delay before each request
-b,               --benchmark BENCHMARK: no delays between requests.
-i,               --internet INTERNET user simulation, hits URLs randomly.
-f,               --file=FILE FILE, select a specific URLS FILE.
-R,               --rc=FILE RC, specify an siegerc file
-l,               --log [=FILE] LOG to FILE. If FILE is not specified, the default is used: /var/log/siege.log
-m,               --mark="text" MARK, mark the log file with a string. between .001 and NUM. (NOT COUNTED IN STATS)
-H,               --header="text" Add a header to request (can be many)
-A,               --user-agent="text" Sets User-Agent in request
-T,               --content-type="text" Sets Content-Type in request
-j,               --json-output JSON OUTPUT, print final stats to stdout as JSON
--no-parser       NO PARSER, turn off the HTML page parser
--no-follow       NO FOLLOW, do not follow HTTP redirects
5. Enable Log file
We can set Siege as per our needs with the help of its configuration file. For that just edit the same:
sudo nano /etc/siege/siegerc
Remove # from the line “logfile = $(HOME)/var/log/siege.log” to enable the logs.
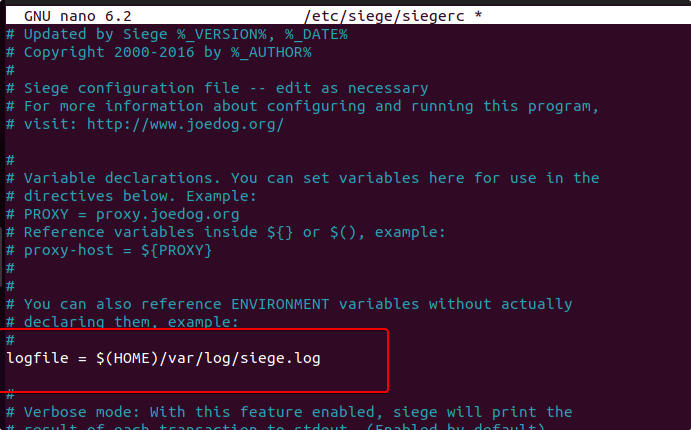
Save the file by pressing Ctrl+O, then Y, and exit- Ctrtl+X.
6. Perform Web server load testing
Now, we can start stressing the webserver by declaring the website’s URL running on it. For that, the Siege syntax is :
siege https://www.your-url.com -t 1m
-t option refers to the time that is 1m (minute). It meant start stressing the mentioned URL for 1 minute only. In this mentioned time this benchmark tool will stimulate a load of default 25 users simultaneously.
Here is an example:
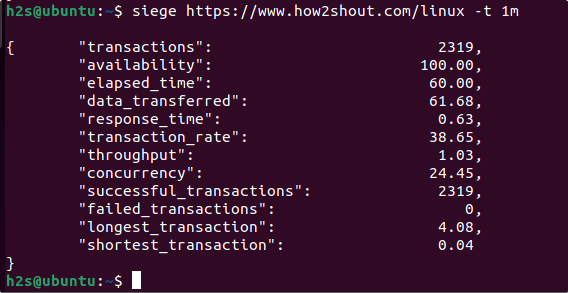
The above example will put the load of 25 users only (set by default), if you want to increase the load of users, then that can be done by mentioning it in the command.
siege https://www.your-url.com -c 100 -t 3m
-c is an option that means “concurrent users” whereas 100 is the number of users you want to use to load the system. While -t 3 is the time.
7. How to test multiple URLs simultaneously
If you have multiple websites and you want to test them all at once, without mentioning them individually one by one, then we can create a file with all our URLs.
sudo nano /etc/siege/test.txt
Add all the URLs you want to test, for example:
http://192.168.1.10
https://google.com
https://facebook
Save the file by pressing Ctrl+O, hitting the Y key, and then exit the same using Ctrl+X.
After that, execute the Siege command with the -f option meaning “file” along with a path for the same.
siege -f /etc/siege/test.txt
In this way, we can install and use the Siege benchmarking tool for web server load testing using the command terminal on Ubuntu Linux.
Other Articles:
• How to install Basemark GPU Benchmark on Ubuntu 20.04 Linux
• Install Windows 11 on Ubuntu 20.04 using VirtualBox
• 3 Ways to install Blender 3D on Ubuntu 22.04
• Install Parse Server & dashboard on Ubuntu 20.04…


