If you want to get started with the latest version of Python3.x on Ubuntu 20.04 LTS, then here is the tutorial along with the installation of PIP3 and its usage to install various Pythons Packages.
If you have just started taking interest in coding and software development then you would already know Python. It is an open-source and free-to-use programming language that has been used to develop hundreds of software projects. Python is a platform-independent language thus can run on all mainstream operating systems such as Windows, Linux / Unix, Mac OS X, Solaris more…
Python has been very popular among developers because of its powerful range of functions and libraries with only a few keywords and the reduced grammatical syntax and the resulting clarity. With Python, you can not only write your own programs but also can integrate scripting language in other applications furthermore building AI models is another usage of Python.
What we learn:
- Installation of Python3’s latest version on Ubuntu 20.04.
- How to install PIP3 on Linux
- How to manage multiple Python versions installation.
- Change the Default Python version
What do we need to perform in this tutorial?
- A non-root user with
sudorights - Ubuntu 20.04 LTS server or desktop system
- The internet connection to download the packages.
Step to install Python3 on Ubuntu 20.04 LTS
Run system update command
Open the command terminal, for GUI Desktop use Applications or the keyboard shortcut CTRL+ALT+T on Ubuntu. And run the system update command, so that our existing repos and packages can be updated.
sudo apt update
Download and install Python3
The good thing is to install python on Ubuntu, we don’t need to add any third-party repository. The programming language is available by default on the official repo. Thus, what we have to do is the running of the command with the version you want to download and install on Ubuntu 20.04 LTS focal fossa.
For Python 3.x:
The latest version in our case for Python was python 3.8.6.
sudo apt install python3
For Python 2.x:
In case also want the older version, then use this command; it will download python2.7 for you.
sudo apt install python
Check installed Python version
If we go through the tutorial then you would have two different Python on the same system. Thus, the command to call the interpreter will also be different.
To check the version of Python 3.x, the command will be:
python3 --version
And for Python2.x
python2 --version
And for default:
python --version
Change the Default Python version on Ubuntu Linux
By default, the command python will be associated with version 2.x and will only call that whereas python3 for version3.x. Therefore, if you are fine with that then skip this step. However, those who want to use python3 with python command instead of using its version repeatedly, then use the below procedure.
First, check the default version:
python --version
The output will be version will be 2.7.x
Python 2.7.18rc1
Now, see all the installed versions of Python on your system:
ls /usr/bin/python*
In our case, the output was:
/usr/bin/python /usr/bin/python2 /usr/bin/python 2.7 /usr/bin/python3 /usr/bin/python3.8
So, you can see the two versions that are available to the user- 2.7 and 3.8. In the same way, you would have on your command terminal.
Now, we set one of them as the default Python version for Ubuntu’s current user. Well, by default, it was 2.7, thus we are changing it to 3.8 here.
nano ~/.bash_profile
Add the following line. You can change the version, with some other available one, if you want.
alias python='/usr/bin/python3.8'
In the same, replace 3.8 in the above command with the one, want to use by default for your current user.
Now, log out and log in again or simply source the bash file:
source ~/.bash_profile
Finally, check the default version:
python --version
This time it will be 3.8 or whatever you have set.
Install PIP3 on Ubuntu 20.04 LTS
Well, in most cases after install python you will get the PIP that is the packages installer for Python. Thus, in case you don’t have then get the PIP for Pthong on Ubuntu manually:
sudo apt install python3-pip
Just the Python, pip3 is not the default version that we can use with only the pip command. Thus, we can also change that by simply using
alias pip=pip3
Therefore, to call the other pip version you need to given the version along with it. However, after using the above command the default pip will work for the pip3 version.
For upgrading pip:
In the future to upgrade the pip, use the command:
pip install -U pip
How to install Python packages using PIP
syntax: pip install packages-name
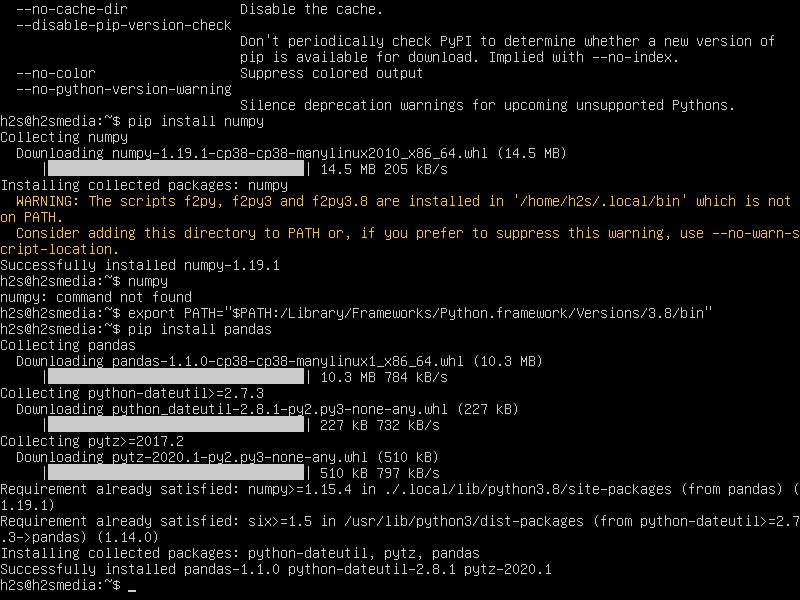
Now, let’s use the pip to install some Python-based libraries such as Numpy
pip install numpy
In case you get a warning:
WARNING: The scripts f2py, f2py3 and f2py3.8 are install in ‘/home/user/.local/bin’ which is not on PATH.
Consider adding this directory to PATH or, if you prefer to suppress this warning, use –no-warn-script-location.
This appears because the PIP installed location is not available in the PATH thus add it:
export PATH="$PATH:/Library/Frameworks/Python.framework/Versions/3.8/bin"
So, this was a quick tutorial on the Python 3.x and Pip3 installation on Ubuntu 20.04 LTS…


Excellent thanks.
There’s a small error – if I am not mistaken, this command –
alias python=’usr/bin/python3.8′
is missing a leading forward slash, i.e.
alias python=’/usr/bin/python3.8′