Tutorials to learn the steps for installing OwnCloud on Ubuntu 22.04 LTS Jammy JellyFish for setting up your own storage cloud server.
Cloud storage services such as Microsoft OneDrive, Dropbox, and Google Drive are convenient for accessing files and information on the go, as well as enabling data sharing with others, improving productivity. However, your files are stored on servers of third parties, which prevents all-encompassing control. A version of the private cloud such as ownCloud provides a remedy.
With ownCloud, you can set up your cloud storage, which allows access to files on the go via browser or WebDAV. As an alternative to the web browser, ownCloud offers desktop clients for Microsoft Windows, macOS, and Linux distributions such as Ubuntu and Red Hat Enterprise Linux. Apps are also available for mobile devices with iOS or Android.
For security, ownCloud can encrypt the files after uploading, so that they can only be viewed or edited with the help of your password so that no one else can access the information. The password obligation can be imposed on the user by the administrator, whereby an expiration date can be prescribed for links. SSL is provided for an encrypted connection, for which you have to generate the necessary certificates yourself, which must be installed later in the browser, which is no problem with Firefox, for example.
The cloud software also increases security with the help of the ClamAV virus scanner, which checks uploaded files for viruses and blocks infected ones so that ownCloud does not become a virus slingshot. If a file has been accidentally deleted, this is not a bad thing, because ownCloud can recover deleted files.
For ownCloud to always be accessible in the corporate environment for optimal productivity, a fixed IP address is required. For private users, however, this is not mandatory. However, they should use a dynamic DNS service that ensures that you can find your own cloud with a changing IP address. This is because changing IP addresses are common for private Internet connections, whereby the Internet provider automatically disconnects the connection to the Internet after a maximum connection time and re-establishes it with a new IP address.
For ownCloud, an Apache web server is required on which MySQL, PostgreSQL, or SQLite, as well as PHP, are running. Alternatively, XAMPP can be used for a local test of ownCloud, which represents a complete web server and includes all the necessary components. However, XAMPP must not be publicly accessible via the Internet, as the web server version was only built for testing on the local network.
Steps to install OwnCloud on Ubuntu 22.04 LTS
The given steps to install OwnCloud are not limited to Ubuntu 22.04, we can use them for other versions of it such as 20.04/18.04 including Debian.
1. Update Ubuntu 22.04
First, update your system to its latest state by running the below-given command:
sudo apt update && sudo apt upgrade
2. Install Apache
We need an Apache web server, PHP, and MySQL stack on our system to install OwnCloud on Ubuntu 22.04 server.
sudo apt install apache2
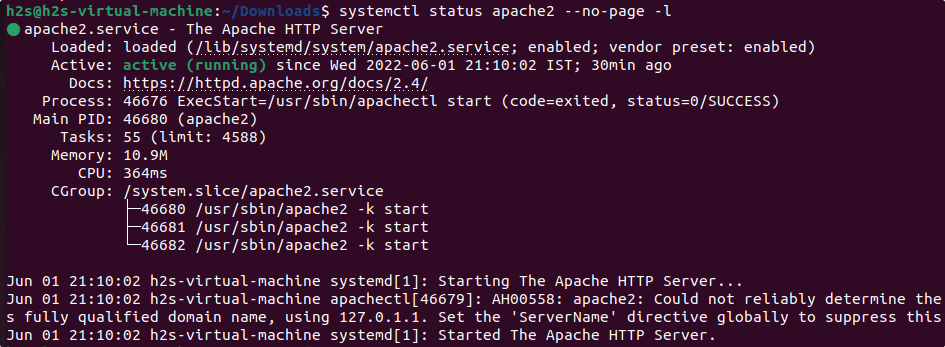
To make sure the webserver service is enabled in the background.
sudo systemctl enable --now apache2
To check status:
systemctl status apache2 --no-page -l
3. Install PHP and required extensions
The PHP version available to install using the default standard repository of Ubuntu 22.04 is 8.x, however, while doing this article OwnCloud doesn’t support PHP 8.0, hence here we are installing PHP7.4 using Ondrej PPA repo.
To have the required version of PHP, add the Ondrej repository:
sudo add-apt-repository ppa:ondrej/php
Run system update command:
sudo apt update
Install required extensions:
sudo apt install php7.4 php7.4-{opcache,gd,curl,mysqlnd,intl,json,ldap,mbstring,mysqlnd,xml,zip}
4. Secure MySQL installation
Next, secure your MySQL database server by creating a new root password and removing the demo database, users, and limited remote access.
Login to MySQL
sudo mysql
Change the root user password for MySQL to whatever you want, however, don’t forget to replace Mypassword@123 in the given command with the password you want to set.
ALTER USER 'root'@'localhost' IDENTIFIED WITH mysql_native_password by 'MyPassword@123';
exit;
Run command to secure MySQL installation:
sudo mysql_secure_installation
The script will ask these questions.
Enter the password for user root: type your set password and then press ENTER.
Change the password for root? Press N, then ENTER.
Remove anonymous users? Press Y, then ENTER.
Disallow root login remotely? Press Y, then ENTER.
Remove test database and access to it? Press Y, then ENTER.
Reload privilege tables now? Press Y, then ENTER.
5. Create Database for OwnCloud
To store the data generated by the OwnCloud, we need a Database server, here we are using MySQL. So, let’s create a Database for OwnCloud using the given commands:
Login to MySQL DB server
sudo mysql -u root -p
Note: Use the password to log in that you have created while securing MySQL.
Follow the command to create a new DB. However, don’t forget to replace new_user with whatever name you want to give to your Database user and in the same way- new_db with a name for Database and your_password for the password.
CREATE DATABASE new_db;
CREATE USER 'new_user'@'localhost' IDENTIFIED BY 'your_password';
GRANT ALL PRIVILEGES ON new_db.* TO 'new_user'@'localhost';
FLUSH PRIVILEGES;
Exit;
6. Download ownCloud on Ubuntu 22.04 LTS
Although OwnCloud is open-source software, not available to install using the default package manager. Therefore, we need to download the latest version of the ownCloud file manually. Go to your terminal and run the given commands.
cd /tmp
wget https://download.owncloud.com/server/stable/owncloud-complete-latest.tar.bz2
Now extract the downloaded file:
tar -xvf owncloud-complete-latest.tar.bz2
Move the extracted folder to the web root directory.
sudo mv owncloud /var/www/html/
Change the ownership of the ownCloud directory:
sudo chown -R www-data: /var/www/html/owncloud
7. Configure ownCloud Apache configuration
To serve Owncloud files efficiently, let’s configured the virtual host configuration file on the Apache web server for it.
sudo nano /etc/apache2/sites-available/owncloud.conf
Copy-paste the following lines:
<VirtualHost \*:80>

ServerAdmin [email protected]
DocumentRoot /var/www/html/owncloud
ServerName example.com

<Directory /var/www/html/owncloud>
Options FollowSymlinks
AllowOverride All
Require all granted
</Directory>

ErrorLog ${APACHE_LOG_DIR}/example.com_error.log
CustomLog ${APACHE_LOG_DIR}/your-domain.com_access.log combined

</VirtualHost>
Save the file using Ctlr+O, hit the Enter key, and then exit the text editor using Ctlr+X.
8. Install OwnCloud on Ubuntu 22.04
Finally, after following all the above-given steps, open your system’s browser and point it to the server IP address or domain address where you have installed the OwnCloud.
Example:
http://server-ip/owncloud
or
http://domain.com/owncloud
9. Create an Admin account
The first thing we have to do as we get the web interface of Owncloud is to create an Admin account.
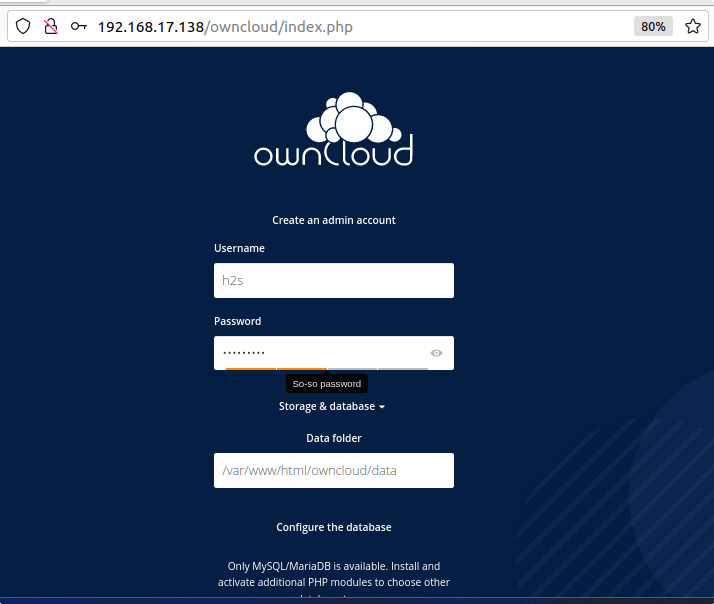
After that, scroll down and add the details of the Database you have created for OwnCloud and click on the “Finish Setup“.
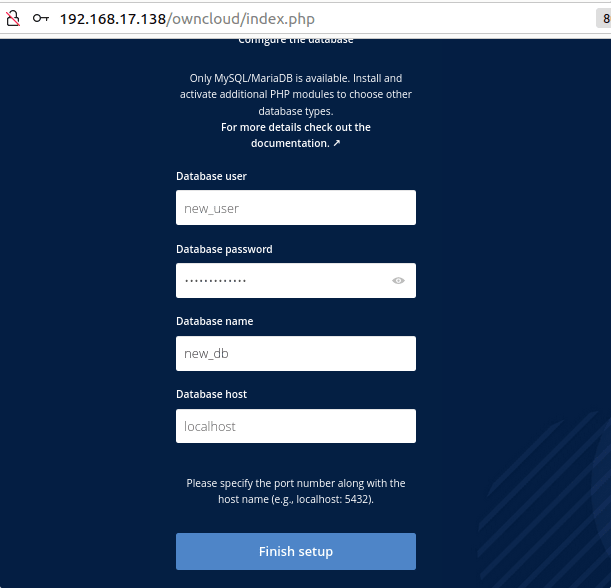
Wait for a few seconds and you will have the Login interface. Use the Admin account details you have created to get the Dashboard.

10. OwnCloud Dashboard
Using the Dashboard of Owncloud, we can upload the files and share them with others if we want.
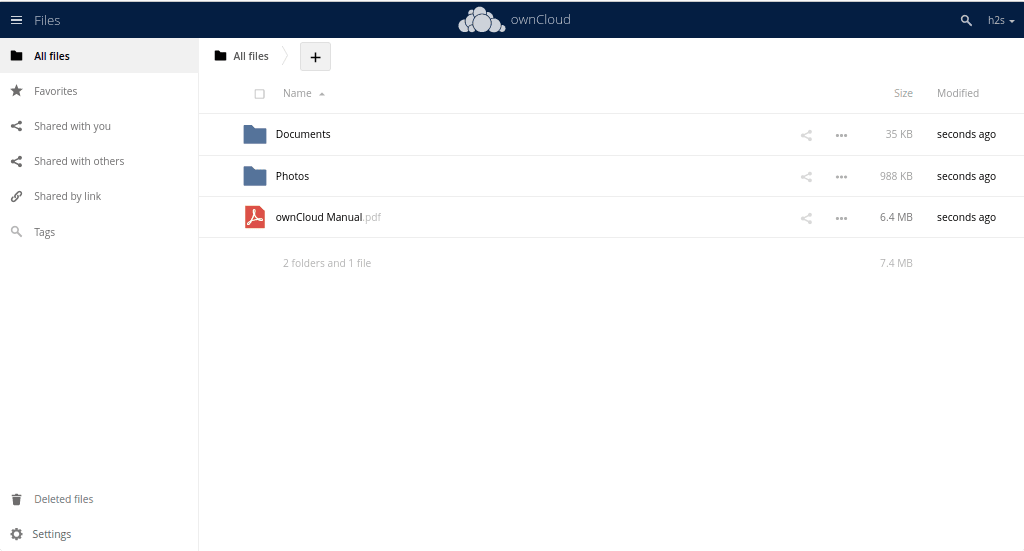
After installing the OwnCloud on Ubuntu 22.04, refer to the official guide to know how to increase the security of your personal cloud to secure your data from falling in the wrong hands…
Other Articles:
How to Install phpMyAdmin with Apache on Ubuntu 22.04 LTS
Install MediaWiki on Ubuntu 22.04 LTS Jammy
How to use Google Two-Factor Authentication with Ubuntu 22.04
Install VMware Workstation Player on Ubuntu 22.04…




I just upgraded ubuntu on my laptop to 22.04.1 lts, and it broke the owncloud client. Do you have a recommendation on how to fix the owncloud client on this platform? It worked fine prior to the upgrade. Note I run the server on another system (a server actually).
First, remove the client completely and install it again…
how to find ip addresss or domain address ?
in your terminal type – ip a