Learn the steps and commands to install Microsoft SQL Server on Ubuntu 20.04 LTS Focal fossa using the command terminal.
Microsoft SQL Server is software from Microsoft and unlike MySQL, this one is a propriety and closed-source Database server platform. It has been used by many big enterprises for corporate applications that require relational database management systems based on SQL.
We can use it for business intelligence and business-critical applications. This includes MSSQL server services such as reporting services, analysis services, integration services, or SQL Server Data Tools (SSDT). It also supports OLE DB and ODBC for Open Database Connectivity. Using powerful MS SQL, a particularly scalable hybrid database platform can be implemented with the database management system on servers in a data center, in a private cloud, or in a public cloud such as Microsoft Azure.
Key benefits of Microsoft SQL Server are:
• High performance, availability, and good scalability
• Can be used on on-premises servers and in the cloud
• Suitable for big data and business intelligence applications
• Support of in-memory functions
• Advanced security features,
• Support of the statistical language R.
• Can be used in Windows, Linux, and container environments.
Steps to install Microsoft SQL Server on Ubuntu 20.04 LTS
The commands given here to set up MS SQL will be the same for other Linux operating systems based on Ubuntu 20.04 LTS such as POP OS, Linux Mint, elementary OS, and more…
1. Add Microsoft SQL Server repository
Being a proprietary application, the MSSQL database server is not available to install using the Ubuntu 20.04 LTS system repository. Therefore, we need to add the official repository of it meant for Ubuntu Focal. While performing this tutorial the latest version of this database was SQL 2022.
sudo apt install wget curl
As per the version of the SQL server you want to add one of the given repositories:
For Microsoft SQL server 2019 version
sudo add-apt-repository "$(wget -qO- https://packages.microsoft.com/config/ubuntu/20.04/mssql-server-2019.list)"
For Microsoft SQL server 2022 version
sudo add-apt-repository "$(wget -qO- https://packages.microsoft.com/config/ubuntu/20.04/mssql-server-2022.list)"
2. Add public GPG Key
Once you have added the repository, the next step is to add the GPG key that has been used by the developers of the MS SQL server to sign its packages. Our system requires a GPG key to ensure it gets the packages from the added repository as they were published by its developers.
wget -qO- https://packages.microsoft.com/keys/microsoft.asc | sudo tee /etc/apt/trusted.gpg.d/microsoft.asc
3. Update your Ubuntu 20.04
Well, it is necessary to execute the update command once you have added both GPG and the repository of the Microsoft SQL Server. It is because we need to rebuild the APT package manager cache to make sure it could recognize the latest packages available through the added repository.
sudo apt update
4. Install SQL Server 2019 on Ubuntu 20.04
Finally, use the APT package to install the MSSQL as we do for any other software on Ubuntu.
sudo apt-get install mssql-server
5. Configure the MSSQL server
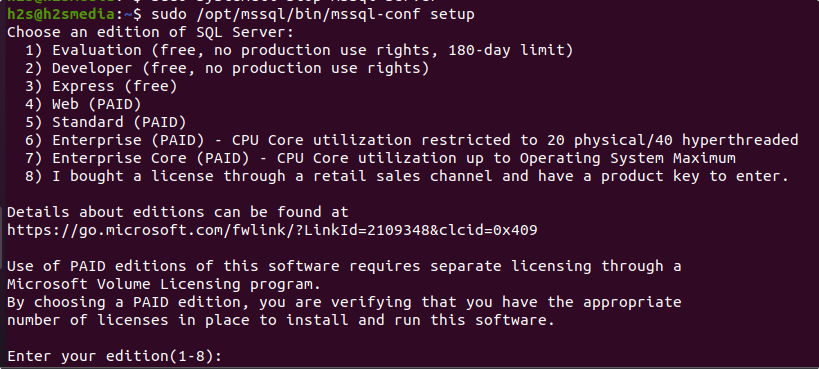
As you are done with the installation, start configuring your SQL server by running the given command. This will ask you which edition of Microsoft SQL Server you want to install along with a prompt to set the SA (SQL system administrator) password.
sudo /opt/mssql/bin/mssql-conf setup
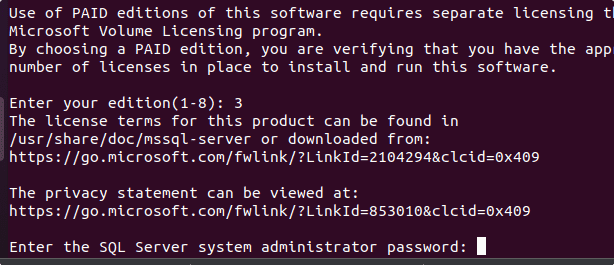
If you are looking for a free version then either go for Evaluation, Developers, or Express. Just type the serial number of the edition that you want to install and then hit the Enter key.

After selecting the Edition, the installation wizard will ask you to set the SA user password.

To check the status of SQL service, whether it is working without any error or not.
systemctl status mssql-server --no-pager
Once the installation is completed, you can connect software such as SQL Server Management Studio to connect it remotely or locally for managing it using the GUI interface. However, for that, you have to open the default TCP port 1433 used by the SQL in your firewall.
sudo ufw allow 1433
———————————–For using the SQL Server using the command line————————————
6. Install SQL Server command-line tools
To create a database using the command line we need a tool that can run Transact-SQL statements on the SQL Server. Therefore for that install tools – sqlcmd and bcp.
However, to get the command tools for the MSSQL server we have to add a Microsoft production repository for Linux.
curl https://packages.microsoft.com/config/ubuntu/20.04/prod.list | sudo tee /etc/apt/sources.list.d/msprod.list
Run system update
sudo apt update
Install MSSQL command tools
sudo apt-get install mssql-tools unixodbc-dev
After completing the installation, use the given command to add the tool folder to your system path, so that we can use it from anywhere in the terminal, regardless of the directory in which we currently are.
echo 'export PATH="$PATH:/opt/mssql-tools/bin"' >> ~/.bash_profile
source ~/.bashrc
7. Create a Database
Well, once the MSSQL tools are on your system, we can create an SQL database using the command terminal of Ubuntu. For that first log in to the SQL command shell by using the SA account and password.
sqlcmd -S localhost -U SA -P 'YourPassword'
Note: Replace YourPassword with the actual password you have set while configuring the MSSQL.
Now, create your DB, using the given command:
CREATE DATABASE myfistdb
To execute the above command, use:
GO
For creating table
Select the DB first:
USE myfistdb
Now, let’s create a table with a name – firstable
CREATE TABLE firstable (id INT, name NVARCHAR(50), quantity INT)
To Insert data into the new table:
INSERT INTO firstable VALUES (1, 'mango', 150); INSERT INTO firstable VALUES (2, 'carrot', 154);
For executing the above commands, again use:
GO
Whereas to exit the SQLCMD command-line shell, use:
QUIT
This was a quick tutorial to install and use Microsoft SQL Server on Ubuntu 20.04 LTS Linux. To know how to use this database further, see the official tutorial provided by Microsoft.
Other Articles:
• 3 Ways to Install Beekeeper Studio on Ubuntu 22.04 | 20.04 LTS
• Command to install Vmware tools on Ubuntu using terminal
• How to install Umbraco CMS on Ubuntu 20.04 LTS
• Install FreeTube – YouTube player app on Ubuntu


Setp 1: sudo apt install wget curl
instal should be replaced with install
this is what i get when try to install on ubuntu server 22.04:
sudo apt-get install -y mssql-server
Reading package lists… Done
Building dependency tree… Done
Reading state information… Done
Some packages could not be installed. This may mean that you have
requested an impossible situation or if you are using the unstable
distribution that some required packages have not yet been created
or been moved out of Incoming.
The following information may help to resolve the situation:
The following packages have unmet dependencies:
mssql-server : Depends: libldap-2.4-2 but it is not installable
E: Unable to correct problems, you have held broken packages.
Because MySQL-server is not available for Ubuntu 22.04, and when we install it using Ubuntu 20.04 repository then this error occurs. However, you can solve this by manually installing the libldap-2.4-2.
Here are the commands to follow:
wget http://ftp.us.debian.org/debian/pool/main/o/openldap/libldap-2.4-2_2.4.47+dfsg-3+deb10u7_amd64.debsudo dpkg -i libldap-2.4-2_2.4.47+dfsg-3+deb10u7_amd64.debsudo apt-get install mssql-server