ESLint, whether on Ubuntu 24.04. 22.04, or any other supported system, analyzes JavaScript (or other ECMAScript/JavaScript-based languages) code. It is an open-source linting tool that developers use to find and fix coding problems based on defined rules. Thus, with the help of this tool, developers can maintain the quality of their code by consistently finding potential issues such as syntax errors, coding standards violations, and more.
ESLint can also be configured for frameworks like TypeScript, React, Vue.js, and libraries. We can integrate ESLint with code editors like Visual Studio Code and Sublime Text.
Key Features of ESLint:
- Customizable Rules
- Pluggable and Extensible
- Supports Modern JavaScript
- Automatic errors fixing
- Integration with Code Editors
- Command-Line Interface
Step 1: Install Node.js and npm
ESLint requires NPM (Node Package Manager) and Node.js to work. Therefore, first, we must install Node on our Ubuntu 24.04 system. While writing this article, ESLint supports Node 18.x LTS and Node 20.x LTS. So, to install either of them, we will use NVM, which we can use to install any active Node version, whether it is LTS or current.
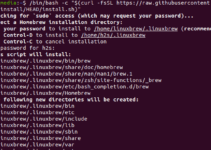
#install nvm (Node Version Manager)
curl -o- https://raw.githubusercontent.com/nvm-sh/nvm/master/install.sh | bash sudo apt updateReload the shell session to make the NVM available for your current session:
source ~/.bashrcInstall Node.js and npm:
Now, we can use the NVM to install the latest Nodejs long-term supported version and NPM.
nvm install 20
Step 2: Verify the installation:
Once you have installed Nodejs, check its version to confirm it is on your system and can be used further for ESLint.
node -v
npm -v
Step 3: Installing ESLint on Ubuntu 24.04 LTS
With the previous step, we have confirmed that NPM is on our system. Now, let’s use it to install ESLint and its required dependencies. The given command will install Eslint globally, making it accessible from any directory on your system.
npm install -g eslintStep 4: Verify the ESLint installation
After installation, you can verify that ESLint is installed correctly by checking its version:
eslint -vStep 5: Initialize ESLint in Your Project
In this step, we will initialize ESLint for our project. First, switch to your project directory.
Navigate to your project directory:
cd /path/to/your/projectInitialize ESLint:
We need to initialize it within a specific project’s directory. This step creates a configuration file that defines linting rules.
Note: if you are creating a new project, then first run – npm init
Run the following command to initialize ESLint:
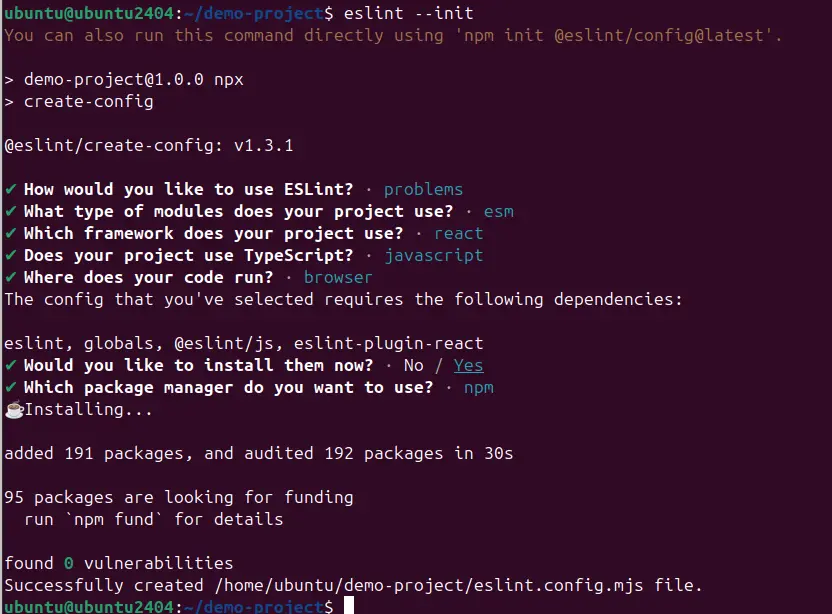
eslint --init
or
npm init @eslint/config@latest
The initialization will ask a few questions about configuring ESLint for your project. You’ll be asked about your project’s coding style, framework type, and other preferences. Answer the questions according to your project requirements.
After completing the setup, ESLint will create a .eslintrc file in your project directory. This file contains your ESLint configuration settings.
Step 6: Run ESLint
Once the ESLint is installed and configured, you can run it to lint your project’s files.
Run ESLint on a specific file:
eslint yourfile.jsTo run ESlint for the entire project, use the given command to lint all JavaScript files in the current directory and subdirectories.
eslint .Fix issues automatically: ESLint can automatically fix some problems. To do this, use the –fix option:
eslint --fix yourfile.jsOne can refer to its official documentation for more detailed information about ESLint commands.
Other Articles:- How to Download and Install Forticlient VPN for Ubuntu 24.04 Linux
- Get Microsoft Edge browser on Ubuntu 24.04 Linux via the command
- 4 Extensions to Change Top Bar in Ubuntu 24.04
- How to Change Root Password in Ubuntu 24.04
- How to Install Kubuntu or KDE Plasma on Ubuntu 24.04 Server