SELinux stands for Security-Enhanced integrated into RHEL and its based operating system such as CentOS, AlmaLinux, and Rocky Linux 8 Linux out of the box. It is an extra layer of security or extension of the Linux kernel, which is available in the form of a separate security module. SELinux has been an official part of the Linux kernel since 2003.
Some Linux distributions offer SELinux as standard and have it enabled by default, however, the user can turn it off if he or she wishes to. SELinux restricts the access rights of programs or processes that are not considered necessary. Thus, all the processes arbitrarily will not be able to get access to the system and it makes sense to restrict access rights even if you actually trust the programs. It greatly reduces the risk posed by security gaps in user programs, if the application is hacked by a third party or infected by malware SELinux limits access and thus also the damage radius. However, we don’t need it every time, many times SELinux defers users to install some applications, in such scenarios the user can disable SELinux either temporarily or permanently.
What do we learn here?
- Disable permanently or temporary SElinux in AlmaLinux and Rocky
- Command to check the status of SELinux
- What is SELinux permissive mode
Command to check the status of SELinux
Before moving further to disable SELinux, let’s first check what is the current status of SELinux on our AlmaLinuc 8 or Rocky. So, that we could know what we have to do.
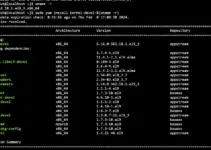
sestatus
The output will be: If it is showing Enabled and Current mode- enforcing means SELinux is active and applicable to limit the system programs’ process.

Actually, there are three modes available for SELinux, one is “Enforcing” which you can see in the above screenshot showing all the policy rules actively enforced for the installed programs. The second is “Permissive”, this mode of SELinux allows to run and process everything without limiting anything, however, it will log the system events; where the third mode is “Disabled” in which SElinux neither logs anything nor restrict any process by applying policy rules.
Disable SELinux Temporarily or enable Permissive mode
If you are planning to install some application that needs to disable SELinux temporarily by putting it in Permissive mode; then here is the command that you can use to achieve the same:
sudo setenforce 0

or

sudo setenforce Permissive
To ensure that SELinux has been successfully switched to Permissive mode, you can run again the status command to check it:
sestatus
Output:

Well, as I said Permissive mode is temporary, thus as you restart your AlmaLinux system, the SELinux will return back to enforcing mode. If you want to disable it completely, then see the next commands…
Permanently Disable SELinux on AlmaLinux or Rocky 8
So far we have learned how to check the status and enable the permissive mode of SELinux, now let’s see the process to put it in and enable its third mode that is “Disabled”. For that, we need to edit the config file of SELinux.
On your Command terminal use below two commands:
sudo dnf install nano

sudo nano /etc/sysconfig/selinux
You will see the text shown in the following screenshot.

Here move your cursor to SELINUX=enforcing and change it to:
SELINUX=disbaled

Save the file by pressing Ctrl+X, type Y, and then hit the Enter key.
Reboot
To apply the changes and to put our SELinux in Disabled mode permanently, reboot your Linux server or Desktop.
sudo reboot
Ending thoughts:
So, this was the quick way to deal with SELinux and put it in either permissive or permanent disabled mode on AlmaLinux or Rocky Linux, whatever you are using.