Managing MySQL or MariaDB using a web-based GUI application – PhpMyAdmin is a lot easier than using the command line. Hence, if you want to install PhpMyAdmin on Rocky Linux 8 then here is a tutorial to help you with that.
phpMyAdmin is free to use PHP-based application distributed under open source licenses and one of the popular tools on various web hosting to manage MySQL databases. It allows the users to perform create, delete, export, import, creating PDF graphics of the database layout and more database-related tasks but with GUI and with a few clicks of the mouse.
phpMyAdmin installation on Rocky Linux 8 with Apache
Here we install phpMyAdmin using the popular web server platform Apache and of course, PHP & MySQL database will be there as well. This tutorial can be used for AlamLinux, CentOS, and HEL 8 versions as well.
1. Install Apache, PHP, and MySQL
PhpMyAdmin requires an Apache web server so that we can access it using the browser. As it is written using PHP hence that must be there on the server including MySQL Database.
If you have these three things then move forward otherwise see our tutorial- how to set up a LAMP server on Rocky Linux 8 and then come back here.
2. Download phpMyAdmin files
The file we require to install and set up this GUI MySQL Database management is neither available in the base repo of Rocky Linux and nor in EPEL. Hence, we have to download it manually from its website. Visit the download page, right-click on the latest version and copy the link.
Note: The latest version while performing this tutorial was 5.1.1 and may be different in your case.

After that type wget in your command terminal of Rocky Linux and paste the link after it, as shown in the below example:
wget https://files.phpmyadmin.net/phpMyAdmin/5.1.1/phpMyAdmin-5.1.1-all-languages.zip
3. Extract the zip and configure phpMyAdmin on Rocky Linux 8
Now, we have the zipped file of the phpMyAdmin, it’s time to extract and perform the necessary changes to make it work.
1. Install unzip
sudo dnf install unzip
2. Extract file
unzip phpMyAdmin-*-all-languages.zip
sudo mv phpMyAdmin-*-all-languages /usr/share/phpmyadmin
4. Create config.inc.php
The sample configuration file for phpMyAdmin is already there, we just need to rename it:
Switch to the directory where we have moved the extracted file in the previous step
cd /var/www/phpmyadmin
Rename the sample configuration file:
sudo mv config.sample.inc.php config.inc.php
5. Generate 32-bit Secret string
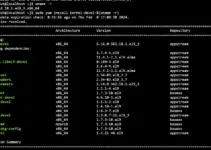
Enter the below-given command and you get a long string of 32 numbers.
openssl rand -base64 32
Copy the string and move to the next step.
![]()
6. Edit Configuration file
Now edit the configuration file that you have renamed:
sudo dnf install nano -y
sudo nano config.inc.php
7. Set the blowfish_secret string and temp directory for phpMyAdmin
In the configuration go to the following line:
$cfg['blowfish_secret'] = '';
Now, add your copied string between the colons as shown in the screenshot:
$cfg['blowfish_secret'] = 'yourgeneratedstring';

Next, scroll down to the “* Directories for saving/loading files from server” area in the same configuration file and add the following line:
$cfg['TempDir'] = '/tmp';
Save the file by press Ctrl+X and then type- Y, after that hit the Enter key.
Note: if you not declard the above temp direcotry in the file you will have an error- The $cfg[‘TempDir’] (/usr/share/phpmyadmin/tmp/) is not accessible

8. Create a Temporary directory and assign its permission
This Temp folder which we have created and also declared in the configuration file above is used to store cache files, which helps PHPMyAdmin to perform better.
sudo mkdir /usr/share/phpmyadmin/tmp
sudo chown -R apache:apache /usr/share/phpmyadmin
sudo chmod 777 /usr/share/phpmyadmin/tmp
4. Create Apache configuration file for phpMyAdmin
We need to tell our Apache to find out where is the location of phpMyAdmin files and how to serve them over the browser when someone calls for it. For this purpose, we create a dedicated Apache configuration file.
sudo nano /etc/httpd/conf.d/phpmyadmin.conf
Copy-paste the below-given code in it:
Alias /phpmyadmin /usr/share/phpmyadmin

<Directory /usr/share/phpmyadmin/>
   AddDefaultCharset UTF-8
   <IfModule mod_authz_core.c>
     # Apache 2.4
     <RequireAny>
      Require all granted
     </RequireAny>
   </IfModule>
</Directory>

<Directory /usr/share/phpmyadmin/setup/>
   <IfModule mod_authz_core.c>
# Apache 2.4
     <RequireAny>
       Require all granted
     </RequireAny>
   </IfModule>
</Directory>
And Save the file by pressing Ctrl+X, to confirm press Y and hit the Enter key.
5. Set proper permission for SELinux policies (optional)
If your system has an enabled SELinux, then run the below command to set the appropriate permission for SELinux policies, so that we can access this GUI app without any limitation.
sudo chcon -Rv --type=httpd_sys_content_t /usr/share/phpmyadmin/*
6. Restart Apache on Rocky Linux 8
To let the Apache webserver recognize the made changes restart its services once.
sudo systemctl restart httpd.service
7. Access phpMyAdmin Web interface
Now, open a system’s browser that can access the Server Ip-address or domain where you have installed phpMyAdmin.
And point it to :
http://your-server-ip-address/phpmyadmin
or
http://your-domain.com/phpmyadmin
Enter the username and password of your MySQL root user to access all the databases.


8. Create phpMyAdmin default Storage database
If you have not manually created a dedicated database for phpMyadmin then as you log in, the same will be asked by the software to create.
At the bottom, you will see a message “ThephpPMyAdmin configuration storage is not completely configured, some extended features have been deactivated.” Click on the “Find out why link.”

Now, another page will open, click on the “Create” link to generate a database name ‘phpymyadmin‘ to complete the configuration storage setup.

That’s it, you have successfully removed the warning and have set up all the required things to manage your MySQL database graphically.

Ending Notes:
In this way, we can install the phpMyAdmin on LAMP running Rocky Linux 8 Server to access MYSQL or MariaDB database using the web-based graphical user interface.
Other Articles:
- How to access remote MySQL database in local phpMyAdmin
- Install PhpMyAdmin on Docker to manage MariaDB or MySQL
- How to install MariaDB 10 on AlmaLinux 8 or Rocky Linux