TensorFlow is a powerful open-source library for machine learning and deep learning developed by Google. Researchers and developers widely use it to build and deploy machine learning models. This article will walk you through installing TensorFlow on an Ubuntu system. We will cover installation using pip (Python’s package installer) and conda (Anaconda package manager).
What do we need to install TensorFlow?
To follow this tutorial, you must have the following things:
- Ubuntu 24.04 or previous versions such as Ubuntu 22.04 or 20.04 LTS.
- The system must have Python 3.6 or later. Along with PIP.
- Internet connection
- A user account with sudo rights
Method 1: Installing TensorFlow with PiP
1. Install System updates
Let’s first run the system update and upgrade command on our Ubuntu 24.04 system to ensure the packages’ stability and compatibility. This will also refresh the repository package list.
sudo apt update && sudo apt upgrade -y2. Install Python, PIP, and VENV
We require Python and PIP to install TensorFlow, so use the given command to install them if they have not been installed already. Using a virtual environment to manage dependencies and avoid conflicts would be best.
- For Python3:
sudo apt install python3 python3-dev- To Check the version:
python3 --version- Apart from Python, we also need its package manager, ‘PIP.’ To install it, use:
sudo apt install python3-pip- Install Python venv to get a Virtual Environment
sudo apt install python3-venv3: Create a Virtual Environment
To install TensorFlow on Ubuntu 24.04 and its dependencies, we are creating a virtual environment to isolate its dependencies from other projects. This is a good practice to avoid conflicts.
To create a virtual environment, run:
python3 -m venv tensorflow_envActivate the virtual environment:
source tensorflow_env/bin/activateNow, the prompt on your terminal will have the name of the created environment.
4: Install TensorFlow on Ubuntu 24.04 using PIP
With the virtual environment activated, install TensorFlow using pip. First, we will upgrade the PIP and then run the command to download and configure “TensorFlow.”
pip install --upgrade pip
pip install tensorflow
5. To check the TensorFlow version
After completing the TensorFlow installation via PIP, we can use it to verify and check the TensorFlow version.
pip show tensorflow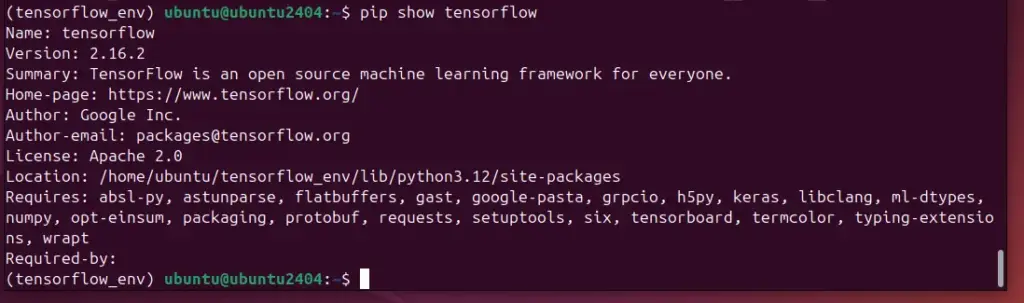
Method 2: Installing TensorFlow with Conda
Those using the Python distribution “Anaconda” can install Tensorflow with Conda, Anaconda’s package manager.
Step 1: Install Anaconda on Ubuntu 24.04
You can skip this step if you already have Anaconda installed on your Ubuntu system. In contrast, other users can see our tutorial on downloading the Anaconda installation from its official website to install on Ubuntu 24.04 or any other previous version.
Step 2: Create a Conda Environment (optional)
First, create a conda environment for your TensorFlow project. You can even select the custom version of Python for your project. For example, here we are using v3.12. Also, here, we use “mytensorflow_env” as our environment name. You can set it to whatever you would like.
conda create -n mytensorflow_env python=3.12Activate the conda environment:
After setting up the environment, activate it by using the given syntax.
conda activate mytensorflow_envStep 3: Install TensorFlow using Conda
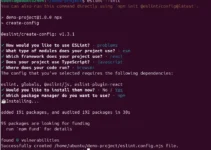
Now, we will use the Conda to install the Tensorflow in our activated environment; here is the command that we need to follow:
conda install -c conda-forge tensorflowIn the above command, we use the “Conda-Forge” channel, a community-led one that offers a collection of various latest versions of packages for the Conda package manager. It is one of the most popular channels for obtaining up-to-date and well-maintained packages in the Conda ecosystem.
However, if you want to use the default channel maintained by Anaconda, Inc., the same command will be used below without specifying a channel name. However, some packages may not always have the latest versions as quickly as conda-forge.
conda install tensorflowWhereas, for some specific TensorFlow versions, we can specify the version in the above command, for example:
conda install tensorflow=2.14.0Step 4: Check the Tensorflow availability:
After completing the installation, we can use the command to check whether Tensorflow is on our system.
conda list | grep tensorflowOptional: GPU Support
So far, we have seen how to install Tensorflow without GPU support. However, if you have an NVIDIA GPU, you should enable its support for better performance. Before taking advantage of GPU acceleration, your Ubuntu must install the following additional software.
- NVIDIA Driver: Install the appropriate NVIDIA driver for your GPU.
- CUDA Toolkit: Install the CUDA Toolkit from the NVIDIA website.
- cuDNN: Download and install cuDNN from the NVIDIA website.
After installing the above components, you can install the GPU version of TensorFlow:
Using Python PIP
pip install tensorflow-gpuOr using conda:
conda install -c conda-forge tensorflow-gpuPIP and Conda are popular ways to install the TensorFlow machine learning framework on the Ubuntu Linux system. After completing the installation process, you can build and deploy machine learning models using either of the two methods discussed in this article.
Other Articles: