Installing a Minecraft Bedrock server on Ubuntu Linux will allow the user to create a gaming environment that can host multiple players. The Bedrock edition differs from the Java edition and is designed for cross-platform play, including consoles and mobile devices. Today, in this tutorial, we will go through the commands and steps for setting up a Minecraft Bedrock server on Ubuntu 24.04 Noble or 22.04 Jammy Linux.
What do we need to follow this tutorial?
Nothing special is required; ensure you have an Ubuntu server or desktop (24.04, 22.04, 20.04…), access to a user account with sudo rights, and an active internet connection.
Steps to Install Minecraft Bedrock Server on Ubuntu 24.04 or 20.04
Step 1: Update your Ubuntu 24.04 packages
Access the command terminal of your Ubuntu distro and execute the system update command to ensure everything is up to date.
sudo apt update && sudo apt upgradeStep 2: Install Required Dependencies
We required a few tools while performing this tutorial: unzip and wget. You may already have them. However, run the given command to confirm.
sudo apt install wget unzipStep 3: Create a Directory for the Minecraft Bedrock Server
Create a dedicated directory to store the Minecraft server files so that we can easily manage them.
mkdir ~/minecraft-bedrock
cd ~/minecraft-bedrock
Step 4: Download the Minecraft Bedrock Server
The latest version of Minecraft Bedrock server can easily be downloaded from its official website. However, we will use the command terminal to get the file here. Therefore, first, visit the official website’s download page, check the License box, and right-click the “Download” button for Ubuntu to select “Copy Link Address.”
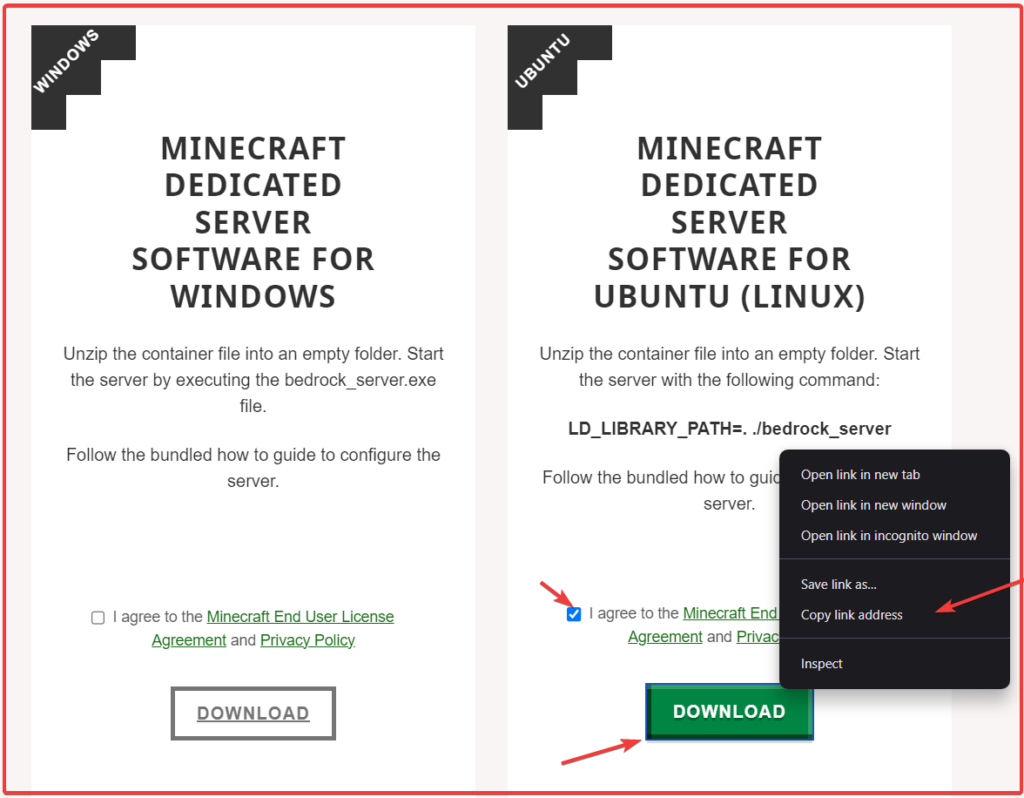
After copying the Download URL of the Minecraft Bedrock server from the official website. Use the following wget Command to download it:
wget paste-urlExample:
wget https://minecraft.azureedge.net/bin-linux/bedrock-server-1.21.1.03.zipStep 5: Extract the Downloaded Archive
Following the previous, we will have a zipped archive file of Minecraft bedrock on our Ubuntu; let’s extract it now.
unzip bedrock-server-*.zipStep 6: Start the Minecraft Bedrock Server
The extracted folder contains the executable file called “bedrock_server”; change its permissions to make it executable.
chmod +x bedrock_serverStep 7: Configure the Server
You can customize your server settings by editing the “server.properties” file. Use a text editor such as Nano to open it while being in the directory where you have extracted the bedrock server:
nano server.propertiesHere are some key settings you might want to configure:
- Server-name: The name of your Minecraft server.
- Game mode: The default (survival, creative, adventure).
- Difficulty: The game difficulty (peaceful, easy, normal, hard).
- Allow-cheats: Enable or disable cheats (true or false).
- Max-players: Maximum number of players that can connect.
- Level-seed: The seed for generating the world.
Step 8: Set Up a Service for Minecraft Bedrock Server
To ensure the Minecraft bedrock server runs in the background and starts on boot, create a systemd service:
Create a new service file:
sudo nano /etc/systemd/system/minecraft-bedrock.serviceCopy and paste to the following lines, and then save the file by pressing Ctrl+X, typing – Y, and hitting the Enter key.
[Unit]
Description=Minecraft Service
After=network.target

[Service]
Type=Simple
WorkingDirectory=/home/ubuntu/minecraft-bedrock
ExecStart=/bin/sh -c "LD_LIBRARY_PATH=. ./bedrock_server"
Restart=on-failure

[Install]
WantedBy=multi-user.target
Step 9: Reload Systemd and Start the Service:
After creating the service file for the Minecraft server script, reload the Systemd daemon to let the system register and recognize the newly created service. Then, start and enable it.
sudo systemctl daemon-reload
sudo systemctl start minecraft-bedrock.service
sudo systemctl enable minecraft-bedrock.service
To check the service status, use:
systemctl status minecraft-bedrock --no-pager -l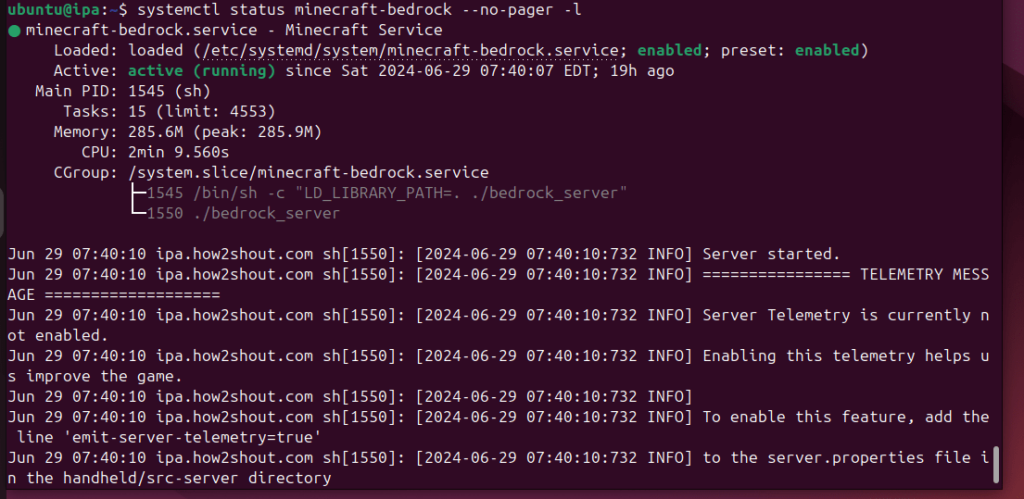
Step 10: Open Firewall Ports
If you have a UFW firewall enabled on your Ubuntu 24.04, you’ll need to open the Minecraft Bedrock server’s port (default is 19132 for UDP), whereas the cloud users have to open the same port but in their service provider’s firewall
sudo ufw allow 19132/udp
sudo ufw reload
Step 11: Connect to Your Server
Finally, our Minecraft Bedrock server runs in the background on Ubuntu 24.04 Linux; you can connect to it using any Minecraft Bedrock client on any platform. To connect, use the IP address and port (the default is 19132) of the Ubuntu server where you have installed the Bedrock.
Conclusion
Installing and setting up the Minecraft Bedrock server on Ubuntu Linux is easy, just like on Windows. Once you have created your server using this guide, your friends can join and play together. To further customize the server settings, remember to use the “server.properties” file, and if you get any issues, you can look for the server logs.