Configure the Samba server on Ubuntu 24.04 LTS Linux using this tutorial’s steps for seamless file sharing and print services to SMB/CIFS clients.
Samba is a free & open-source implementation of SMB protocol for integrating servers and desktops running Linux or Unix in environments with Microsoft’s Active Directory directory service. The software can be used as a controller for the domain or as a regular member.
Using SAMBA software, users can easily access the files, printers, and other shared resources on a company network or intranet, among other things. The best thing in almost all Linux distributions is that SAMBA is present in their repositories to install easily.
Samba uses the frequently used client/server protocols SMB (Server Message Block) or CIFS (Common Internet File System), which is nowadays an open variant of SMB. If applications are compatible with SMB or CIFS, they can communicate with the Samba Server.
Samba’s SMB/CIFS client is called “smbclient”. Some desktop variants of Linux have the Samba Client pre-installed, whereas others need to be installed manually. The source code can be found at samba.org.
Step 1: Refresh Package List
Open your Ubuntu 24.04 command terminal, run the system update command to rebuild the repository package list, and install the latest security updates.
sudo apt update && sudo apt upgrade -yStep 2: Installing Samba server on Ubuntu 24.04
The default repository of Ubuntu 24.04 offers the packages required to install the Samba server without any additional repository.
sudo apt install samba nautilus-share -yTo check the service status of the Samba server, use this command:
systemctl status smbd --no-pager -lTo enable the service and start it automatically with system boot, here is the command:
sudo systemctl enable --now smbd

Step 3: Add your user to the Samba group
Let’s add our current System user to the SambaShare group so it can access all files and folders shared under it.
sudo usermod -aG sambashare $USER
Set the password for sharing: This will differ from your system password.
sudo smbpasswd -a $USER
Note: $USER means your current user. If you want to set a different user, change $USER to the particular user name. Also, the file or folder you want to share must be accessible to that user.
Alternatively, if you want to add some other users to the SAMBA group, use:
sudo usermod -aG sambashare your-user
To set a password:
sudo smbpasswd -a your-user
Now, we create a custom directory that will hold the files we want to share over the network using the Samba protocol. Here we are creating a directory called “linuxshare” under our ubuntu user HOME. However, if want to share some existing directory then that is possible as well which we learn how in the next step.
sudo mkdir /home/linuxshareGive ownership of the created folder to your current user:
sudo chown user:usergroup path-to-folderFor example, if our Ubuntu user is “linuxshout” then to have the rights of the created folder, the command will be like this:
sudo chown linuxshout:linuxshout /home/linuxshareStep 5: Edit the Samba Configuration:
To tell the Samba server what folder or directory we want to share over the network using SMB protocol, we need to define the same in the the Samba server’s configuration file. This file controls the settings and shares available on your Samba server.
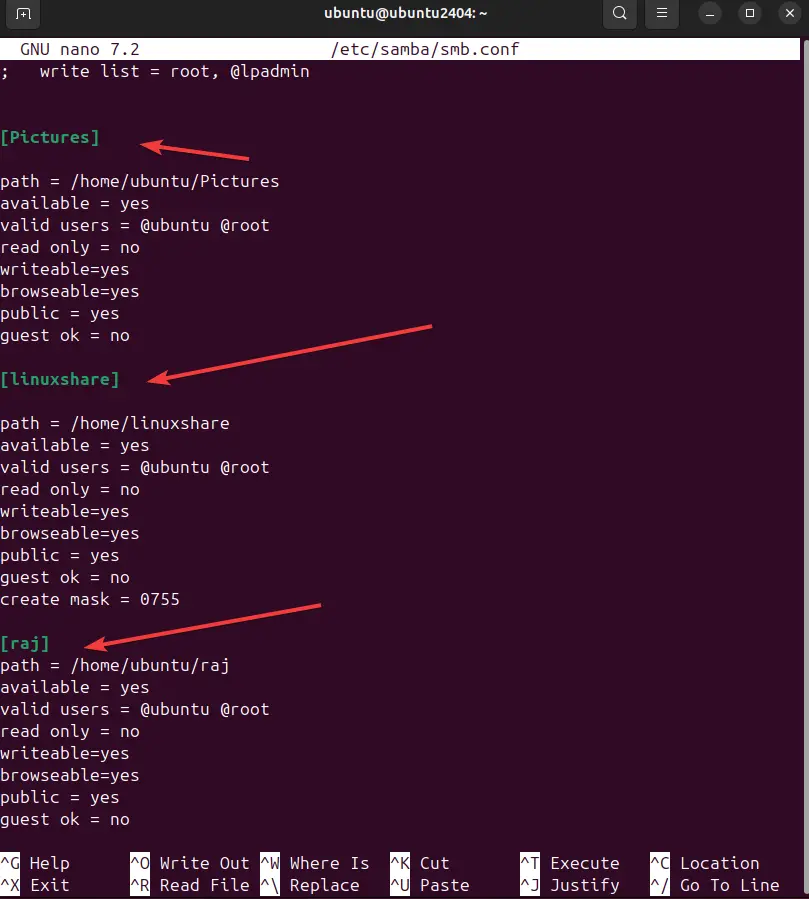
sudo nano /etc/samba/smb.confScroll to the bottom of the configuration file and add a new section for your share. Here’s an example configuration for a shared directory:
The given configuration is for the directory we have created, i.e., “linuxshare”. In the given configuration, you have to change the “linuxshare” with your directory name and “path = ” with where the directory is located and @ubuntu with your current system user added in the Samba group in Step 3 of this article.
[linuxshare]

path = /home/linuxshare
available = yes
valid users = @ubuntu @root
read only = no
writeable=yes
browseable=yes
public = yes
guest ok = no
create mask = 0755
Similarly, if you want to use some existing folder on your Ubuntu 24.04 to share over SAMBA, you can use the same configuration above by changing the path and directory name. For example, if we want to share the existing “Pictures” folder of our system, then the configuration will be like this:
Save the file by pressing Ctrl+X, hitting Y, and then Entering the keys.
Restart the SAMBA server to apply the added configuration.
sudo systemctl restart smbdWe use Debian and Windows 11 to access the remotely shared folder on Ubuntu 24.04. You can use macOS if you want.
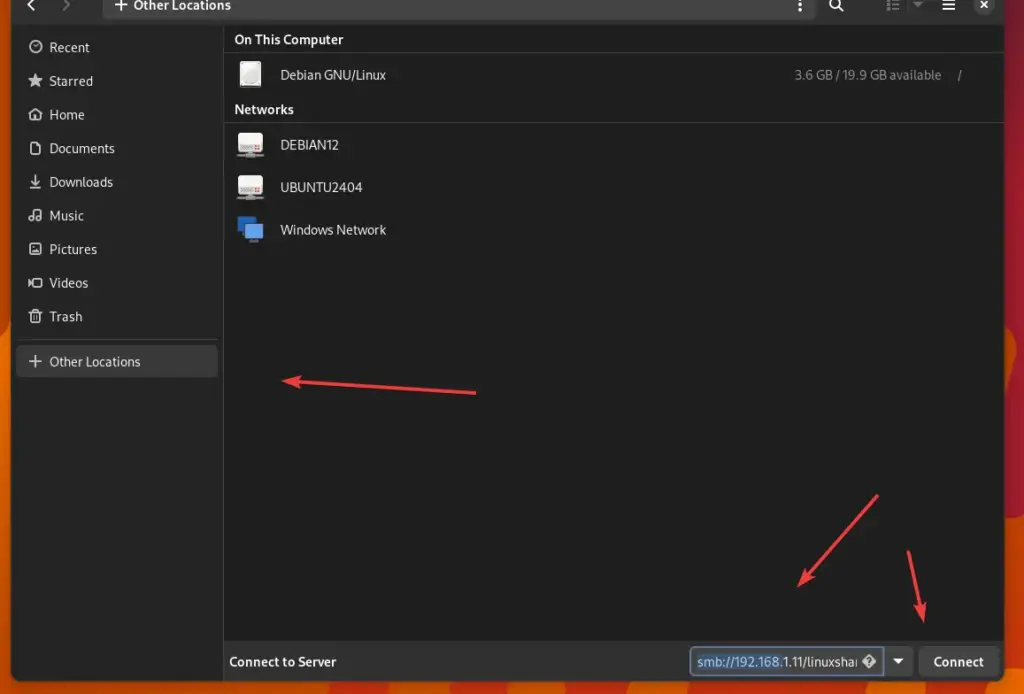
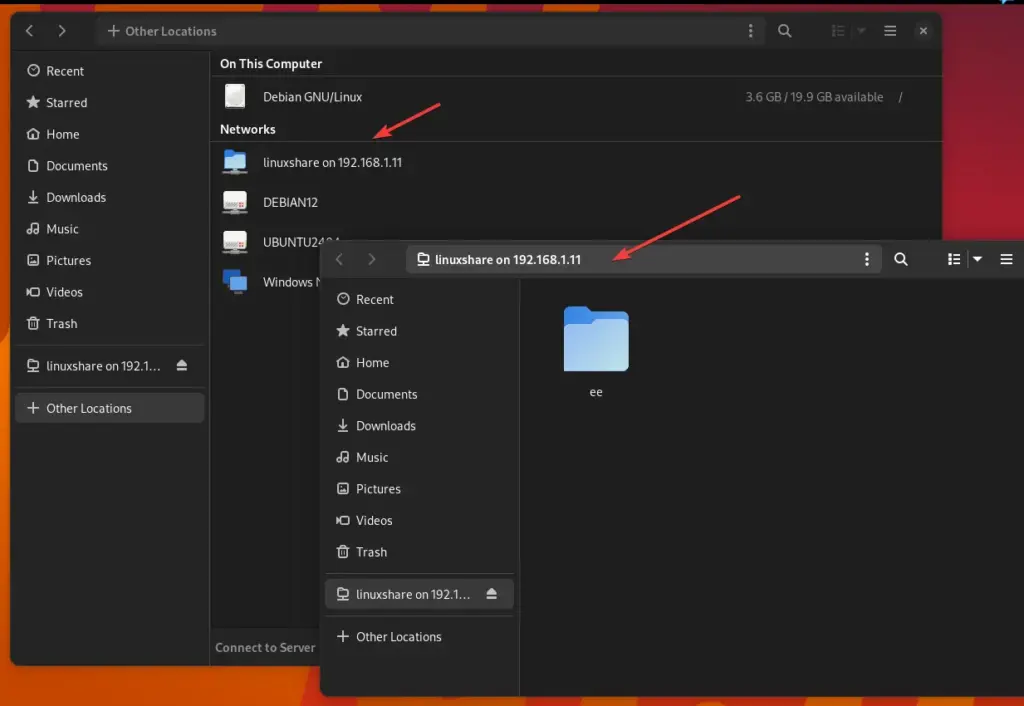
On Debian, Ubuntu, CentOS, and other Linux with Gnome
⇒ Go to File Manager and then click on the Other locations.
⇒ There, go to the Connect Server box and type your Ubuntu 24.04 Samba IP address in the following format:
smb://ip-address/shared-folder-nameIn the above URL format, replace the IP address with your SAMBA server IP and Shared-folder-name with a folder that you have shared.
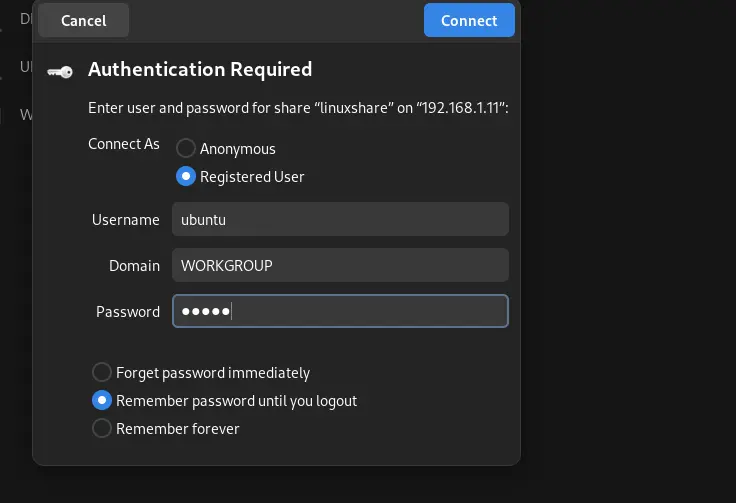
When we connect, the server asks us to enter the credentials or user and password added to the SAMBA group.
After connecting, you will have access to your shared folder and a shortcut for the same on the Debian or any other Linux you are using.
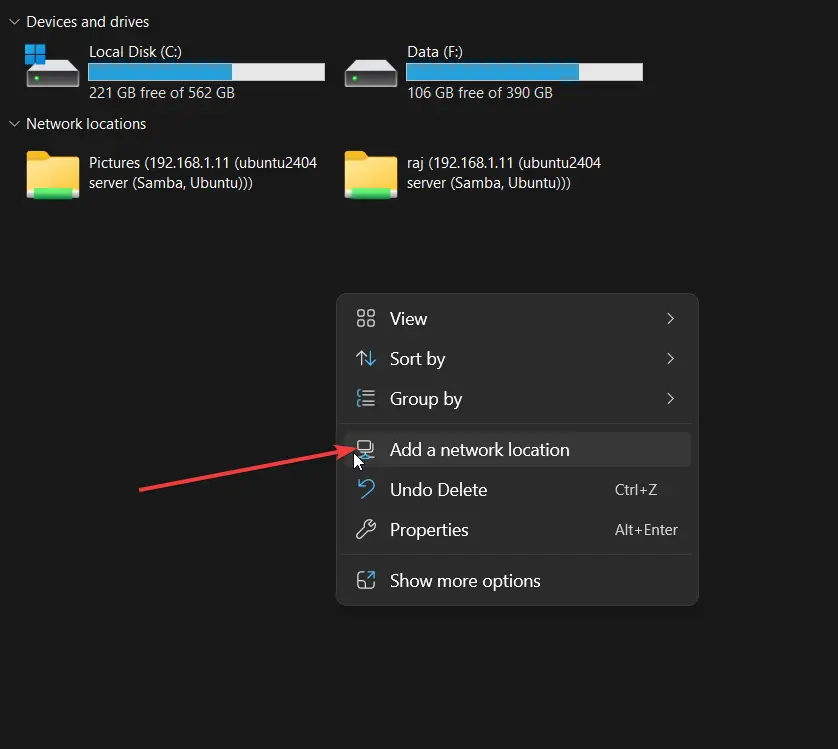
On Windows 10 or 11:
If you are using a Windows system and want to mount the folder shared on Ubuntu 24.04 with the help of SAMBA, then follow these steps.
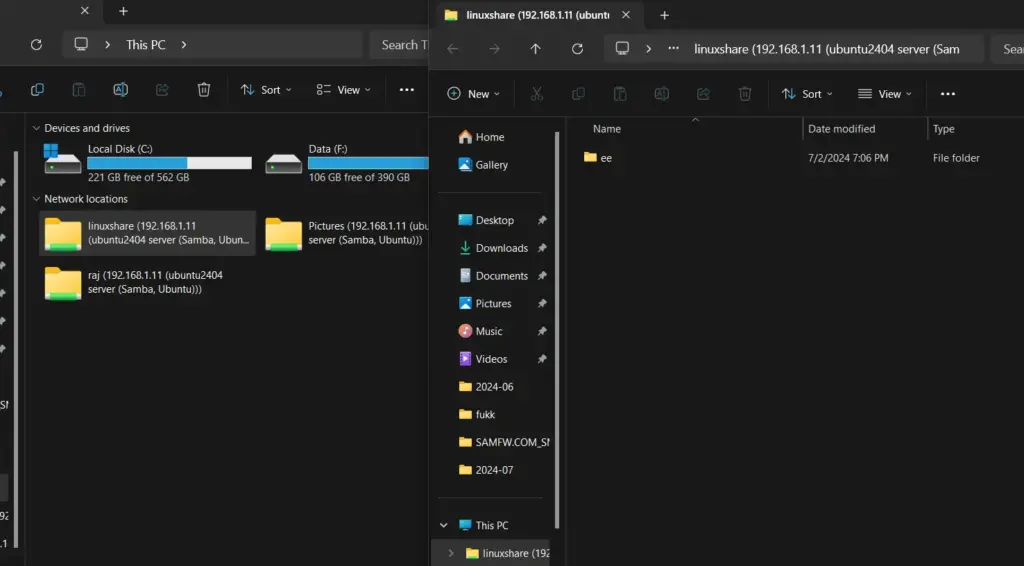
⇒ Go to This PC and right-click somewhere on the blank area to select “Add a network location” from the context menu.
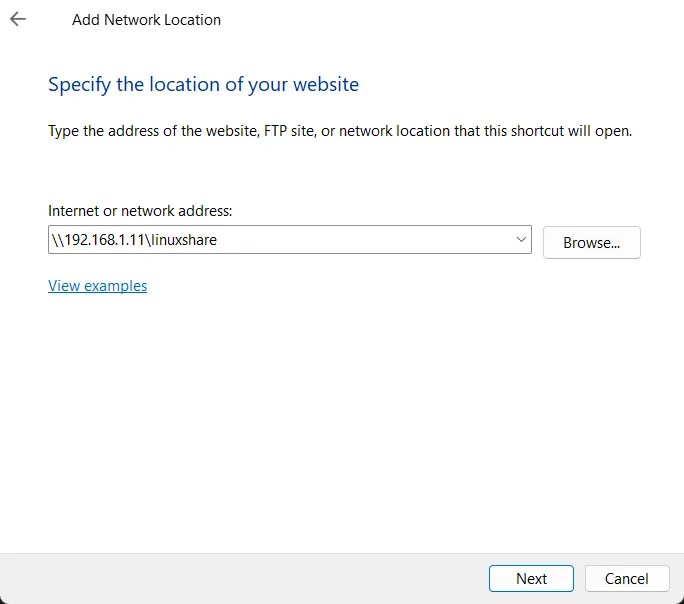
⇒ Now, enter the IP address and shared folder name in the following format:
\\server-ip-address\shared-folder
Replace the server IP address with your Ubuntu IP, where you have configured the SAMBA and the shared folder name.
⇒ Soon, the system will ask you to enter the Username and password to access the SAMBA share folders. Enter that and hit the OK button.
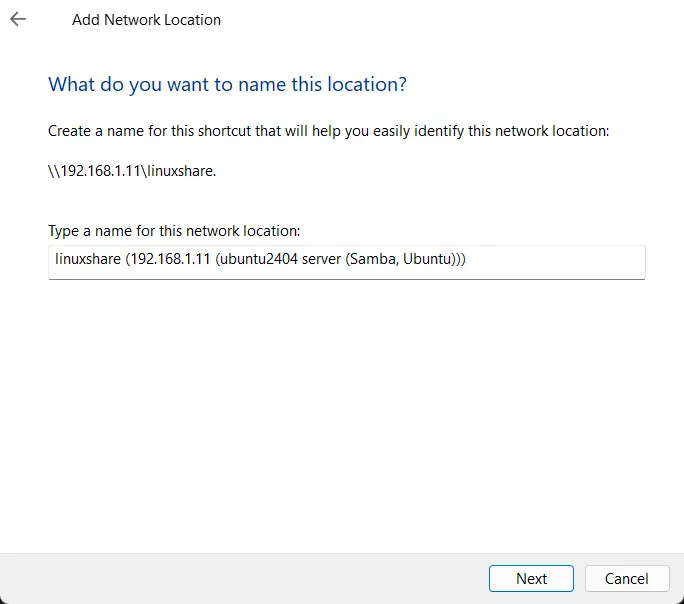
⇒ Finally, Ubuntu’s shared folder is mounted remotely or locally on your Windows 10 or 11 via SMB protocol.
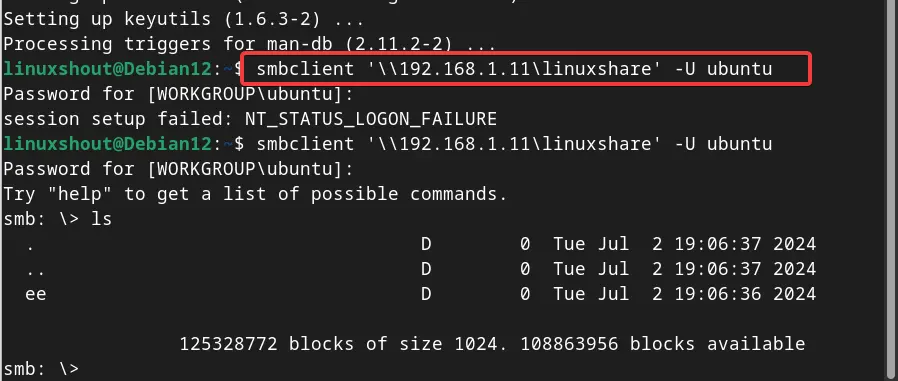
You may be not using a GUI based operating system and in that case the command line is the only option to access the shared SAMBA directory. So, to access it, first install the Samba client and CIFS-utils.
On Debian or Ubuntu systems:
sudo apt install samba-client cifs-utilsOn RHEL/Oracle/Rocky/Fedora/AlmaLinux:
sudo dnf install samba-client cifs-utilsTo connect the SAMBA Shared folder, here is the command syntax:
smbclient '\\ip-address\folder-name' -U usernameReplace Ip-address with the Server address where you have installed the SAMBA and LinuxShare with your shared directory and username with the user added in the SAMBA group.
How to mount Samba directory on Ubuntu
Now, let’s also learn the steps to mount the Shared Samba directory on Ubuntu, so that we don’t need to run the Smbclient command to connect it.
Create a Credentail file:
Let’s store our Samab credentials in a file. Create a file, for example /etc/samba/credentials, and add your username and password:
sudo nano /etc/samba/credentialsAdd the following lines to this file and replace the values with your user and password used for Samba:
username=your_username
password=your_password
Save the file- Ctrl+X, Y and hit the Enter key and then secure it:
sudo chmod 600 /etc/samba/credentialsCreate the Mount Point or directory:
sudo mkdir -p /mnt/sharedNow, mount the share using this credentials file. Here is the command syntax to used:
sudo mount -t cifs -o credentials=/etc/samba/credentials //server/share /mnt/sharedReplace “//server/share” and “/mnt/shared” with your actual share path and mount point.
To access the mounted folder and its files use:
cd /mnt/sharedWhereas to list the files:
lsOther Articles: