Generally, when it comes to using virtualization for running various operating systems on a Desktop or PC, we either use Vmware or VirtualBox, however, they are both Type 2 virtualization software. Therefore, would not be able to deliver the performance in comparison to Type 1. Also, we need to have a graphical user interface desktop to use both technologies. However, if we have a Linux server and want to run multiple operating systems then one of the most popular and efficient virtualization solutions is KVM (Kernel-based Virtual Machine), combined with QEMU (Quick Emulator).
What is KVM?
KVM is an open-source technology for turning any existing Linux platform into a full-fledged hypervisor. It is a virtualization module in the Linux kernel, hence easy to enable and can be used to run multiple virtual operating systems at their native speed. KVM stands for Kernel-based Virtual Machine and requires a processor with hardware virtualization extensions (Intel VT or AMD-V) which are present in all modern processors.
What is QEMU?
QEMU is a generic and open source machine emulator and virtualizer. When used as a virtualizer (with KVM), QEMU achieves near-native performance by executing the guest code directly on the host CPU. When used as an emulator, it can emulate various architectures, allowing you to run applications and operating systems designed for different platforms.
Prerequisites
Before following this tutorial, ensure you have the following things:
- An Ubuntu 24.04 server or desktop OS running system.
- A user with sudo access or a root user
- Hardware virtualization support must be enabled from the BIOS
Ubuntu 24.04 KVM QEMU installation
Together, KVM and QEMU provide a powerful solution for creating and managing virtual machines on Ubuntu 24.04 Noble LTS and other Linux systems.
Step 1: Check Hardware Virtualization Support
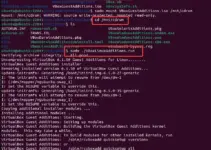
Well, we don’t know whether the virtualization is enabled in our BIOS or not, therefore to confirm that we can run the given command in our Ubuntu 24.04 terminal.
lscpu | grep VirtualizationThe output of the above is either VT-x or AMD-V according to your process as shown in the screenshot. However, if you get blank output or nothing in return after running the above command then it means you have to enable the virtualization from your system’s BIOS.

Step 2: Installing KVM on Ubuntu 24.04 LTS
The Qemu-KVM package is available to install through the default Ubuntu 24.04 system repository, it will enable the Kernel Virtual Machine feature on our Ubuntu Linux system. However, apart from that we are also installing a few other packages required for the management of virtual machines. So, execute the given command in your terminal:
sudo apt install qemu-kvm libvirt-clients libvirt-daemon-system bridge-utils virtinst libvirt-daemon virt-top libguestfs-tools libosinfo-bin qemu-system tuned
Step 3: Add Your User to the Libvirt and KVM Groups
To manage VMs without root privileges, add your current Ubuntu 24.04 user to the libvirt and kvm groups:
sudo usermod -aG libvirt $(whoami)
sudo usermod -aG kvm $(whoami)
After that enable and start the Libvirt Deamon service
sudo systemctl enable --now libvirtdVerify the KVM modules are loaded: You will see ‘KVM‘ in the output showing it is loaded…
lsmod | grep kvmNow, reboot your system:
sudo rebootStep 4: Optimize for running KVM guests
While installing the KVM, we have also installed a package called “tuned”. This tool offers a pre-configured profile to optimize the host or guest as per the requirements.
Enable Tuned services:
sudo systemctl enable --now tunedBy default, the balanced profile will be activated on Tuned but as we want to run the virtual machines on our Linux host, we can select a profile that optimizes the host for running VMs, here is the command to do so:
sudo tuned-adm profile virtual-hostto verify the same, use:
tuned-adm activeTo list all available profiles you can run:
tuned-adm listStep 6: Create Bridge Network on Ubuntu 24.04
Well, by default, the NAT is configured to be used on KVM guest machines, it is good if you only want to surf the internet on the guest VM but you won’t be able to connect or access some other system available on the host network. Even the web server and other web services running on the Guest OS won’t be available to access from outside the host system. Therefore, we will create a Bridge network that will allow the Guest VMs to directly fetch the IP address from the same DHCP server available for our host system.
With Bridge the guest VMs will be available on the Physical network just like the host system, hence it is important to configure the Bridge network, here are the commands to follow:
To list the default NAT network, use:
sudo virsh net-list --allNow, to find the network adapter or interface used by the host to connect outside world or network:
sudo nmcli device statusIn our case, it is ens33 and would be different in our case, so note it down.
DEVICE             TYPE         STATE                                    CONNECTION
ens33             ethernet    connected                             netplan-ens33
lo                    loopback    connected (externally)           lo
virbr0             bridge        connected (externally)           virbr0
Vnet1              tun            unmanaged                          --

First of all, let’s create a bridge interface that we will be able to use with virtual machines. “Br0” is the name we are assigning to our bridge interface.
sudo nmcli connection add type bridge con-name br0 ifname br0We have created the Biidge interface using the previous command, now, assign which physical ethernet or interface you want to use as a slave from where the Bridge connection will fetch the IP address. As here our physical interface name is ens33, so we will use that, similarly in the given command replace “ens33” with your network interface name. Also, we have to give a name to this connection we are creating, here we will call it “KVM Bridge connection 1“, you can assign whatever name you want.
sudo nmcli connection add type ethernet slave-type bridge \
con-name 'KVM Bridge connection 1' ifname ens33 master br0
Enable the “connection.autoconnect-slaves” parameter which determines whether slave connections (e.g., individual network interfaces like Ethernet ports or Wi-Fi adapters) are automatically added to a master connection (e.g., a bridge or bond connection) when they are available.
sudo nmcli connection modify b0 connection.autoconnect-slaves 1Activate the Bridge Connection:
sudo nmcli connection up br0Reload Network:
sudo nmcli connection reloadCheck the network interface status to confirm the bridge connection up
sudo nmcli device status
Now, to check the Ip-address of the Bridge connection, use:
ip -brief addr show dev br0
Step 7: Set Image Directory permission
By default, the images are stored in the “/var/lib/libvirt/images” directory, and the access of it is limited to the “root” user only. To make it accessible for your current user, use the given commands.
To check whether it is accessible by your current use;
ls /var/lib/libvirt/images/You will have a “permission denied” message.
Now, first, remove the existing permissions for the directory…
sudo setfacl -R -b /var/lib/libvirt/imagesSet permission for your current user to access the Images directory
sudo setfacl -R -m u:$USER:rwX /var/lib/libvirt/imagesThe above will only set permission for the existing files however to apply it for any folders and files we will create in the future, run the given command.
sudo setfacl -m d:u:$USER:rwx /var/lib/libvirt/imagesNow, copy whatever ISO images you have and want to create the virtual machine using them to “/var/lib/libvirt/images“.
Step 8: Create a Virtual Machine on KVM
There are two graphical ways to create a Virtual Machine on KVM one is using Virtual Machine Manager and the other with the help of Cockpit.
On your Linux operating system to install the Virtual Manager run the given command:
For Debian-based:
sudo apt install virt-manager virt-viewerFor RHEL based
sudo dnf install virt-managerWhereas, those who want to use the web interface can see our article – how to use Cockpit to create virtual machines.
However, those who are using Virt Manager, follow the given instructions:
- Click on the “Computer icon” on Virtual Machine Manager and select the medium of your ISO image. If it is in the “/var/lib/libvirt/images” then select the “Local install media (ISO image or CDROM). After that hit the “Forward” button.

- Click on the Browse button and select the ISO image you want to install. Uncheck the box given for “Automatically detect from the installation media/source” and manually search for the operating system you want to install

Configure the amount of RAM you want to allocate to your Virtual Machine.

Allocate the amount of virtual storage needed by the Guest OS.

To configure the Network, click on the arrow of “network selection“, select “Bridge Device…” from the drop-down box and finally click on the “Finish” button.

Soon, your Virtual Machine will be booted and start the installation process like we do on any physical machine.

Conclusion:
These were the steps to install and configure on the Ubuntu 24.04 LTS server. Although the installation of virtual machines is not as straightforward as we have on VMware or VirtualBox, performance-wise you will feel the difference. Also, for those who have Windows where they can’t install Virtual Machine Manager natively, Cockpit Virtual Manager would be the best method to use because of its web-based interface.
Other Articles: