In this tutorial, we learn how to securely convert our Ubuntu server into a Jump server or host to connect to other machines in the private network.
A Jump Server is a special-purpose server used to access and manage devices or servers within a secure or restricted network environment. It acts as a secure gateway between a less secure and more secure network. Apart from the name “Jump server,” users call it Jump host, Jump Box, or Bastion host. It provides a single, controlled point through which administrators can access servers in a more secure network zone, simplifying and securing the process of managing access to multiple servers.
What do we need?
- Ubuntu 24.04 Server or any other previous version such as Ubuntu 22.04, 20.04 or 18.04
- A user account with sudo rights or direct root user access.
- User should know how to use SSH
- Internet connection to install packages
Let’s see how to install and configure a Jump Server on an Ubuntu 24.04 system.
Diagram: A simplified diagram of how a Jump Server operates within a network:
+---------------------+
|  Administrator's PC |
+---------------------+
          |
          | (Secure Connection - VPN/SSH/RDP)
          |
+---------------------+
|     Jump Server     |
+---------------------+
          |
          | (Secure Internal Network)
          |
+---------------------+     +---------------------+
|   Internal Server   |     |   Internal Server   |
|  (Database Server)  | ... | (Application Server)|
+---------------------+     +---------------------+
Step 1: Update Ubuntu 24.04
On your Ubuntu server terminal, run the system update command to update the existing packages and install the latest security updates.
sudo apt update && sudo apt upgrade -yStep 2: Installing OpenSSH Server
Those with an OpenSSH server configured on their Ubuntu system can skip this step; however, the rest must follow the given steps. The OpenSSH server is essential for the Jump Server to handle SSH connections.
sudo apt install openssh-server -yVerify that the SSH server is running and enabled:
sudo systemctl status sshIf it’s not running, start the service:
sudo systemctl start sshEnable it to start automatically on boot:
sudo systemctl enable sshStep 3: Configure SSH Server
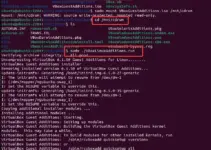
Let’s edit the SSH server configuration file to enhance security by changing a few values:
sudo nano /etc/ssh/sshd_configFind the lines given below, and remove the ‘#’ if it is present before the lines to enable them. After that, set their values as shown here.
PermitRootLogin no
AllowUsers your_username
PubkeyAuthentication yes
PasswordAuthentication no
Explanation:
- Disable Root Login: Set PermitRootLogin to no.
- Limit User Access: The AllowUsers directive specifies which users can connect via SSH.
- Use Key-Based Authentication: Ensure PubkeyAuthentication is set to yes.
- Disable Password Authentication: Set PasswordAuthentication to no (after setting up key-based authentication).
Save and exit the file by pressing Ctrl+O, hit the Enter key, and then exit using Ctrl+X..
Once done, reload the SSH service to apply the changes:
sudo systemctl reload sshStep 4: Create a Banner Message (Optional)
Well, this step is completely optional but useful for those who want to display crucial information for security and compliance reasons to users who log in to the Jump server. By editing the SSH configuration file on the Jump server, we can display whatever text we want as a banner message upon login.
First, edit the SSH banner file and add your customer message to the file. For example, we want to display, “Unauthorized access to this system is prohibited. All activities are monitored and recorded.“
sudo nano /etc/issue.netAdd your custom message.
Then, edit the SSH configuration to use this banner:
sudo nano /etc/ssh/sshd_configUncomment or add the following line:
Banner /etc/issue.netReload the SSH service to apply the changes:
sudo systemctl reload sshStep 5: Allow SSH port in the firewall.
When configuring the SSH server, ensure that port number “22” or any other custom SSh port is whitelisted in your system or cloud firewall so that we can access the Jump server from our client machine.
If you create the JUMP server on a Cloud server with an Ubuntu instance, port 22 should already be opened in your service provider’s firewall; otherwise, open it manually. Users with a locally installed UFW firewall on Ubuntu 24.04 need to run: “sudo ufw allow OpenSSH“
Step 6: Set Up SSH Key-Based Authentication
After installing and setting up the OpenSSH server on your Ubuntu 24.04, go to the client system, where you will access the JUMP server. On the Client machine, generate the SSH key and copy the public key to the Jump Server.
On the client machine, generate an SSH key pair:
ssh-keygen -t rsa -b 4096Copy the public key to the Jump Server:
The command for Linux running client machines:
ssh-copy-id your_jumpserver_username@jump_server_ip
The command for Windows running client machines:
ssh -i "path-to-ssh-public-key" jump-server-username@ip-address
Note: When you generate an SSH key pair, the path to the SSH public key will appear in the output.
After copying the public, you will have access to your Jump server on the client machine, now set the correct permissions for the SSH key on the server:
chmod 700 ~/.ssh
chmod 600 ~/.ssh/authorized_keys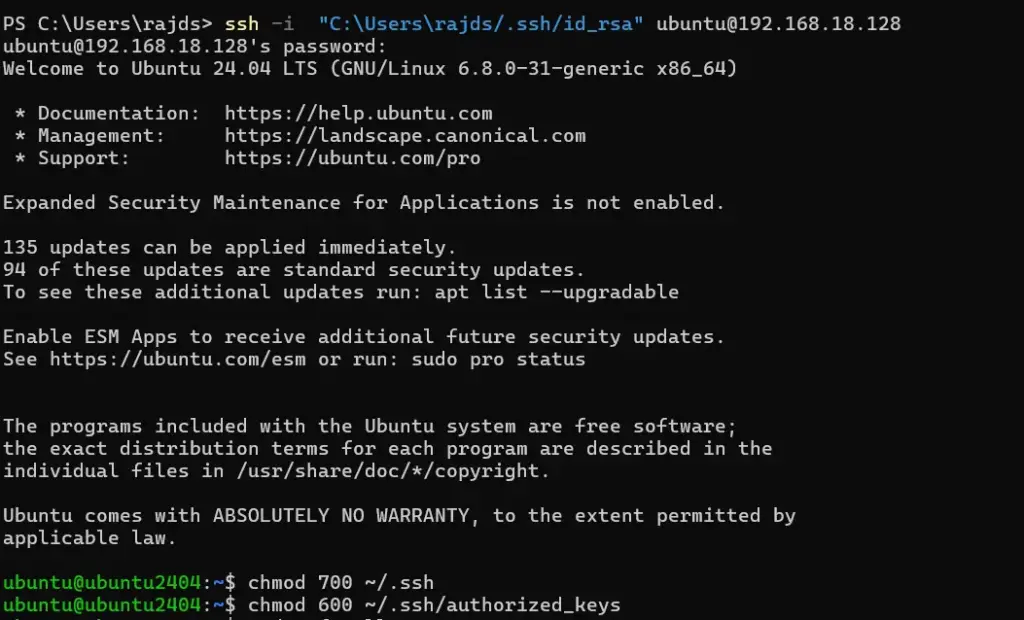
Step 7: Using the Jump Server
To use the Jump Server as a gateway to another server in the private network, configure your SSH client with the ProxyJump or ProxyCommand option.
Example using ProxyJump:
ssh -J your_username@jump_server_ip your_username@destination_server_ip
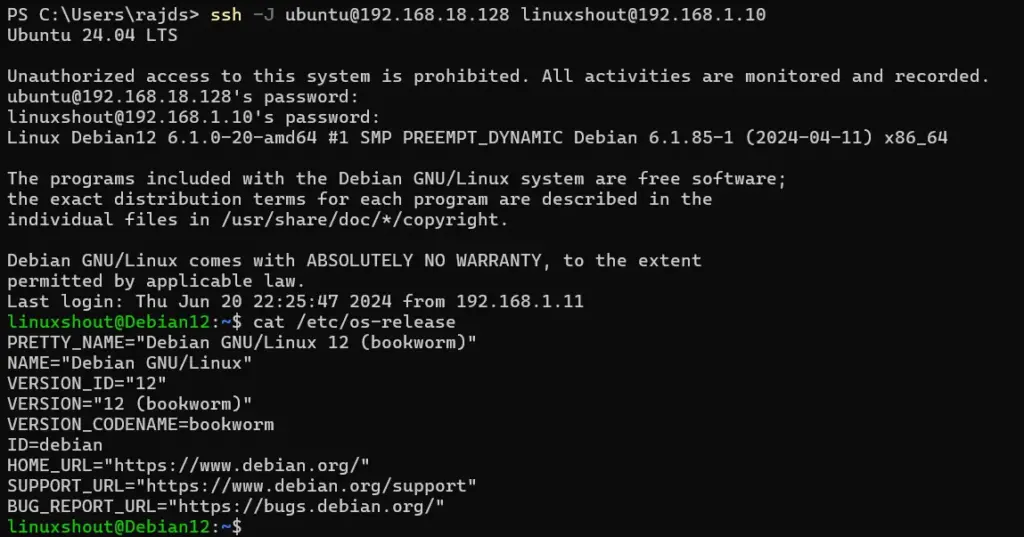
Whereas, if you don’t want to copy the public key to the Jump server, which we have done in Step 6 of this article, you can use the “-A” option. This allows the client machine to forward the SSH agent connection to the remote server, which means you can use your local SSH keys on the remote server without copying them to the server.
ssh -A -J your_username@jump_server_ip your_username@destination_server_ip
Example using ProxyCommand:
Furthermore, if you don’t want to type a long command with the username and IP address of the same server again and again, then we can create a Proxy command to connect to the remote server easily.
Edit ~/.ssh/config:
On Linux
nano ~/.ssh/configOn Windows:
notepad "C:\Users\your-user\.ssh\config"Add the following lines:
Change the username and IP address of the Jump server and the private server you want to access through the Jump server. Once done with the setting, save the file by pressing Ctrl+O, hit the Enter key, and then to exit, use Ctrl+X.
Host jump-server
HostName jump_server_ip
User your_username

Host private-server
HostName destination_server_ip
User your_username
ProxyCommand ssh -W %h:%p jump-server
Now, to connect to the remote server, ssh it with its name, for example:
ssh private-server“Private server” is the name given to the remote server. You can change it to whatever name you want to give to identify it easily while connecting.
Ending thought:
This was the basic guide to setting up a secure Jump Server on Ubuntu 24.04; however, the steps can also be followed for other Ubuntu versions. This server setup provides an additional layer of security to prevent unauthorized access.
Other Articles: