Using containers using the command line on Ubuntu 24.04 can be a little bit difficult, especially for beginners, therefore, to make things easy we can install Cockpit and Cockpit-podman module on the Ubuntu 24.04 Server.
What is Cockpit and Cockpit-Podman?
The cockpit provides a graphical user interface that is web-based and meant to be used on Linux servers that come with only a command line interface, however, GUI desktop users can also use it. The key feature of Cockpit is to provide a centralized location to operate key tasks and manage certain things on the server such as Logs, Storage, Networking, Accounts, and services.
Now, apart from that Cockpit also offers a few apps to extend its capacities further and Cockpit-podman is one of them. After installing it, the same will be shown in the “Applications” Tab.
In this detailed tutorial, we learn steps for installing and configuring Cockpit-Podman on Ubuntu to effortlessly manage containerized applications and services.
Prepare your Ubuntu 24.04
Let’s make sure our system is up to date and for that on your command terminal run the given command.
sudo apt update && sudo apt upgradeInstalling Cockpit and Cockpit-Podman
To use Cockpit-Podman on your Ubuntu 24.04 LTS, we must have Cockpit server management on our system. The given command will install both Cockpit and its Podman extension on Ubuntu 24.04.
sudo apt install cockpit cockpit-podmanEnable and Start the Cockpit
Once the installation is completed, activate the Cockpit service and also enable it to start automatically whenever we reboot our system.
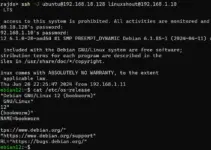
sudo systemctl enable --now cockpit.socketNext, let’s check the Cockpit service’s status to ensure it is active without any errors.
sudo systemctl status cockpit --no-pager -l
Open Cockpit Web Interface
We have a running Cockpit service on our Ubuntu 24.04 along with the Podman module, now to work with them using the web interface, open your system browser that can access the Ip-address of the server or desktop where you have installed the Cockpit.
https://your-Server-IP:9090
or
https://your-domain:9090
Note: The port number used by it is 9090, so don’t forget to open it in your firewall. Those who are using the UFW firewall can run the command – sudo ufw allow 9090 whereas the cloud users need to open this port in their service provider’s firewall.
On your browser, due to SSL if you get a “Your connection is not private” warning then click on the Advanced and then select “Proceed to x.x.x.x (unsafe)“.
You’ll see the Cockpit login screen. Log in with your system user credentials.

Step 6: Manage Containers with Cockpit-Podman
Once logged in, on the web interface of Cockpit Dashboard, from the left side panel click on the “Podman Containers”. Now, you can create or manage the existing containers available on your Linux system.
First, click on the “Start Podman” button to enable and start its service on Ubuntu 24.04 LTS.

Now, to create containers from the Cockpit interface, click on the “Create Container” button, and then select the owner or user for the container, in the “Image” section type the name of the application or image you want to pull.

After that, if necessary set the memory limits and other settings such as Port Mapping. For that click the Integration Tab and map whatever port you want of Container with host.

Once all the settings are done you can click on the “create and run” button. The Container is created you will see the status on your Cockpit Dashboard.

For running or issuing a command directly in the Container, select the created container and then click on the Console Tab.

These were the easy steps anyone can follow to have Podman and Cockpit-podman on Ubuntu 24.04 for creating and managing Container machines. If you are facing any problems in performing this tutorial, the comment section is all yours, let’s know.
Other Articles: