See the step-by-step guide for creating an Ubuntu AWS Ec2 instance and then installing Docker on it to create a virtual container for running various App Images.
Docker is not some unknown platform, if you are here to follow this tutorial then you would already know we use it to create virtual containers. So, that we can develop, deploy, and run various applications or Linux distros quickly but without putting much load on our system resources.
Containers are portable and cross-platform, therefore we can run our apps on any platform or infra that supports Docker. It provides a way to package an application and its dependencies into a single container, which can be run on any Docker-enabled host. That is the reason users can easily deploy and scale their applications as needed.
The architecture it follows is a common – client-server model, in which the Docker client interacts with the Docker daemon for building, running, and managing containers. Both CLI and API are made available by its developers to interact with the Docker daemon and manage your containers.
Steps to Install Docker on AWS EC2Ubuntu
1. log in to your AWS Ubuntu Linux
The only difference between the installation of Docker on Ubuntu running locally and AWS, is the hardware where you are using it. Otherwise, command wise there is nothing new.
So, either use the local SSH or Putty to connect your Ubuntu Ec2 Instace or directly log in to AWS Dashboard and use the Web console. However, if you have not created Ubuntu Sever Instace on AWS, then here is the tutorial to do that: Step by Step tutorial to create and connect Ubuntu Linux on AWS Instance.
2. Update Ubuntu Package List
As you got the access to your Ubuntu Instance, run the system update command first. This is necessary to install security and version updates for packages including refreshing of APT index cache.
sudo apt update && sudo apt upgrade -y3. Add Docker’s package repository
Although Ubuntu’s default system repository and Snap both offer Docker packages to easily install, however, it is better to go with the official repository. Because you will have future updates from time to time for Docker on your system. Now, on your terminal screen follows the given commands:
Install Common required packages or tools:
sudo apt install ca-certificates curl gnupg lsb-releaseAdd Docker’s GPG key
sudo mkdir -p /etc/apt/keyringscurl -fsSL https://download.docker.com/linux/ubuntu/gpg | sudo gpg --dearmor -o /etc/apt/keyrings/docker.gpgAdd the official repository
After adding the GPG key required for the Docker repository to authenticate the packages available through it, let’s set up its repository as well.
echo "deb [arch=$(dpkg --print-architecture) signed-by=/etc/apt/keyrings/docker.gpg] https://download.docker.com/linux/ubuntu $(lsb_release -cs) stable" | sudo tee /etc/apt/sources.list.d/docker.list > /dev/nullRun the system update again.
sudo apt update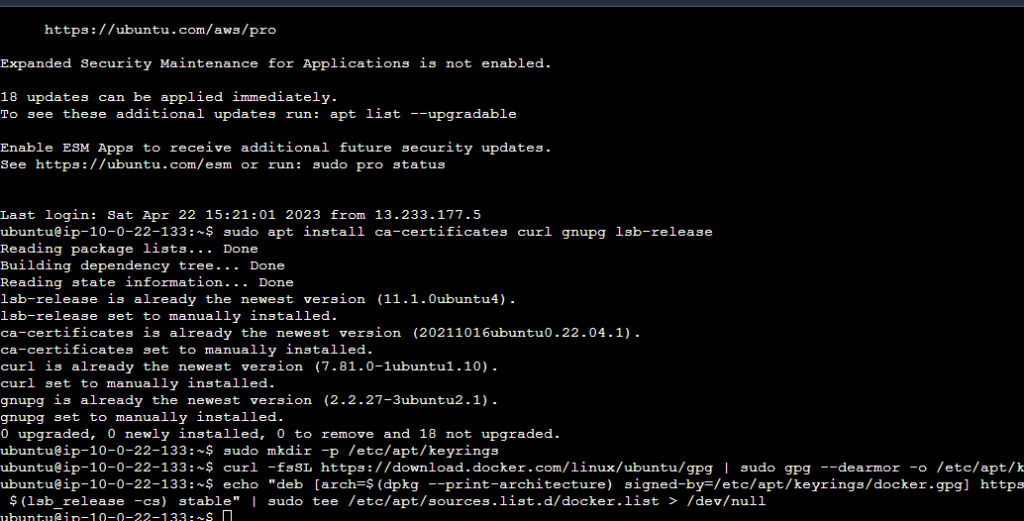
4. Installing Docker CE on AWS Ec2 Ubuntu
By following the above commands, we will have all the necessary things on our Ubuntu Linux to get the latest version of Docker and its other tools. So, now in your terminal run the given Docker installation command:
sudo apt-get install docker-ce docker-ce-cli containerd.io docker-buildx-plugin docker-compose-plugin5. Check the Version & Status
As the installation is done successfully, let’s check the version of Docker and whether its background service is running properly without any error or not.
For Version details:
docker -vTo get the service status:
systemctl status docker --no-pager -l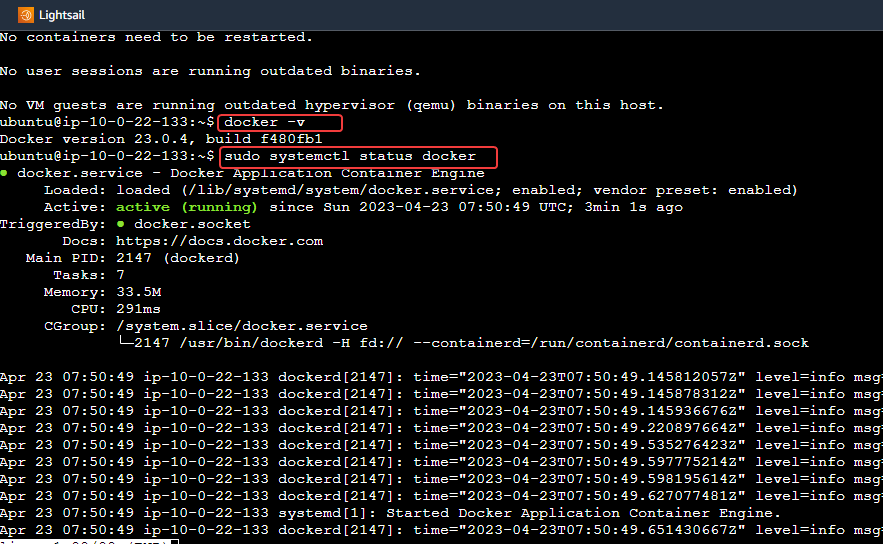
6. Add your Ubuntu user to the Docker Group
You won’t be able to pull and create docker containers using your current user unless you use the sudo. To solve this, we will add our current user to the Docker group, so that we won’t need to use sudo every time.
sudo usermod -aG docker $USERTo check whether your current user is in the Docker group or not, can use:
id $USER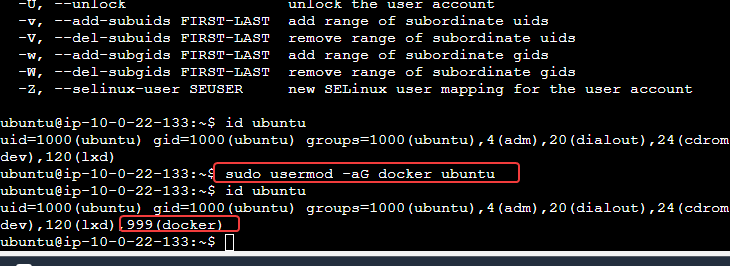
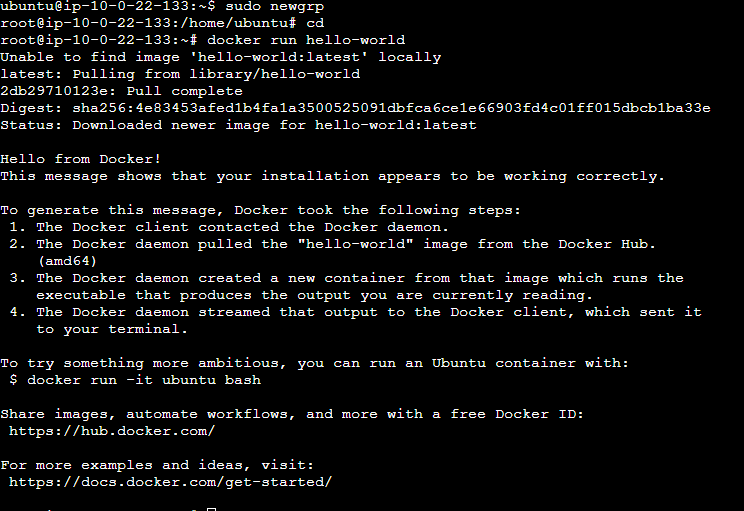
7. Reload the Shell Session
Even after adding the user to the Docker group, you won’t be able to use it without sudo; to do that either you have close the session and connect the Instance again or use the given command:
newgrp docker8. Test Docker by installing Image
We can use the Hello-world or any other image to confirm Docker is working and creating containers successfully. Let’s first try the Hello-world image.
docker run hello-worldThe output will generate some messages related to Docker. This means everything is working fine.
Now, if you want to create a container using some Linux such as AlamLinux, here is the command to do that:
Pull Image:
docker pull almalinuxCreate Container
docker run -dit --name alinux almalinuxNote: –name “alinux” is the name we are assigning to our container.
Connect the container command line:
docker exec -it alinux /bin/bash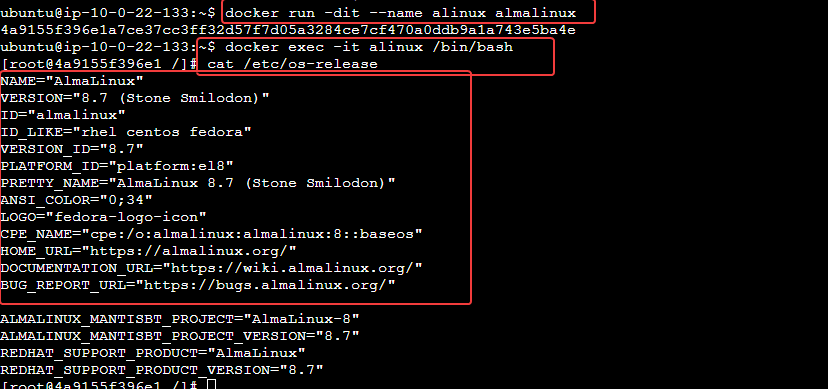
Other Articles:


