Nmap or “Network Mapper” is an open-source tool meant for security experts and developers by the “Nmap Developer Team” since 1997. Here we will learn the commands to install NMAP on Debian 11 Bullseye and how to use it?
Using Nmap, a user can scan the network and or computers on the internet/local (ie with their IP address) can be checked for open ports and the services listening on them. Known and unknown scanning methods make this tool a very powerful program.
The Network Mapper is particularly suitable for finding out all active hosts in the network environment (ping sweeps) as well as their operating system (OS fingerprinting) and version numbers of various services installed there.
Nmap can be used, for example, to test your firewall configuration or computer for open ports and (possibly undesired) services running in the background. Although this tool itself comes with a command-line interface, however using Zenmap the user can handle things more conveniently.
By default, Nmap performs an SYN scan that is based on the compliance of a TCP stack. It can be used to scan thousands of ports and allows a clear and reliable differentiation between ports with open, closed, or filtered status.
Typical usage of NMAP:
- Analyze and scan networks
- Get Network inventory
- Detect connected and active systems
- Determine details of services, configurations, and versions
- Monitoring of operating times, hosts, or service
- Check service updates
How to install Nmap on Debian 11 Linux Bullseye
Apt Repository Update
One of the first we will do is run the system update command. This will rebuild the system repo cache and also let the installed packages achieve their latest versions.
sudo apt update
Install NMAP on Debian 11 Bullseye
We don’t need to add any repository manually because the official package to install NMAP is already available on Debian 11 default base repo. Hence, running the APT package manager command to get it will be enough.
sudo apt install nmap -y
ZenMap (GUI) installation on Debian 11 (optional)
Those who are looking for a graphical user interface to use NMAP for scanning and analyzing networks. They can go for ZenMap, however, its latest is not available for Debian in binary format. Therefore to install it, first, we have to convert its existing RPM binary to Deb. Let’s follow the steps.
Install Alien
sudo apt-get install alien -y
Download the ZenMap RPM
Go to the official website of Nmap and download the Zenmap RPM package.

Convert RPM to Deb
If you have used the browser to download the file, then, first switch to Downloads directory- cd Downloads
sudo alien zenmap-*.noarch.rpm
Install Zenmap
sudo dpkg --install zenmap_*_all.deb
Check Nmap version
To check the version of the current Nmap, use the given command:
nmap --version

Use the Nmap Scanner on Debian 11
Nmap options target range can be a single IP address (it works with IPv4 by default, but you can also use IPv6 addresses), an IP address range, or a host. If you do not enter any further options, just type in Nmap target range, Nmap checks the target computer for the first 1000 ports. These are the majority of the so-called well-known ports that are permanently connected to certain typical applications (such as web servers or POP3).
To see all the options available to use with you can see its help page:
nmap -h
Nmap – Port-Scanning
Using the port option we can scan to know the start of ports whether they are open or closed. However, filtered start can be annoying because it makes the admin scan ports with other methods. Let’s see some common states of ports we usually get while scanning the ports on a network.
Open– It means that an application or service is listening on this port and a connection is therefore possible.
Closed- This means that the host has refused a connection on this port. No application is listening behind it.
FILTERED / BLOCKED means that the host does not respond to requests on this port. This means that the connection is neither confirmed (OPEN) nor rejected (CLOSED). If the host can otherwise be reached, filtering (FILTERED) or blocking (BLOCKED) by a firewall takes place.
unfiltered – In this case, Nmap is reachable to port but cannot confirm whether it is open or closed.
The command to start scanning is:
sudo nmap ip-address
or
sudo nmap website address
To check your computer, you can use:
sudo nmap localhost

To scan the entire subnet use:
sudo nmap IP-address/24

Service and version identification
Service identification is also known as service fingerprinting or version detection (version scan). The service scanning command of Nmap tries to determine installed applications (uses some ports to talk outside the world) and their version as precisely as possible. This can be used to search versions of applications and then available vulnerabilities in a targeted manner.

Use Nmap for Operating system scan
OS identification is also known as OS fingerprinting or OS detection is the process in which we use Nmap to identify what type of operating system is used by the host we are targeting.
OS & Service Identification with NMAP
Option to use for it:
• OS scan (OS detection) = -O Provides exact information of the operating system, if possible. The scan uses different application protocols on the ports that are considered “open” or “open | filtered”.
• Service scan/version scan = -sV Scan ports to identify the applications running behind the open ports.
• RPC scan = -sR – If RPC (Remote procedure call) service is available on a port, the Nmap will scan that to give more information about the operating system.
• Combined OS & service scan -O -sV or -A To provide OS and applications info, combined in a single output.
sudo nmap -O  [IP address]
or
sudo nmap -O [website address]

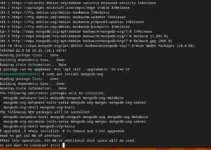
Well, if the Nmap is unable to provide exact information about the target host operating system then you can use the guess option, which is unreliable but give some idea with reliability percentage.
sudo nmap -O --osscan-guess ip-address
You can see that in the given screenshot.

Classic ping scan (network scan)
The given command will use a classic ping scan with ICMP echo requests (-PE), but without port scan (-sn).
sudo nmap -PE -sn -oG - ip-address-range/24

Extended ping scan (network scan)
Using this TCP ping scan combines the classic ping (ICMP echo) with the TCP SYN scan.
sudo nmap -sP -oG - ip-address-range/24
Scanning techniques
Let’s have again a glimpse of Nmap’s various scanning options or parameters that can be used with its command.
| Nmap – scanning techniques | |
| Scan technique | description |
-sT |
Simple connect scan. A full TCP connection is established and cleared down for each port to be scanned. This scan is also available if Nmap is called without root rights. |
-sS |
“SYN-Stealth-Scan”: Similar -sT, but no complete TCP connection is established, therefore less noticeable. (Standard with root rights) |
-sU |
Scans UDP ports instead of TCP. |
-sn |
Ping scan: only checks for availability via ICMP echo request, TCP SYN packet on port 443, TCP ACK packet on port 80, and ICMP timestamp request. Useful for testing entire network areas for active hosts. This scan is also available if Nmap is called without root rights (then only with SYN packets on ports 80 and 443). |
Expert info:
The following more exotic techniques (and others) can be useful in individual cases. However, it is advisable to study the nmap manpage or homepage beforehand to understand the special features and possible findings.
| Special scanning techniques | |
| Scan technique | description |
-sF, -sN,-sX |
Nmap sends deliberately manipulated or incorrect TCP packets to the ports to be scanned. Based on the reaction of the port (or the server), conclusions can be drawn as to whether the port is open or protected by a firewall. Compared to -sTor -sRless conspicuous. |
-sA, -sW |
Also used to test whether a port is open, closed, or protected. Especially good for detecting firewalls. |
Options
Nmap knows various options that can be combined with the scanning techniques mentioned above:
Version and OS detection
| Nmap options (version and OS) | |
| option | description |
-sR |
If an RPC service is recognized, additional RPC packets are sent, as this allows further information on the service listening on the relevant port to be found. |
-sV |
Tries through additional tests to identify the service on each open port. Includes -sR. |
-O |
OS detection: Attempts to identify the target’s operating system using special features of the network implementation. |
-A |
Short for -sV -O |
Ports
By default, Nmap scans all ports from 1 to 1024, plus the higher ones listed in the /usr/share/nmap/nmap-services file. The following options produce a different behavior:
| Nmap – options (ports) | |
| option | description |
-p X |
Scans port X only |
-p X-Y |
Scans ports X to Y only |
-p X,Y,Z |
Scans ports X, Y and Z |
-p- |
Scan all ports |
-F |
Fast scan, only scans the known ports that are listed in the nmap-services file. |
-r |
Scans all ports in numerical order, which can improve clarity with the option -v. By default, Nmap chooses a random order. |
other options
| Nmap – options (miscellaneous) | |
| option | description |
-Pn |
Before a full port scan, Nmap usually checks whether the computer exists and is online (see scan technology -sn). This option switches this off and is required to scan hosts on which no web server is running and which block pings. |
-e eth0 |
Explicitly instructs Nmap eth0to use the network interface. Usually, Nmap chooses the interface itself. |
-oN DATEI |
Log the scan to FILE |
-v |
Outputs additional information during the scan. |
Uninstall or Remove Nmap
Well, if you don’t want Nmap on your Debian 11 anymore then we can use the same APT package to remove it.
sudo apt remove nmap
Other Articles:
• Install WPScan WordPress Security Scanner on Ubuntu 20.04 LTS
• How to install Zenmap Nmap GUI on Ubuntu 20.04 LTS
• 10 popular Open-Source Tools to Secure Your Linux Server in 2022
• How to Open or close ports in AlmaLinux 8 or Rocky Firewall