This tutorial is to know how we can install, config, setup, and use the VSFTPD FTP server on Ubuntu 20.04 LTS Focal Fossa using the command terminal.
Vsftpd is an FTP server that is very consciously designed for security. For example, the program checks its configuration and the rights of all files it is to access before starting and refuses to start if it is configured incorrectly. We can use this open-source program to set up an FTP server on Ubuntu Linux. Here are the commands to follow:
Steps to install and VSFTPD FTP Server on Ubuntu 20.04
The steps given here can be used on Ubuntu 20.04 as well including Debian 11, Linux Mint, and other similar Linux distros.
1. Update Ubuntu 20.04
Let’s start with the running of the system update command because we are going to use an APT package manager to install VSFTPD. Therefore, this step ensures all the latest available updates are on our system.
sudo apt update && sudo apt upgrade2. Install VSFTPD on Ubuntu 20.04
We don’t need to add any third-party repository or download any deb binary manually because the official Ubuntu repository is enough; use the APT package manager command given below and you are done:
sudo apt install vsftpd3. Check Vsftpd service is active
Once the installation is completed, let’s check the service of this FTP server is running in the background without producing any errors.
systemctl status vsftpd --no-pager -l
4. Create a user for FTP on Ubuntu 20.04
Let’s create a user that will not have sudo access and we only use it to access a specific folder under its home directory for FTP to read and write files.
sudo adduser h2smediaNote: Change h2smedia with whatever name you want to give to your user. The above command will also ask you to set the password for the user.
5. Create the FTP folder:
Now, let’s create a folder under the home directory of the newly created user so that the user can only access that to upload and download files. However, to restrict the user’s access to only some specific directory vsftpd uses chroot that we also need to enable, which we do later in this article. Yet, there is one more problem, it is VSFTPD will not allow a user to connect to the FTP server if the home directory is writable. Therefore, we create a root directory for a user named- FTP under the user’s home that will act as- chroot, and inside that, there will be another directory known as upload to hold the files.
Note: Don’t forget to Replace h2smedia with your created user.
sudo mkdir /home/h2smedia/ftpConfigure ownership:
sudo chown nobody:nogroup /home/h2smedia/ftpRemove the root FTP folder writable permission:
sudo chmod a-w /home/h2smedia/ftpCreate a directory to upload files, which going to hold your files:
sudo mkdir /home/h2smedia/ftp/uploadGive created upload folder ownership to our FTP user
sudo chown h2smedia:h2smedia /home/h2smedia/ftp/upload
Now to test, let’s a create demo file inside the upload folder:
echo "My FTP Server" | sudo tee /home/h2smedia/ftp/upload/demo.txtFinally, check the permission for the FTP directory:
sudo ls -la /home/h2smedia/ftp
6. Configuring VSFTPD on Ubuntu 20.04
After installation, the configuration file /etc/vsftpd.conf must be adapted to your own needs with an editor. The file is commented on in detail. Nevertheless, the most important settings are explained below.
sudo nano /etc/vsftpd.conf7. How to enable Anonymous user
(optional) By default due to security reasons, nobody can log in to the FTP server anonymously (without using a valid user). However, due to any reason, if you want to enable it then find a line- anonymous_enable=No and change NO to YES.
8. Enable Local FTP user
Well, to access the FTP server using the users you have created and available on your system, you can look for a line given below in Vsftpd config file on Ubuntu 20.04:
local_enable=YESBy default, it is set to YES or enabled, hence there is no need to do anything.
9. Enable file & folder upload
In the basic configuration, no user is allowed to write via FTP. Neither local users (if they are allowed by “local_enable=YES”), nor anonymous users. To enable uploading of files to FTP server, we need to
# Uncomment this to enable any form of FTP to write a command.
write_enable=YES
10. Restrict local users to their home directory
Now, restrict local users to their home directories. So, that they can’t access the files outside of their home directories. Find the below line and remove the # given in front of it to enable it.
chroot_local_user=YES
Scroll to the end of the file and the following lines, this will ensure that when a user login the FTP server, it routes to the directory that is meant to be accessed.
user_sub_token=$USER
local_root=/home/$USER/ftp
Set Passive ports:
The Vsftpd uses active mode by default on ports – 20 / 21 to communicate if you want to set up passive mode as well which works if there is some firewall issue between client and server. However, both the server and the client must support passive FTP mode for this process to work. However, the passive ports must be allowed in the server firewall. Know about its configuration.
pasv_min_port=30000
pasv_max_port=31000
Also, add the following lines which make sure the VSFTPD only allows the access of users to the FTP server which are in its list not anyone randomly.
userlist_enable=YES
userlist_file=/etc/vsftpd.userlist
userlist_deny=NO
Save the file by using Ctrl+O, hit the Enter Key, and Exit the file using Ctrl+X.
Also, don’t forget to open ports in the firewall, if you are using UFW then use this command other wiser open the system in your cloud or network firewall. Port 900 is for TLS.
sudo ufw allow 20,21,990/tcpsudo ufw allow 30000:31000/tcp11. Add created user to the VSFTPD User list
Next, add the created user to the VSFTPD user list file, so that it allows that user to log in and access the FTP server.
echo "h2smedia" | sudo tee -a /etc/vsftpd.userlistNote: Replace h2smedia with your created user.
12. Restart the VSFTPD Server
To apply the changes we have made so far, restart the FTP server service once:
sudo systemctl restart vsftpd13. Connect to Test Ubuntu 20.04 FTP Server
We can use both the command line and GUI app to test the server to know whether it is working or not. Let’s first try with the command line:
Using Command line
-p is for passive mode
ftp -p 192.168.135.129Note: Replace 192.168.135.129 with your Ubuntu 20.04 Server address where VSFTPD is installed.
As it asked for a Name, enter the FTP server username and then the password, you have set. If you have configured everything right, you will be able to log in.

Test Using File Zilla
Here we are using GUI FTP client FileZilla, you can use any other you have. On your FTP client enter the IP address of the Ubuntu 20.04 server where you have configured the VSFTPD. After that add the username and password.

14. Setup SSL/TSL for Vsftpd on Ubuntu 20.04
By default, the data transfer using the Vsftpd FTP server will not be in an encrypted format even the credentials, to remove this security flaw we can configure SSL using OpenSSL to provide encryption.
On your command terminal, first, run:
sudo openssl req -x509 -nodes -days 3650 -newkey rsa:2048 -keyout /etc/ssl/private/vsftpd.pem -out /etc/ssl/private/vsftpd.pemThis will generate the required 2048-bit private key and self-signed SSL certificate.
Once you have generated the SSL certificate, edit the VSFTPD configuration file and add the location of the Private key and SSL certificate to that.
sudo nano /etc/vsftpd.confScroll down to find the following lines and change their values as shown further:
rsa_cert_file=/etc/ssl/certs/ssl-cert-snakeoil.pem
rsa_private_key_file=/etc/ssl/private/ssl-cert-snakeoil.key
ssl_enable=NO
Change the values of rsa_cert_file and rsa_private_key_file directives with the path of the SSL & Private key file we have generated. Also, change ssl_enable=NO to ssl_enable=YES. As shown below:
rsa_cert_file=/etc/ssl/private/vsftpd.pem
rsa_private_key_file=/etc/ssl/private/vsftpd.pem
ssl_enable=YES
Also, scroll to the end of the file and add:
allow_anon_ssl=NO
force_local_data_ssl=YES
force_local_logins_ssl=YES
This will deny access to Anonymous connection over SSL and force users to transfer data and log in using SSL only:
Save the file using Ctrl+O, hit the Enter key, and then exit using Ctrl+X.
Restart the FTP server:
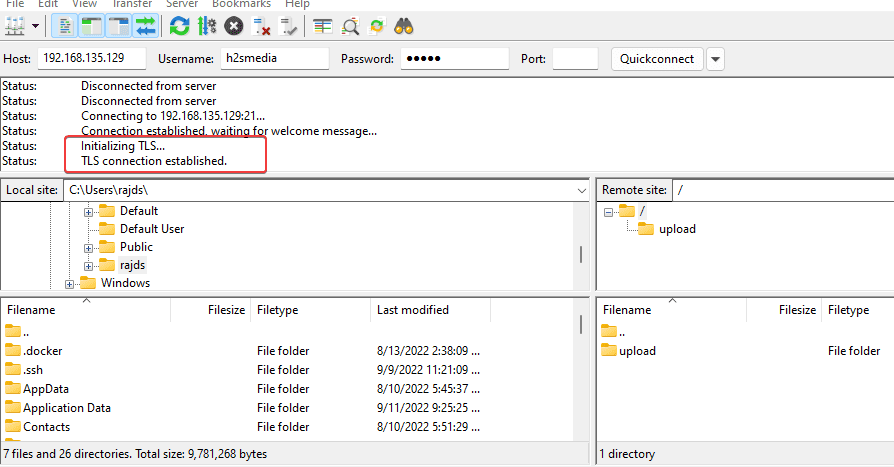
sudo systemctl restart vsftpdNow, check whether we can access the FTP server over TSL or not. Here we are using again the FileZilla:

15. How to update VSFTPD
As we have used the default system repository to install VSFTPD open source FTP server on Ubuntu 20.04, hence we can use the system update and upgrade command as well to get future updates for this server application.
sudo apt update && sudo apt upgrade16. Uninstall or Remove
To completely uninstall VSFTPD from Ubuntu 20.04, in case you don’t require this FTP server anymore on your system. Then, here is the command to follow:
sudo apt autoremove --purge vsftpd*


