With TeX Live, the TeX Users Group has created the most extensive distribution of the TeX free typesetting system. Here we learn how to install Tex Live full distribution version on Ubuntu 20.04 LTS Linux.
Well, Tex Live has replaced the no longer maintained teTeX distribution and is most likely aimed at users who already have experience with DTP and the corresponding programming languages.
It comes with lots of features, such as the TeX Live helps users to prepare and edit texts for typesetting and printing. A large number of typographical rules can be set for this. TeX Live specializes in texts with complex content – the program can also handle tables, for example, and TeX Live is the measure of all things, especially when it comes to setting mathematical formulas.
For this purpose, it brings almost all currently available TeX packages, as well as the macro languages LaTeX and ConTeXt based on them, plus the applications Metafont, MetaPost, BibTeX, and a large number of character sets. In order to deal with all of this, users should bring some prior knowledge with them.
- Run system update
To rebuild the system repo cache and update the installed packages run the system update command i.e
sudo apt update
- Install Tex Live on Ubuntu 20.04
The packages to install Tex live on Ubuntu are already available in the official repository, thus, we can simply use the installation command to get it using APT.
However, the full package of Tex Live to install users needs to download around 2GB and require 5GB free space on a local hard drive. Whereas, if you just want to start with basic and some other packages then don’t go for the full one
Here are the commands:
sudo apt install texlive-full
For basic and some extra packages
sudo apt install texlive
If you wanted to be more precise then as per your profession go for the particular package such as
apt install texlive-publishersapt install texlive-scienceapt install texlive-pstricksapt install texlive-humanitiesapt install texlive-picturesapt install texlive-xetexapt install texlive-metapostapt install texlive-music
However, when you install the full Tex Live distribution, all these packages will automatically get installed.
- Write and compile Latex code
As we ready have installed the Tex Live programming along with other packages, macros, and free fonts. It’s time to write some code to compile and create a PDF.
nano hello-latex.tex
Add the following lines
\documentclass{article}

\begin{document}
Hello world!
\end{document}
Save the file by pressing Ctrl+X and then type Y and hit the Enter key.
Now, compile the created Tex file to PDF using pdflatext command tool-
pdflatex hello-latex.tex
Once you have compiled the code, you will see a PDF file generated using your LaTex code. Now, we can use any PDF viewer to open that file.
By default, Ubuntu comes with a document viewer called – Evince PDF viewer and we can call it directly to open the file using the command line-
evince hello-latex.pdf
or else use some dedicated LaTex editors…
- Install Tex Live Latex Editor
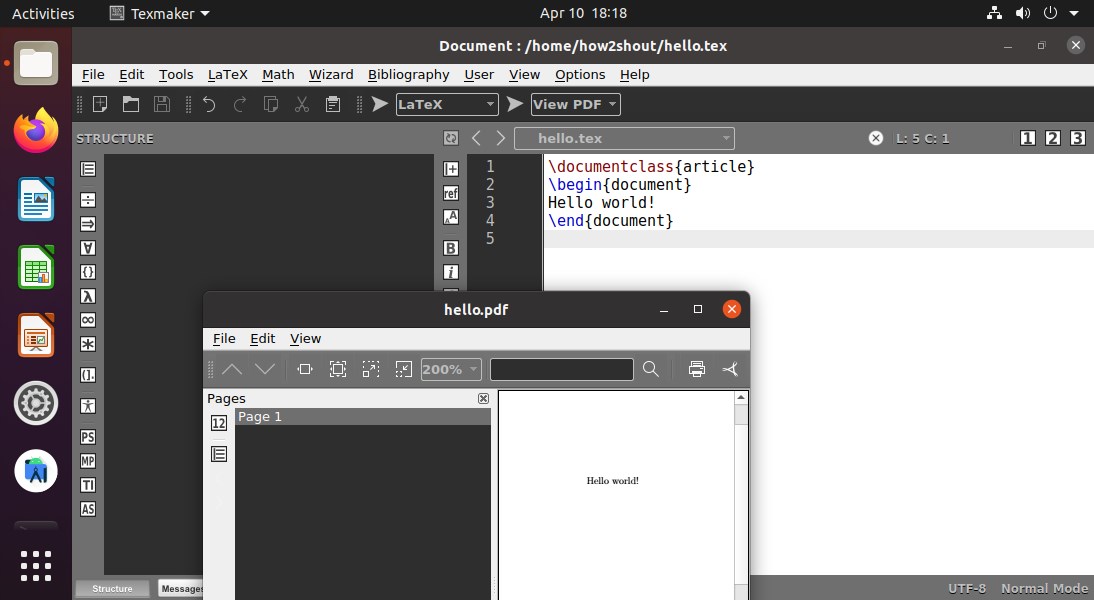
We can also use some LateX editors such as Texmaker, TextStudio, Kite, Overleaf, and more to write and compile Tex Live code including to view the output PDF file. Let’s install the popular one i.e Texmaker. It is also available in the official repo of Ubuntu.
sudo apt install texmaker
Run it by simply typing texmaker in the command terminal or from the Applications.
Once the LateX editor opened, write the code, save it with the extension such as .tex and then press F1 or go Tools and select Quick Build.
Know more about the basic commands of LaTex and how to use them on WikiBooks.


Thanks Heyan Maurya…I didn’t find these instructions at https://www.tug.org/texlive/ Very useful this post. 😀