SSH stands for Secure Shell. As its name implies, SSH is meant to access the Server or Desktop Shell in Windows, macOS, Linux (CentOS, Ubuntu, and all others), and other available operating systems remotely. It is basically a network protocol, which means set rules to establish a secure and encrypted connection between client and server.
The key benefit of using SSH is a secure transmission of data over insecure networks such as the Internet. It is really useful to connect remote computers and access them securely via the command line. We can also use it to transfer files over the skeptical networks. This is the reason why most of the Data centers and Cloud Admins use it to access the servers remotely.
Here we will show the steps to install the OpenSSH server on CentOS 8 Linux. This software package uses SSH (Secure Shell protocol) to provides a secure channel over the network in a client-server architecture.
Enable SSH on CentOS 8 Linux
The below-given steps for the installation of the OpenSSH server will work not only on the CetnOS 8 but earlier versions as well such as 7 & 6.
1. Install OpenSSH Server
Open Command terminal on CentOS 8, if you are using the CLI version then you already there. The installation of OpenSSH is very simple as it is already there on the official repository of CentOS. Thus, one command and it will be on your machine.
sudo dnf –y install openssh-server
The single command will install both OpenSSH client and server daemon- sshd on the system.
2. Start SSH service on CentOS
After the installation, we need to start the service of OpenSSH otherwise, we would not be able to access it via any client tool from Windows, Linux, or other systems. However, after successfully activated it we could easily connect and establish a secure connection. Thus, run the below command:
Start OpenSSH server SSH daemon:
sudo systemctl start sshd
In case you want to stop it, the command will be
sudo systemctl stop sshd
3. Check the sshd status
To know after starting the SSH service whether it is working perfectly or not. Run the command:
sudo systemctl status sshd
You will see a green color “active (running)” text on your screen that will confirm everything is fine.

4. Enable OpenSSH service at boot level
If you want to start the SSH automatically every time you reboot your system. Then use the below command. This will also make sure that you won’t need to start it every time manually.
sudo systemctl enable sshd
To disable it in future (options command) run:
sudo systemctl disable sshd
5. Allow port 22 firewall
In case even after performing all the steps, you wouldn’t be able to access the ssh server from the client due to a firewall, then allow it. To allow the SSH port 22 on CentOS 8 Linux run:
firewall-cmd --zone=public --add-port=22/tcp --permanent
Restart Firewall:
firewall-cmd --reload
6. Connect to the SSH server
To connect and access the CentOS via SSH, simply open a command prompt in Windows or Terminal in Linux and type a command in this syntax:
ssh username@server-IP-address
For example- let’s say the username is root and server address is 192.168.0.12, then the command will be :
ssh [email protected]
If you have changed the default port 22 to something else then it will be:
ssh [email protected]:port
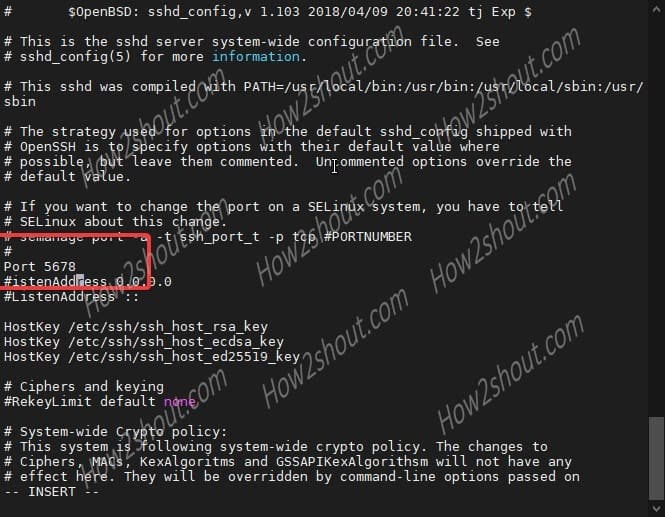
7. Change the default SSh port on CentOS 8/7 (optional)
By default the port used by the SSH is 22, however, to improve security you can change it to something else. For that edit SSHD configuration file.
sudo vi /etc/ssh/sshd_config
- Now, find the line #port 22
- Press Insert key on the keyboard.
- Remove # and change the sshd 22 port with something else, let’s say 5678
- To save the file, press Esc key and then type :wq
Restart sshd service to mark changes into effect.
service sshd restart
If you get an error:
Redirecting to /bin/systemctl restart sshd.service
Job for sshd.service failed because the control process exited with error code.
See "systemctl status sshd.service" and "journalctl -xe" for details.
This means you need to give it SELinux permissions by informing that you have added a new port for the service.
semanage port -a -t ssh_port_t -p tcp 5678
Note: Replace the 5678 with the port number you have entered in the sshd configuration file above
Again if you get an error like:
ValueError: Port tcp/5678 already defined
This means the port you are choosing to use with SSH service is already assigned or reserved for some other service. Therefore, change the port number in the configuration file and again run the semange port command.
Once you successfully added it, check which ports are allowed by the SELinux on your system for SSHD service:
semanage port -l | grep ssh
You will get something like this:
ssh_port_t tcp 5678, 22
Finally, you have two ports for a single service.
9. Block the default CentOS port 22
As we have two ports for a single Secure Shell service, thus we can block the default one that is 22 for permanently. This will increase the security of the system and let us only use the one custom port number for the service.
firewall-cmd --direct --add-rule ipv4 filter INPUT -p tcp --dport 22 -j REJECT
Now, allow the custom port number you have created in the firewall, here in our case, it is 5678
firewall-cmd --add-port=5678/tcp --permanent
firewall-cmd --reload
Now you will not be able to connect via default one and if you try, it will through an error: ssh: connect to host 192.168.0.107 port 22: Connection refused
To connect using the custom ssh port, use this command syntax:
ssh -p 5678 username@server-address
In the above command 5678 is the port number, so replace it with the one you have.
For example:
ssh -p 5678 [email protected]
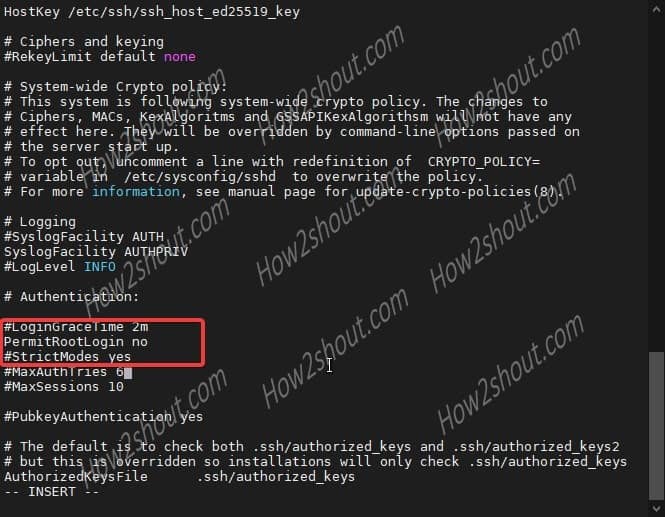
10. Disable root login (optional)
To escalate the security of the server to a further level, you can disable the root user access on SSH. This implies remotely one can access and control the server using any non-root users only.
Again edit SSHD configuration file:
sudo vi /etc/ssh/sshd_config
- Use arrow keys and find the line: “PermitRootLogin=yes“
- Press Insert key on Keyboard.
- Change the value “yes to no”.
- Press Esc key and type- :wq
- Hit the Enter Key
service sshd restart
11. Uninstall OpenSSH
To remove it:
dnf remove openssh-server
Read more: