ClamAV for Linux is a free and open-source virus scanner that is operated via the command line. Here we will see the process of installing ClamAV (Clam AntiVirus) on Rocky Linux 8 or AlmaLinux 8.
ClamAV anti-virus engine scanner clamd (ClamAV daemon) service can be started in the background to receive calls (for virus scanning) from other programs. This antivirus is mainly used as a server-side virus scanner on mail servers. ClamAV offers a Command-line scanner, a Milter interface for Sendmail, an Advanced database updater, and built-in support for archive formats, ELF executables + Portable Executable files, and popular document formats. Hence, it is used for various purposes such as email scanning, web scanning, and endpoint security.
Why a virus scanner for Linux?
As compared to Windows, malware in Linux is generally not much lethal, that’s why Virus scanners are not necessary for Linux operating systems. Therefore, ClamAV is very suitable for heterogeneous environments where both Linux and Windows platforms use together in which files downloaded on Linux transfer to Windows, hence this must be checked and scanned before being passed on. For example, checking mail attachments or for use in combination with third-party programs such as Samba or a mail server.
Clam AntiVirus (ClamAV) installation on Rocky Linux or AlmaLinux
1. Install EPEL Repository
Packages to install Clamv are not available in the Rocky Linux base repo to install. However, we can get them from the EPEL repo (Extra packages for Enterprise Linux). Hence, add that first.
sudo dnf install epel-release -y
2. Run system update
After adding the EPEL repo, run the system update command that will refresh the system repository cache and let it know about the packages available in the added repository to install.
sudo dnf update -y
3. Install ClamAV on Rocky Linux or AlmaLinux
Now, we can easily download and install ClamAV including its service “clamd” to run antivirus in the background and Antivirus updater. Just run the following command:
sudo dnf install clamav clamd clamav-update

4. Add ClamAV user on Rocky Linux or AlmaLinux
sudo groupadd clamav
sudo useradd -g clamav -s /bin/false -c "Clam Antivirus" clamav
5. Set SELinux for ClamAV
There would be some restrictions on some files by SElinux if it has been enabled on our system. Hence, run the below command to configure it for ClamAV.
sudo setsebool -P antivirus_can_scan_system 1
6. Run ClamAV database update command
Before configuring this antivirus further, let’s first run its Virus database signature update command:
sudo freshclam

7. Enable LocalSocket
If you are setting up a simple, local clamd instance then enable the LocalSocket option in its scan configuration file.
sudo sed -i 's/#LocalSocket \/run/LocalSocket \/run/g' /etc/clamd.d/scan.conf
8. Create Systemd file freshclam
By default, there will not be a service file for freshclam. that updates the Clamav Signature database. to run it in the background. Hence, to run the freshclam app in the background as a service, we have to create a Systemd unit file manually.
sudo nano /usr/lib/systemd/system/freshclam.service
Now, copy-paste the following lines:
[Unit]
Description = ClamAV Scanner
After = network.target

[Service]
Type = forking
#if you want to update database automatically more than once a day change the number 1
ExecStart = /usr/bin/freshclam -d -c 1
Restart = on-failure
PrivateTmp =true

[Install]
WantedBy=multi-user.target
Save the file by pressing Ctrl+O and exit the same using Ctrl+X.
9. Start FreshClam and Clamd scanner services
Start and Enable Freshclam
We already have created a service file above, let’s start, enable and check its status:
sudo systemctl start freshclam
sudo systemctl enable freshclam
Check status:
sudo systemctl status freshclam
In case you want to stop it then run:
sudo systemctl stop freshclam

Start and Enable Clamd Scanner service
Clamd is the scanner service that we installed during the installation of this open-source antivirus program for Rocky Linux. Hence, just run the below command to start and enable it.
Start it:
sudo systemctl start clamd@scan
Now, enable it to run automatically with system boot.
sudo systemctl enable clamd@scan
Check Status:
sudo systemctl status clamd@scan
To stop scanner (optional, only if required):
sudo systemctl stop clamd@scan

10. Use Clamav antivirus to Scan files on Rocky Linux
If you want to scan some folder, file, or home directory, here is the syntax to follow on your command terminal:
sudo clamscan filename
To scan the directory:
sudo clamscan -r directoryname
To remove found threats, when you have done a manual scan. Use the following syntaxes.
sudo clamscan --remove filename

sudo clamscan -r --remove directoryname

11. On-Access Scanning (optional)
One more handy feature of ClamAV Antivirus is On-Access scanning which is a form of real-time protection for Linux systems. This feature is run by its client identified by clamonacc alongside Clamd. By default it will not only notify the user when some malicious file discovers, hence will not prevent the reading or writing of such files. Once the user gets notified, he or she can take appropriate action to deal with the malicious files.
To enable the on-access module, run:
First stop clamd service
sudo systemctl stop clamd@service
Now, enable On-Access in the ClamAV scan configuration file:
sudo sed -i 's/#OnAccessPrevention yes/OnAccessPrevention yes/g' /etc/clamd.d/scan.confUsing the above command we have enabled this service in the Scan.conf file. If you want the Scanner to monitor some directory or file, declare that in the Scan.conf file as well.
You can do that by editing the sudo nano /etc/clamd.d/scan.conf file manually and declaring your folder or file to scan in the below format at the end of the file :
OnAccessIncludePath path-to-folder
Or else you can use the command syntax given below. For example, I want to set On-Access scan monitoring for my Home directory.
sudo sed -i 's/#OnAccessIncludePath \/home/OnAccessIncludePath \/home/g' /etc/clamd.d/scan.conf
Also, exclude your Clamd user from scanning, to make sure it will not get blocked accidentally:
sudo sed -i 's/#OnAccessExcludeUname clamav/OnAccessExcludeUname clamscan/g' /etc/clamd.d/scan.conf
Start Daemon and On-Access Scanner service, manually:
sudo su - clamav -c "/usr/local/bin/clamd"
sudo clamonacc
Run clamd service as well:
sudo systemctl start clamd@service
Create clamonacc Service file (optional)
Note: If you want to run the On-Access Scanner service automatically after a system reboot then you have to create a systemd file for it.
You can use the below-given commands:
sudo nano /usr/lib/systemd/system/clamonacc.service
Copy-paste the below-given line in the file:
[Unit]
Description=ClamAV On Access Scanner
Requires=clamd@service
After=clamd.service syslog.target network-online.target

[Service]

Type=simple
User=root
ExecStart=/usr/bin/clamonacc -F --log=/var/log/clamonacc --move=/tmp/clamav-quarantine
Restart=on-failure
RestartSec=7s

[Install]
WantedBy=multi-user.target
Save the file by pressing Ctrl+O and exit the same using Ctrl+X.
Also, create a log file and Quarantine directory declared in the above lines:
sudo touch /var/log/clamonacc
sudo mkdir /tmp/clamav-quarantine
Start and Enable clamonacc service
sudo systemctl daemon-reload
sudo systemctl start clamonacc
sudo systemctl enable clamonacc
Status:
sudo systemctl status clamonacc

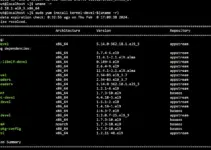
12. Check All the Clamav running services
To check what are services of this Antivirus running on our system run:
ps -ef | grep clam
You will get output something like the below screenshot, with all the details:

13. Uninstall (optional)
If you don’t need ClamAV on your system Rocky Linux or AlmaLinux 8 anymore then run:
sudo dnf remove clamav clamd clamav-update

To know more about the ClamAV scanner and its command refer to Official Documentation.


As I take a quiet moment, I realize that the command in step 6 is incorrect.
Please update article for ClamAV 1.0.x LTS.
For the latest 1.0x use these commands:
wget https://www.clamav.net/downloads/production/clamav-1.0.1.linux.x86_64.rpm
sudo dnf install clamav-1.0.1.linux.x86_64.rpm