Learn the simple commands to install Plex Media Server on Ubuntu 22.04 LTS Jammy JellyFish for creating your streaming server.
Plex was started as a hobby project but with time, it developed into a professional streaming server software to manage various types of media files. Users can install and use it to access their videos, music, and images remotely using the internet or locally over a local network; even you can share them with friends while on the move.
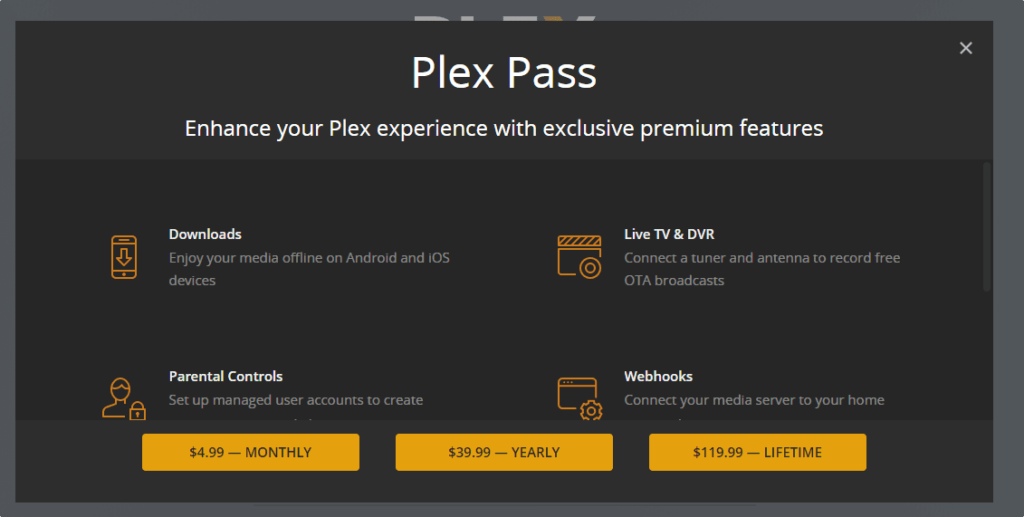
The basic version of the Plex Media Server can be used free of charge, but it only has a limited range of functions. You can get additional functions by purchasing Plex Pass at $4.99/month. As is usual with paid subscriptions, the price decreases as the term increases. The annual subscription costs $39.99 annually whereas if you are already a user of Plex and want a lifetime commitment then it offers a lifelong subscription for a one-time fee of $119.99.
Steps to install Plex Media Server on Ubuntu 22.04 LTS
What do you need to get started?
• Ubuntu 22.04 LTS Jammy JellyFIsh Server
• A non-root sudo user at least
• Active internet connection
1. Update APT cache
First, we should perform the system update on the Linux system before using its package manager. This will rebuild the system cache and also install any update, if available. Along with that, install “CURL” as well.
sudo apt updateAlong with that install some tools we required before performing any further configuration.
sudo apt install apt-transport-https curl2. Add Plex Media Server repository on Ubuntu 22.04
The user can download directly the binary of the Plex server to install it on Ubuntu 22.04, however, the best way is to use its official repository. Here are the steps to add the repo:
Add GPG Key:
curl https://downloads.plex.tv/plex-keys/PlexSign.key | gpg --dearmor | sudo tee /usr/share/keyrings/plexserver.gpg > /dev/nullNext, use the given command to add the repo:
echo deb [arch=amd64 signed-by=/usr/share/keyrings/plexserver.gpg] https://downloads.plex.tv/repo/deb public main | sudo tee /etc/apt/sources.list.d/plexmediaserver.listRun system update
sudo apt update3. Command to Install Plex for Ubuntu 22.04 Server
Once we have everything set, it becomes very easy to install the Plex Media server just by using the APT Package Manager. Here is the command:
sudo apt install plexmediaserverWhen it asks to update the Plex Media configuration file, then press Y and hit the Enter key.

4. Check Plex Service Status
To confirm that the Plex media server is running the background fine. Run the status command.
sudo systemctl status plexmediaserverIf it is not active then use the given command to start and enable it.
sudo systemctl enable --now plexmediaserver
5. Access Plex Media Settings Web Page
Now, let’s access the web interface of the Plex Media Server to configure it further. For that simply open any web browser that can access the IP address of the Ubuntu 22.04 server where you have installed the Plex. The format is given below:
Plex server Port number is 32400
http://server-ip-address:32400/webNote: Replace the server-IP address with your original server Ip-address.
Also, if you are using the Firewall, then open port 32400 in that:
sudo ufw allow 32400——————————————————————————-
For remote Ubuntu 22.04 Server
If your Ubuntu is running on some remote server, then to access the Plex configuration page for further setup, open an SSH Tunnel to remove the server on your local PC to access the Plex web setup.
ssh remote-server-ip -L 8888:localhost:32400Then on your local machine, you can use:
http://localhost:8888/web——————————————————————————–
6. Register your Media Server
Once you have the Plex Web, the user has to register the server in the Plex account he or she owns by logging in. If you don’t have an account with Plex, then use any given method to register one.

You will see a glimpse of Infographics showing how the Plex Works. Well, simply click on the GOT IT! button to move forward.

7. Plex Pass on Ubuntu 22.04
This is an optional thing, if you want some advanced feature then subscribe to Plex pass plans, otherwise close it; because we can do this later.
8. Server Setup
To identify your Media server easily over the network and in case you have multiple Plex servers under a single account, give some user-friendly name to it. Here we are adding –h2smedia. You can give whatever you want. Further, those of you who are planning to access the Plex outside your home network, don’t forget to select the box given for “Allow me to access my media outside my home”, if not selected by default.

9. Add Media Library
To add your media files for accessing them through Plex, click on the “Add Library” button. 
Select the category of Media files that you want to add such as Music, Photos, and Videos. Here we are selecting Music.

Click on the “Browser for Media Folder” button and then navigate to the folder where you have your Audio files. Select that and then click on the “Add Library” button.

Note: In case even after adding the media files, the same is not showing on the Plex Web Client to play, then give the rights of the folder where you have your content to the Plex dedicated user.
sudo chown -R plex:plex /media/your-content-folder/ Replace /media/your-content-folder/ with your actual folder.
10. Plex Media Web Client
Once you have added the media files, you will have that on the Plex Web-based client either on your browser or devices. Apart from that, we can also watch Live TV, Movies & Shows, Web shows, and other content offered by the Plex itself.


11. Nginx as reverse Proxy for Plex Media Server
Nginx is a web server and also can act as a reverse proxy to secure and give better performance to your web applications, here it is Plex Media server. Moreover, its installation is super easy because the packages we need are already available in the Ubuntu 22.04 repository. Hence, just run the given command:
sudo apt install nginx Start and enable the Nginx service
To make sure the Nginx could start automatically if crashed or on system reboot, use the given command that not only starts its service but also mark it as enabled to start with system boot.sudo systemctl enable --now nginx To confirm the service status:
systemctl status nginx Create Nginx Configuration file for Plex
Once the Nginx is up and running, let’s create a configuration file that will tell the Nginx what is Ip-address and the port number where the Plex is running, and what port Nginx must use to show it on the browser; so that the user can access it easily.sudo nano /etc/nginx/conf.d/plexmediaserver.conf
Now, copy-paste the below-given lines. In this change the server_name value to either a fully qualified domain or if you want to only access the Plex via the Ip-address then instead of giving the domain name just use the IP address.
For example server_name demo.how2shout.com, change to whatever domain name you want to use. However, make sure that A record in your DNS is already pointed toward
your server-IP-address where you have installed the Plex. In another scenario, if you want to use the reverse proxy with only IP then instead of a domain name, remove the # and replace server-ip with your IP address.
server {
listen 80;
server_name demo.how2shout.com;
#server_name server-ip;

location / {
proxy_pass http://127.0.0.1:32400;
proxy_set_header Host $host;
proxy_set_header X-Real-IP $remote_addr;
proxy_set_header X-Forwarded-For $proxy_add_x_forwarded_for;

#upgrade to WebSocket protocol when requested
proxy_set_header Upgrade $http_upgrade;
proxy_set_header Connection "Upgrade";
}
}
Save the file by pressing Ctrl+O, Hit the Enter key, and then to exit use: Ctrl +X. To check the configuration file we have created is error-free run:
nginx -tAfter that reload the Nginx service.
sudo systemctl reload nginx Now, open the browser and start accessing your Plex media server via the Domain name or Ip-address on the default HTTP 80 port.
12. How to update Plex Media Server – Ubuntu 22.04
Well, as we have used the official repository of Plex to install it on Ubuntu 22.04, we don’t need to do anything additional to update it. Running the simple system update and upgrade command will do its work.
sudo apt update && sudo apt upgrade13. Uninstall or Remove Plex
Those who are not interested anymore in this free media server then can completely remove it using the given commands:
sudo systemctl stop plexmediaserver
sudo apt remove plexmediaserver*
To remove its repo:
sudo rm /etc/apt/sources.list.d/plexmediaserver.list
To remove the Nginx server:
sudo systemctl stop nginx
sudo apt remove nginx*
In this way, we can install and use Plex Media Server on Ubuntu 22.04 Jammy JellyFish. To know more information about it, you can refer to the official Plex Knowledge page.
Other Articles:
• NGINX vs. Apache: Comparision of web servers to host your website
• 3 Ways to Install VLC Media Player on Debian 11 Bullseye Linux
• Use Snap command to install Plex Server on Ubuntu
• Install Plex Media Server on Debian 11 Bullseye


