We are going to learn the commands to install OpenCV (Open Source Computer Vision Library) on Ubuntu 22.04 or 20.04 Linux system using the terminal.
OpenCV is a Python library for those who develop applications for computer vision and machine learning. This powerful library offers useful functions and algorithms that are helpful in image and video processing, object detection, and more. As Python is a cross-platform programming language so does the OpenCV library which is free to users because of its open-source license.
It is quite useful in application areas such as Object detection, gesture & Facial recognition, Structure from motion (SFM), Motion video tracking, and more…
In this article, we see the steps to install OpenCV for Python on Ubuntu Linux.
Step 1: Update Ubuntu Packages
To install the Python library we need to have access to the command terminal, so get that. If you are using the Ubuntu GUI Desktop, then can press Ctrl+Alt+T to open Terminal Application. After that, run the system update command to rebuild the APT package index and install the latest update.
sudo apt updatesudo apt upgradeStep 2: Install Required Dependencies
There are a few dependencies that we need to install on our Ubuntu Linux before setting up OpenCV. So, to get them simply in your terminal execute the given command:
sudo apt install python3-dev python3-pip python3-numpy build-essential libgtk-3-dev libavcodec-dev libavformat-dev libswscale-dev libv4l-dev libxvidcore-dev libx264-dev libjpeg-dev libpng-dev libtiff-dev gfortran openexr libatlas-base-devStep 3: Install OpenCV for Python on Ubuntu
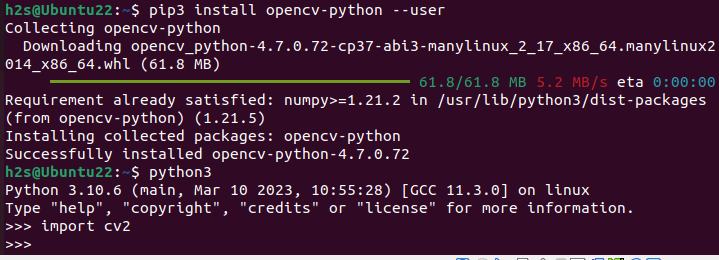
As you are done installing all required dependencies, use Python’s PIP package manager to install the OpenCV library on Ubuntu Linux. Moreover, not only Ubuntu users but any Linux including Windows and MacOS systems with already installed Python and PIP can use the given command to install OpenCV.
pip3 install opencv-pythonStep 4: Verify the Installation
Now, we are done with the setting up of OpenCV but how to confirm, it is installed correctly and working without producing any errors? For that on your command terminal switch to Python interpreter by running:
python3And after that import the OpenCV module by running:
import cv2If the library is imported successfully without any errors, it is working fine.
Step 5: Install Extra OpenCV Packages (Optional)
This step is not necessary but those who want to install further packages available to extend the functionality of OpenCV can install them using the given command syntax:
pip3 install opencv-contrib-python“OpenCV-contrib” module offers additional functionality, including advanced algorithms and techniques.
Conclusion:
Installing OpenCV for Python on Ubuntu is not a complicated task and the same as we have learned in this tutorial. Any user who has Python installed on his system can easily get OpenCV to have its computer vision capabilities in an application.
Other Articles:


