Mattermost is an open-source instant messaging service. It comes in both free and paid versions. It can be operated either in the cloud or on-premise as a web application. Here we learn how to install and configure Mattermost on Rocky Linux.
Mattermost enables the communication between individuals and groups. Communication can take place as a chat, video call, or normal telephone call. The exchange of data and links is also possible. Mattermost can be seen as a direct competitor of MS Teams or Slack in this regard. If you are cloud users such as AWS, Google, Azure, and others pre-built open-source images are available with them to install and deploy Mattermost on the cloud as quickly as possible. After installation, its web interface can be accessed using the browser or Mobile & Desktop Apps on Windows, Linux, and Mac, iOS, and Android.
Under the name Omnibus, Mattermost released package, a complete stack of the free messaging system, can be installed with just a few commands. In addition to Mattermost itself, the administrator can set up PostgreSQL as a database, Nginx as a proxy web server, and Certbot to issue and renew SSL certificates in no time at all. However, Omnibus is only for Debian based system and will not work on RHEL or its derivatives, hence we have to set up Mattermost on Rocky Linux step by step.
Steps to Install Mattermost on Rocky Linux 8
1. Run system update
First, update the existing packages available on your Rocky Linux to make sure everything will be in its latest state.
sudo dnf update
2. Install MySQL Server on Rocky Linux
If you already have a server installed with MySQL database then you can skip this step. Otherwise, use the below-given command to install MySQL server on Rocky Linux to store the data that will be generated by Mattermost.
sudo dnf install mysql-server

Once the installation is completed, ensure the MySQL service is enabled and running…
sudo systemctl enable --now mysqld

sudo systemctl start mysqld
Check the status-
sudo systemctl status mysqld
Secure your Database server installation.
sudo mysql_secure_installation
As we run the above command, it will ask us to set a password for Mysql and remove other things that make the database vulnerable.

3. Create Database for Mattermost
Now, let’s log in to our MySQL server and create a Database to use later with Mattermost installation.
To log in as a root user type-
mysql -u root -p
Create Database:
Replace h2sdb with the name that you want to give to your database.
CREATE DATABASE h2sdb;
Next, create a database user.
Here h2suser the username and pass is the password we used for it. You can change these values…
CREATE USER 'h2suser'@'localhost' IDENTIFIED BY 'pass';
Assign all rights of the database to the created user.
grant all privileges on h2sdb.* to h2suser@localhost;
Reload the grant tables and exit-
flush privileges;

exit;
4. Install Mattermost Server on Rocky Linux 8
Now, let’s download the latest version of the Mattermost server to install. For that go to the official website’s download page and copy the latest tar file download URL and use it with wget command on your Rocky Linux terminal to get it. While writing this article, the latest available version was 5.34.2, if it is the same in your case then you can use the below command as well.
sudo dnf instal wget -y
wget https://releases.mattermost.com/5.34.2/mattermost-5.34.2-linux-amd64.tar.gz

Extract and move the downloaded file to /opt directory. So, that we won’t delete it accidentally.
tar -xf mattermost-*-linux-amd64.tar.gz
sudo mv mattermost /opt
Create Data directory in the copied folder to store data-
sudo mkdir /opt/mattermost/data
5. Create user and Group
For security reasons, we will create a separate user and group for Mattermost on Rocky Linux. It will have the right to manage and access Mattermost services.
Add user and group called mattermost–
sudo useradd --system --user-group mattermost
Give the newly created user a right to manage copied folder in /opt directory.
sudo chown -R mattermost:mattermost /opt/mattermost
Set Read and write permissions.
sudo chmod -R g+w /opt/mattermost
6. Set up database driver & data source in
Edit the configuration file and change two things- Database driver name and Datasource-
sudo dnf install nano -y
sudo nano /opt/mattermost/config/config.json
Database Driver:
Use your keyboard arrow keys and scroll down until you find DriverName values Under SQL Settings. By default, it will be set for PostgreSQL and if you are using MySQL then change it to mysql.
Set “DriverName” :”mysql”
Next, just below it, you will find the Data Source line that is-
"postgres://mmuser:<mmuser-password>@<host-name-or-IP>:5432/mattermost?sslmode=disable&connect_timeout=10".
Change that with the below one and also replace the bold text
"mmuser:<mmuser-password>@tcp(<host-name-or-IP>:3306)/mattermost?charset=utf8mb4,utf8&readTimeout=30s&writeTimeout=30s"
Replace–
mmuser– With your MySQL database user
mmuser-password- Replace with the Database password
<host-name-or-IP>– Type your Database server Ip-address. If you are using the same server for both Mattermost and MySQL database, then replace it with localhost or 127.0.0.1
mattermost– Delete it type the name of your database.
Example– If you use our MySQL database value then this Data source line will be like this
"h2suser:pass@tcp(127.0.0.1:3306)/h2sdb?charset=utf8mb4,utf8&readTimeout=30s&writeTimeout=30s"
Save and close the file by pressing Ctrrl+X, type y, and hit the Enter Key.

Test everything is working fine
Switch to mattermost directory and start its server-
cd /opt/mattermost

sudo -u mattermost ./bin/mattermost
You will see some text where the server is listening on the 8065 port showing it is working and the configuration file is valid. To stop it, press Ctrl+C.

7. Create Mattermost systems service file on Rocky Linux
To run the service of this free messaging platform to run at the background that can be stopped or start using systemctl command, let’s create a configuration file for the same.
sudo nano /etc/systemd/system/mattermost.service
Copy the below-given code in that.
[Unit]
Description=Mattermost
After=syslog.target network.target mysqld.service

[Service]
Type=notify
WorkingDirectory=/opt/mattermost
User=mattermost
ExecStart=/opt/mattermost/bin/mattermost
PIDFile=/var/spool/mattermost/pid/master.pid
TimeoutStartSec=3600
LimitNOFILE=49152

[Install]
WantedBy=multi-user.target
Save the file by press ctrl+x then type- Y and hit the Enter Key.
Make the file executable-
sudo chmod 664 /etc/systemd/system/mattermost.service
Reload the systemd services-
sudo systemctl daemon-reload
8. Enable and Start its Service
Now, enable the above-created service file to run with the system boot and also start the same.
sudo systemctl enable mattermost.service
Start it-
sudo systemctl start mattermost.service
Check Status-
sudo systemctl status mattermost.service
To exit- Ctrl+C

9. Access Mattermost web interface
If you want to access this chatting server using the Ip-address, then first open port number 8065 on your Rocky Linux
sudo firewall-cmd --zone=public --add-port=8065/tcp
Now, open your web browser and point it to the server-IP-address where you have installed the Mattermost. For example- if the IP address of your server is 192.168.0.108, then the URL will be like this-
192.168.0.108:8065
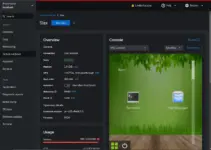
You will find this-
Enter your email address and other things to create an account.

10: Use fully qualified domain and 80/443 port
There are two ways to use FQDn, however, both require first the mapping of domain with server-IP address using the DNS server.
1st Method:
If you want to use standard FQDn instead of IP-address to access the server, then first point the domain to the Mattermost serve IP-address and after that go to System console and select webserver.
There enter the website domain or URL which you have to point to its server. And if you don’t want to use 8065 port number with domain then replace it with 80 or 445.

Once set, Test the Live URL. If it works fine, then you can use the Let’s Encrypt option given there to get the free SSL certificate.
2nd Method
Using Nginx Reverse Proxy
Although we can directly point the domain name to your server IP address to access Mattermost using a fully qualified domain, however, to improve security let’s install and Nginx as a Reverse proxy.
sudo dnf install epel-release
sudo dnf install nginx
Enable and start
sudo systemctl enable --now nginx
sudo systemctl start nginx
Create configuration file
sudo nano /etc/nginx/conf.d/mattermost.conf
Paste the below code and replace mattermost.how2shout.com with the domain name you want to use…
upstream backend {
server 127.0.0.1:8065;
keepalive 32;
}

proxy_cache_path /var/cache/nginx levels=1:2 keys_zone=mattermost_cache:10m max_size=3g inactive=120m use_temp_path=off;

server {
listen 80;
server_name mattermost.how2shout.com;

location ~ /api/v[0-9]+/(users/)?websocket$ {
proxy_set_header Upgrade $http_upgrade;
proxy_set_header Connection "upgrade";
client_max_body_size 50M;
proxy_set_header Host $http_host;
proxy_set_header X-Real-IP $remote_addr;
proxy_set_header X-Forwarded-For $proxy_add_x_forwarded_for;
proxy_set_header X-Forwarded-Proto $scheme;
proxy_set_header X-Frame-Options SAMEORIGIN;
proxy_buffers 256 16k;
proxy_buffer_size 16k;
client_body_timeout 60;
send_timeout 300;
lingering_timeout 5;
proxy_connect_timeout 90;
proxy_send_timeout 300;
proxy_read_timeout 90s;
proxy_pass http://backend;
}

location / {
client_max_body_size 50M;
proxy_set_header Connection "";
proxy_set_header Host $http_host;
proxy_set_header X-Real-IP $remote_addr;
proxy_set_header X-Forwarded-For $proxy_add_x_forwarded_for;
proxy_set_header X-Forwarded-Proto $scheme;
proxy_set_header X-Frame-Options SAMEORIGIN;
proxy_buffers 256 16k;
proxy_buffer_size 16k;
proxy_read_timeout 600s;
proxy_cache mattermost_cache;
proxy_cache_revalidate on;
proxy_cache_min_uses 2;
proxy_cache_use_stale timeout;
proxy_cache_lock on;
proxy_http_version 1.1;
proxy_pass http://backend;
}
}
Save the file- Ctrl+X, press Y, and hit Enter key.
Check configuration file is working without any error-
sudo nginx -t
Restart Nginx Server
sudo systemctl restart nginx
Open port 80 and 443 on the server firewall
sudo firewall-cmd --add-service={http,https} --permanent
sudo firewall-cmd --reload
Now, if you have pointed your domain to the Server Ip-address then you will be able to access it in the browser. However, an SSL certificate error will be there. Thus, to remove that install one using the Let’s Encrypt.
To know more refer to the official Mattermost documentation.