Learn the steps and commands to install Checkmk open source monitoring tool on Ubuntu 22.04 LTS Jammy JellyFish Linux server.
What is Checkmk?
Checkmk is a wide-ranging IT monitoring system that, with its monitoring capability, enables system administrators, IT managers, and DevOps teams to identify and quickly resolve issues across their infrastructure. The tool’s customers include several well-known companies such as Airbus and Bosch.
Why do we use Checkmk?
Checkmk’s many features include inventory management, maintenance scheduling, web traffic reporting, and CPU monitoring and configuration management. Checkmk also has a wide range of unique advantages: it is ultra-scalable, offers millions of services as part of monitoring, and has excellent storage performance for live data through RAM. Checkmk is suitable for all common operating systems.
Further, the barrier to starting monitoring is very low. For example, the entire configuration is done via the web interface. At the same time, Checkmk scales very well and can also monitor complicated structures.
What versions of Checkmk are there?
It is available in three different versions – as an open-source, enterprise, and managed services versions. Users of the software include companies of all sizes, especially those with multiple data centers and very large scale-ups that require infrastructure and application monitoring.
Steps to Install Checkmk On Ubuntu 22.04 LTS Linux
Note: Log in as root to run the below commands…
1. Update Ubuntu 22.04
First, run the system update command and let your system install the latest available package and security updates.
sudo apt update && sudo apt upgrade
2. Download Checkmk Raw edition’s Deb file
Go to the official website of Checkmk and select the stable version of the Linux package you want to download. As here we are using the Ubuntu server, we will go for Ubuntu one available for 22.04 LTS; similarly, users on some old versions of Ubuntu such as 20.04 and 18,04.. can download the available file corresponding to them.
If you want to install it on a remote or CLI server, then connect it using SSH and then with the help of wget a command download it. For example, while writing the tutorial, the latest version of Checkmk was 2.1.0p1, thus the command will be like this:
wget https://download.checkmk.com/checkmk/2.1.0p1/check-mk-raw-2.1.0p1_0.jammy_amd64.deb
3. Install Checkmk on Ubuntu 22.04
The installation of the tool is pretty simple. As we already have its Debian packages, thus let’s run the command to install the same.
sudo apt install ./filename
sudo apt install ./check-mk-raw-*.jammy_amd64.deb
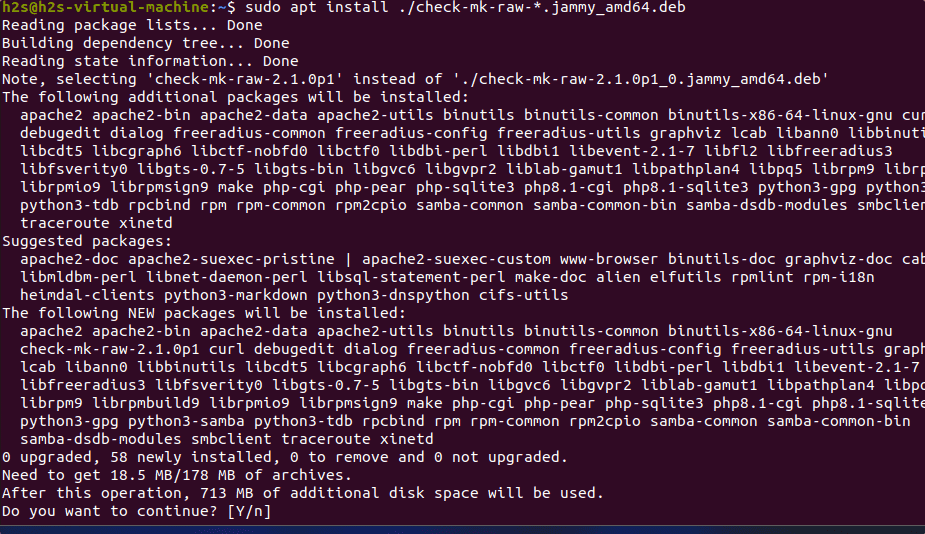
To check the installed version, simply run:
omd version
Note: Open Monitoring Distribution (OMD) is also an open-source project developed by Mathias Kettner to manage monitoring solutions made up of various components. In short, we can use this command tool to manage Checkmk services.
4. Creating CheckMk monitoring instance or site
To use Checkmk we have to create an instance that is also known as a site. It works on the instance model so that if a server has multiple copies of Check_mk then creating an instance will isolate them from each other, hence, there would not be any kind of hindrance. However, creating a single instance will be enough. Here is the command to do that.
sudo omd create instance-name
Replace the instance name with whatever you want to give it. For example, here we are using h2smonit, then the command will be:
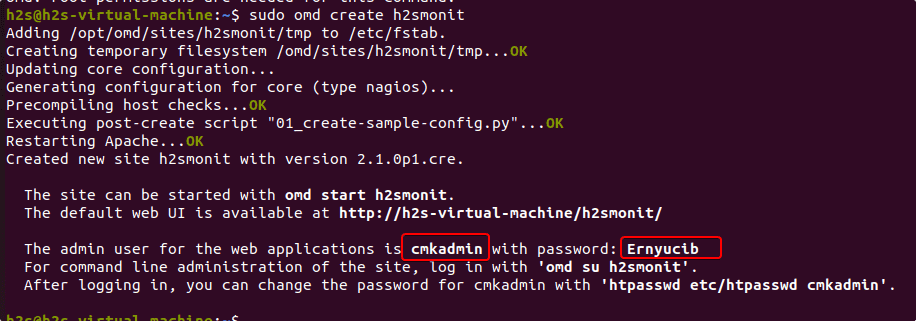
sudo omd create h2smonit
You will get output something like shown in the below screenshot. Along with details such as user name and password to login to the web application interface of Checkmk.
4. Start Checkmk Instance on Ubuntu 22.04
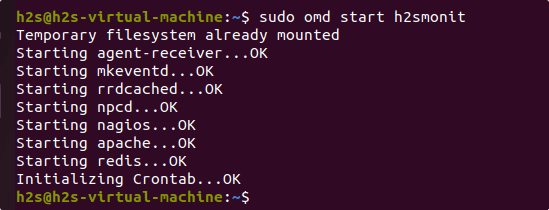
The instance has been created and we already have the admin credential to log in to its web interface from where we can monitor our network devices and systems. However, before that, we have to start the services of the created instance.
For that use the command- sudo omd start instance-name, here we have used h2smonit, thus the command will be:
sudo omd start h2smonit
5. Access Check_mk web interface
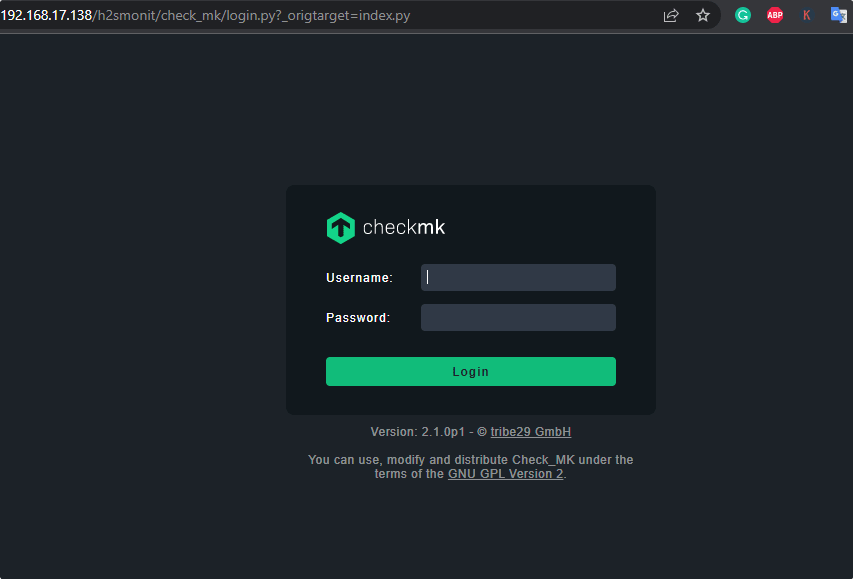
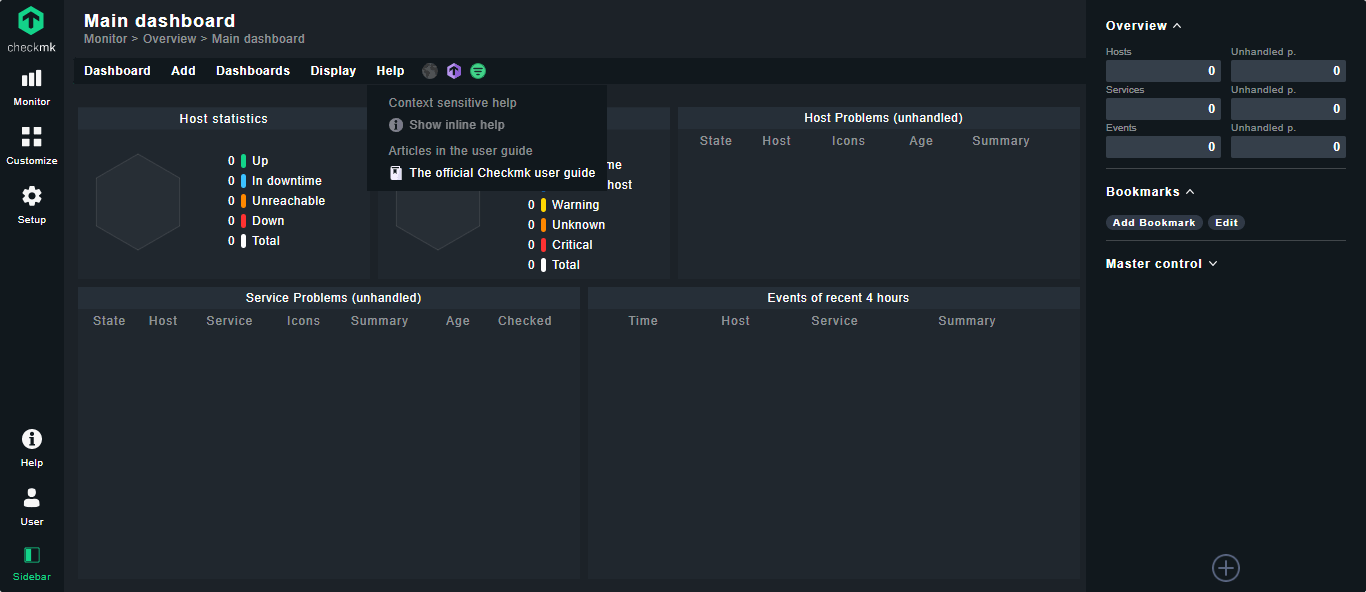
Finally, our instance is up and running, now it’s time to access the web interface of this IT infrastructure monitoring solution. Open a browser on your local machine and enter the IP address or domain name of the Ubuntu server where you have installed Checkmk along with the instance name. example- http://ipaddress/instance-name
Here our instance name is h2smonit and our IP address is 192.168.17.138, hence the URL will be – http://192.168.17.138/h2smonit/
6. Change Admin password (optional)
Once you logged in if you want then change the Admin user password that was generated by the Checkmk’s OMD command so that you can easily remember it.
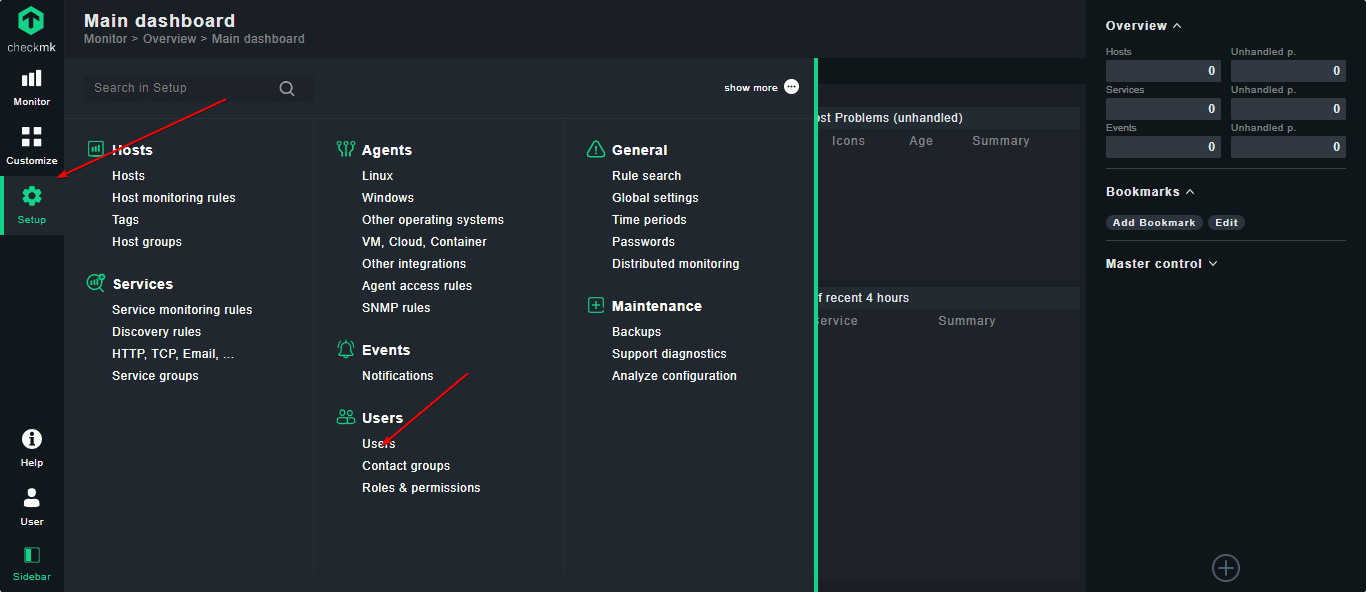
For that, go to Setup – Configuration, select Users, and click on the Pencil icon given in front of your Admin user.
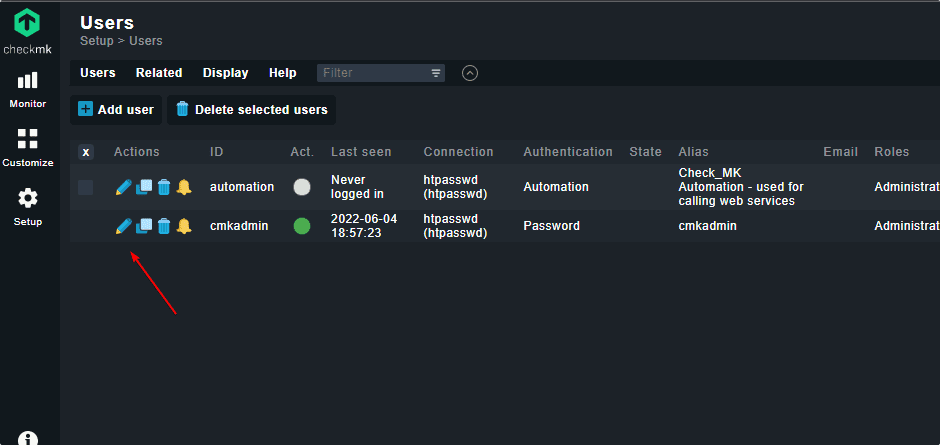
Enter the Password you want to use and then click on the Save button. This will automatically log you out immediately. Now, log in again with the new password you have created.
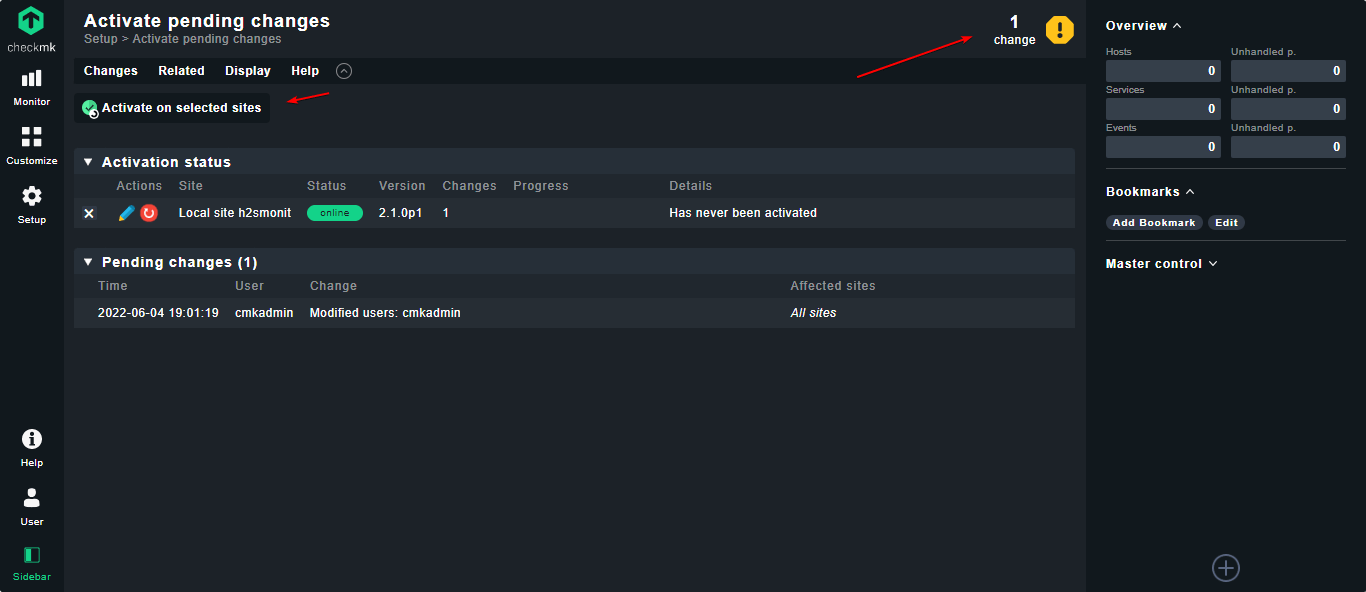
One thing that needs to be noted, every time we make some change in the configuration of Checkmk, a yellow color Change button will get highlighted. And to implement the changes properly, click on it, select the Changes you have made, and hit the Activate it.
6. Install Checkmk agent to Monitor Linux or Windows hosts
As you see no activity would be there on Checkmk because, yet we have not told our monitoring server which machines need to be monitored.
So, whatever machine you want to be get checked by this Linux monitoring tool, we have to first install the Checkmk agent on that including the Server where you have installed the Checkmk itself. To make all this easy, go to the Monitor Agent option available in the Setup menu area and download the files as per the system you want. For example, Deb file for Debian and Ubuntu-based systems, RPM for RHEL/CentOS, MSI for Windows, and so on.
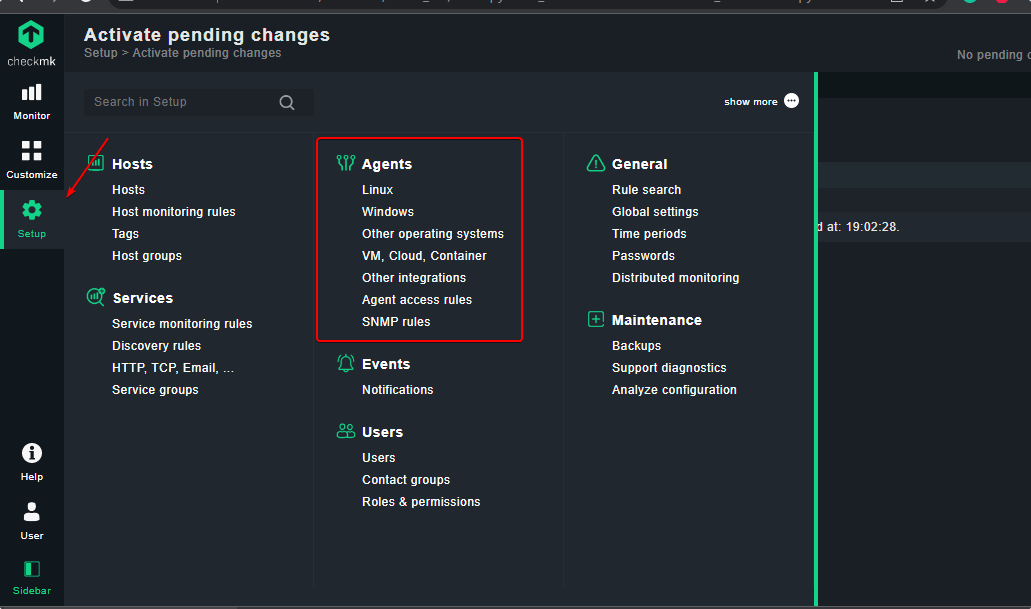
——-If you want to use the command line to download the Linux Agent
#On Ubuntu or Debian Linux
First Install Xinetd- Xinetd (Extended Internet Service Daemon), if not already. It is an open-source super-server daemon that manages Internet-based connectivity.
sudo apt-get install xinetd
After that Download the agent file from the Setup area either by directly clicking on it or using the wget :
wget address-of-agent-you-copied
For example:
wget http://192.168.17.138/h2smonit/check_mk/agents/check-mk-agent_2.1.0p1-1_all.deb
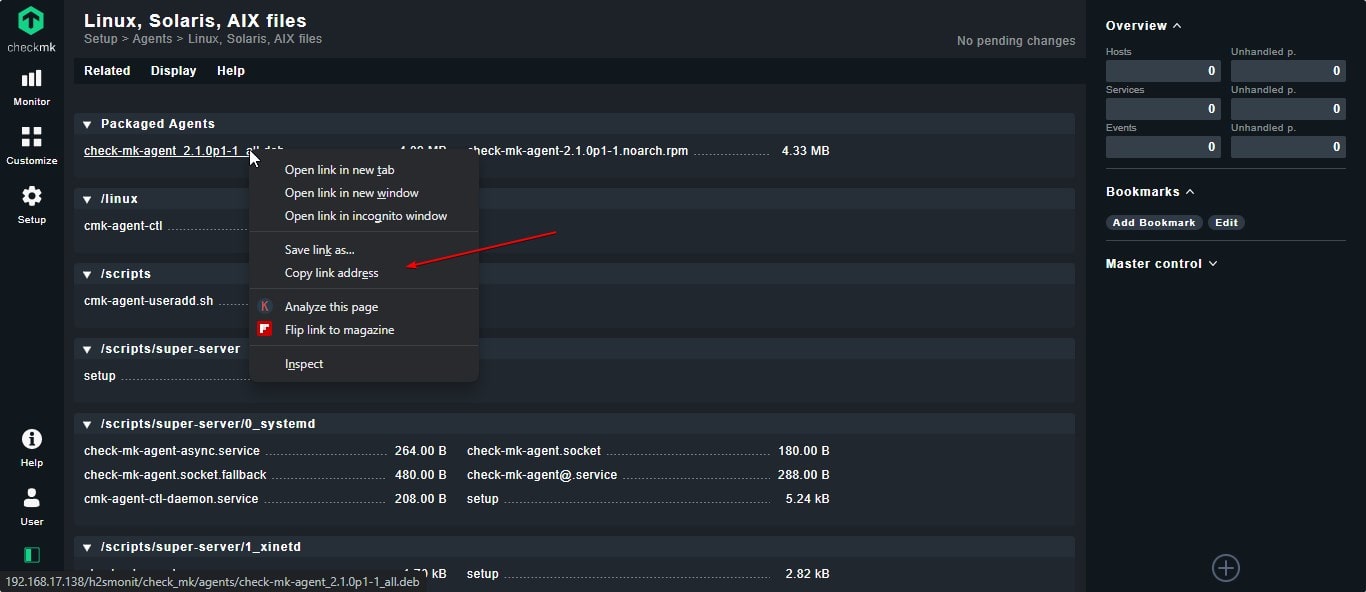
To install-
sudo apt install ./downloaded-file-name
example– sudo apt install ./check-mk-agent_*_all.deb
#For RHEL or CentOS Linux
As we have done for Ubuntu or Debian-based system above if you want to download the RPM package of Check_Mk Agent and install the same.
sudo yum install -y xinetd
Download file
Right-click on the RPM package and copy its link:
wget file-link
Installation
sudo yum install -y ./check-mk-agent-*.noarch.rpm
To check the installed Agent version, we can use :
check_mk_agent
#For Windows
To monitor Windows OS-based system, we just need to download the MSI package of the Check_mk agent and the installation will be like any other Windows software.
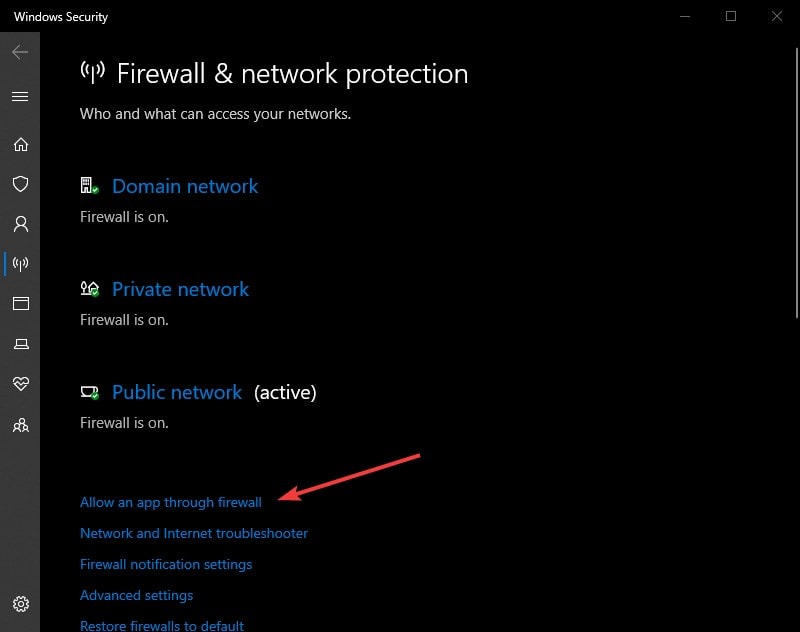
On Windows, you would also need to allow the Check_mk Agent application in the firewall. For that open firewall, select Allow an app through the firewall option.
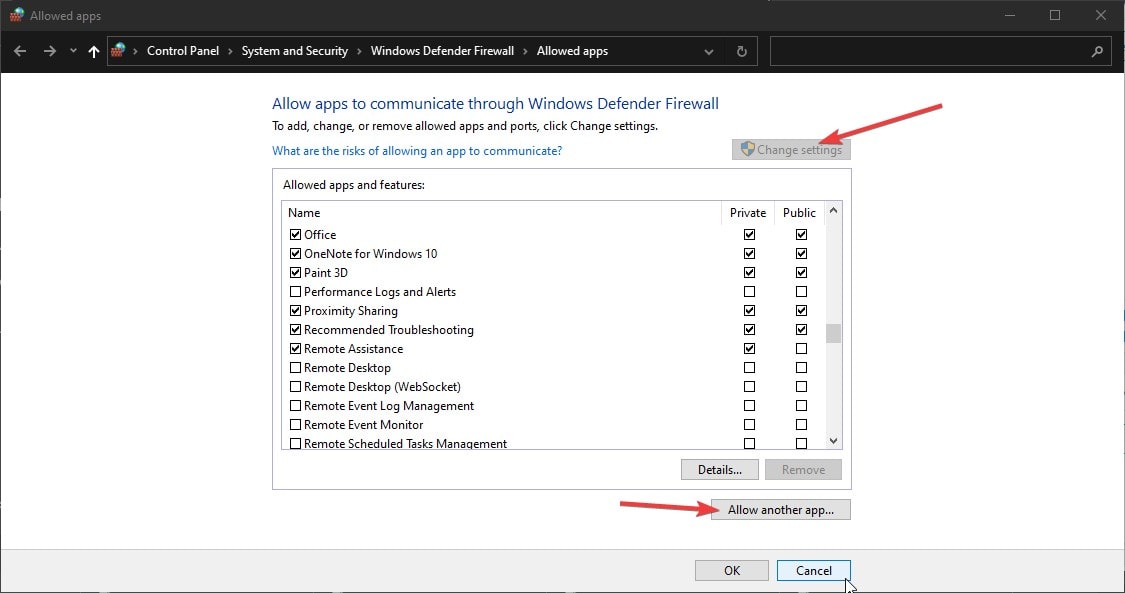
Click on change settings and then Allow another app.
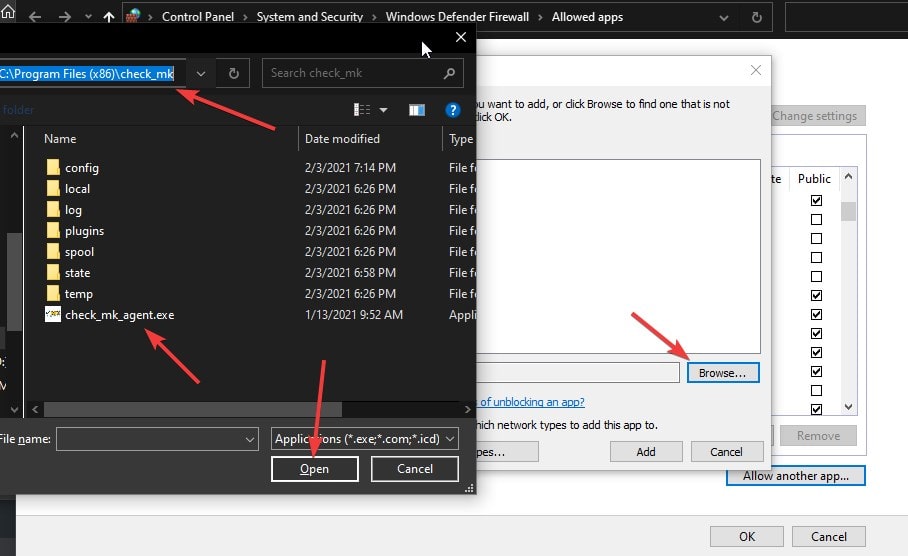
After that browser the check_mk_agent.exe
7. Restricting Host to Server IP-address only
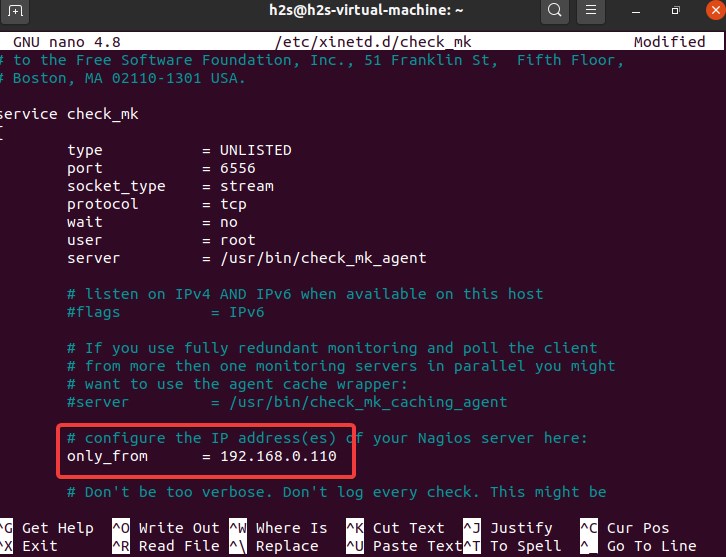
Our Check_mk server will read the host’s vital health information with the help of check_mk_agent and use telnet to port 6556. However, for security reasons, it will be a good idea, if we restrict the host installed Agent to send information only to Check_mk Server Ipaddress.
On Linux systems edit xinetd file:
sudo nano /etc/xinetd.d/check_mk
And uncomment only_from and type the check_mk server IP address in front of it. And save the file by Ctrl+X, type Y, and then hit the Enter Key.
On Windows, we can restrict it using the firewall easily…
8. Add host to Check_Mk
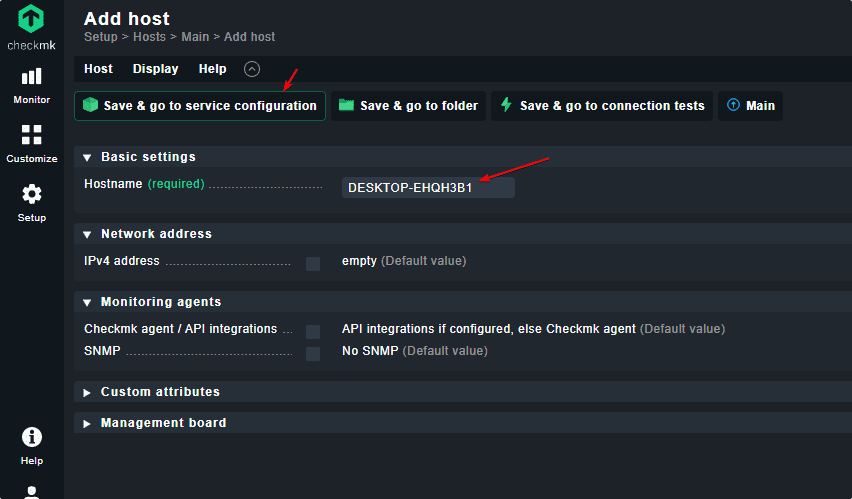
On the Web interface of this monitoring tool, select the Hosts from the Setup configuration and then select the New Host option.
Enter the hostname of the host you want to add and monitor on Check_mk.
If you don’t know the hostname then you can find it by typing the command- hostname on the machine, you want to monitor.
After that save and test it.
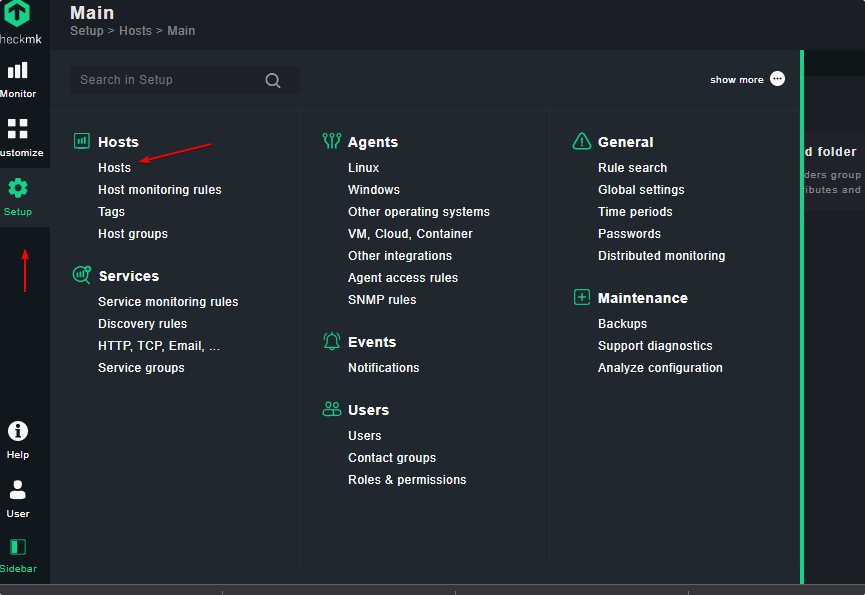
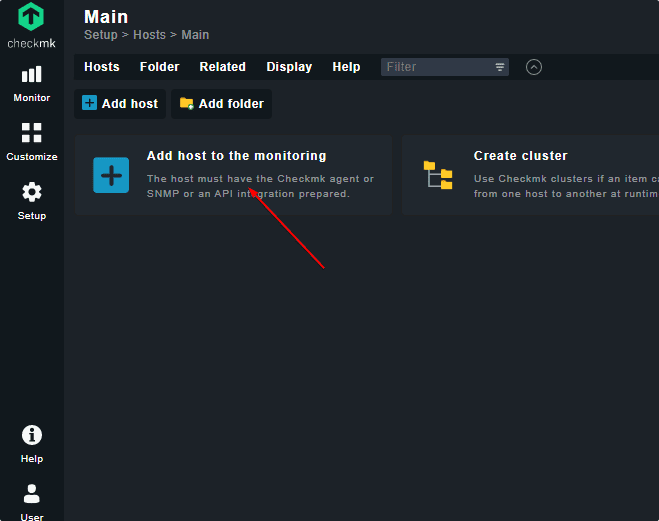
If you want to check the Connection to the host first, then installed going to service configuration use – “save & go to connection tests” option.
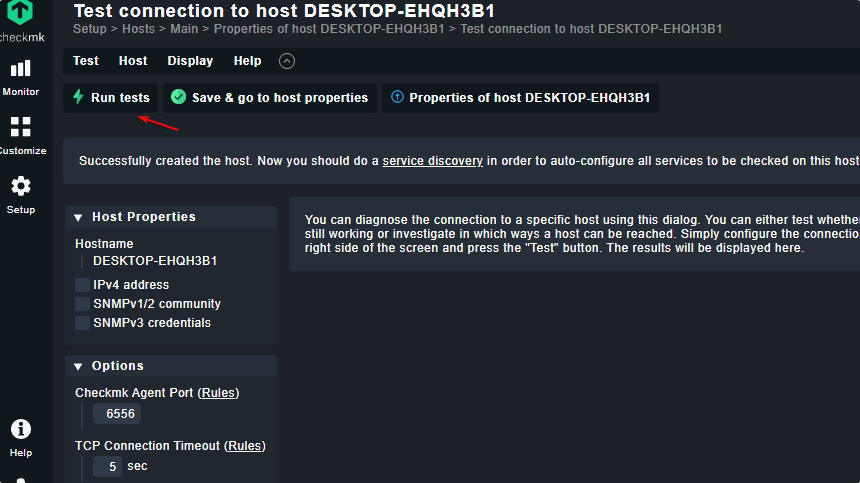

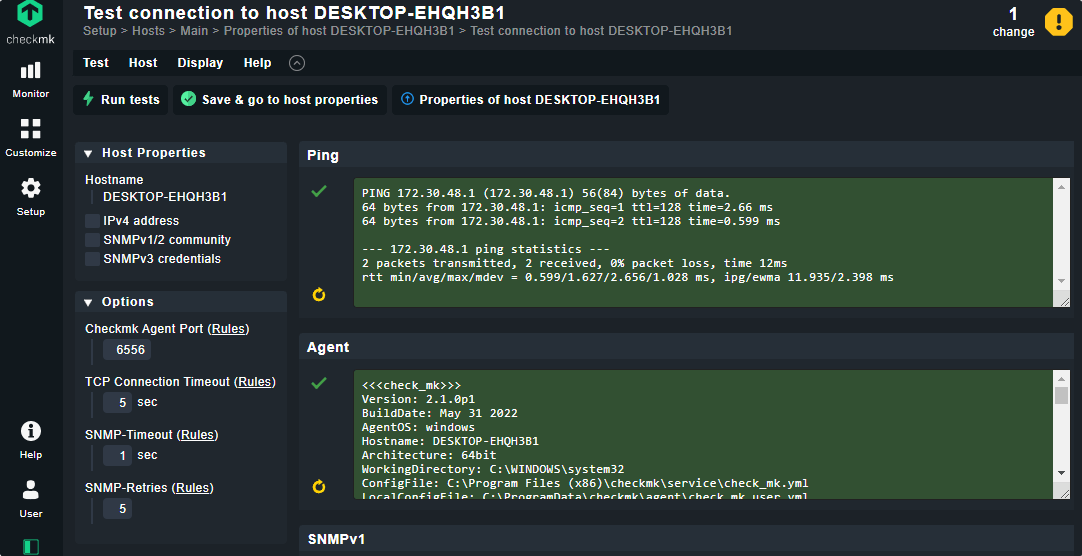
Once you have added hosts successfully, activate them. For that, you will see again a yellow color Change button on the Top Menu, select that, and hit the Activate affected button.
9. Main Overview- Report
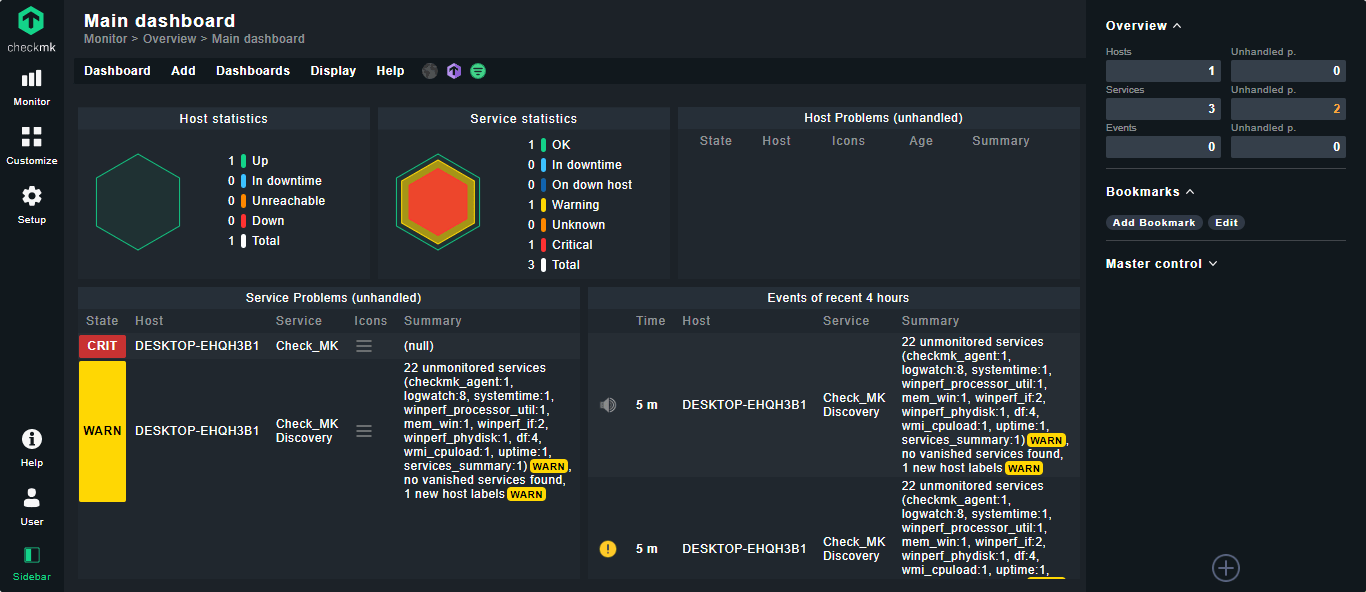
Now, on the main Dashboard screen, you will see two globe icons along with hosts information such as how many hosts are up and down, unreachable, Downtime, errors, and more. To know further we can also use the All hosts option given under the View menu and from there select the hosts individually to see further details.
10. Uninstall CheckMK
Due to any reason you don’t require this Monitoring platform from your Ubuntu Linux, then first remove the site you have created using OMD and then remove the Debian package of Checkmk.
sudo omd rm site-name
For example, here we have used h2somit, then the command will be:
sudo omd rm h2somit
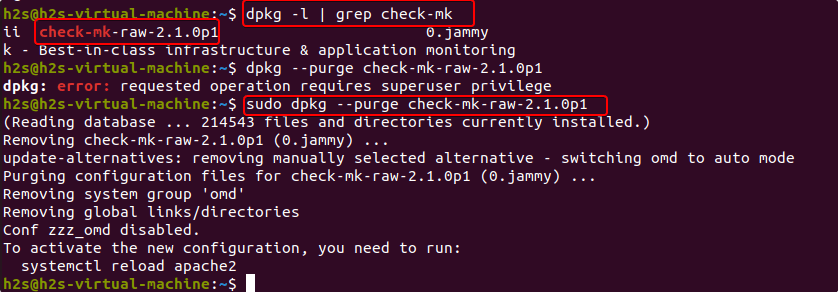
Now find the installed CheckMk Debian package:
dpkg -l | grep check-mk
You will have the name and the version of the Debian package installed. Use the DPKG purge command and the package name shown on your screen to uninstall it.
sudo dpkg --purge package-name
11. Check_MK Tutorial verdict…
This tutorial is just an introduction and installation of Checkmk Linux monitoring server on Ubuntu 22.04 Server, however, there are lots of features that one can know in detail from the official documentation.
Other Articles:
5 Best htop alternatives to monitor Linux systems
How to install Zabbix Agent on Debian 11 Bullseye
Install Kibana Dashboard on Ubuntu 22.04 LTS
7 Best Gnome system monitor alternative Linux applications


Now lets suppose a 0 day does come out some day, what account do you supposed they would try?