Start compressing your file by installing 7-Zip on Ubuntu 22.04 LTS Jammy JellyFish using the command terminal or GUI interface.
7-Zip is a popular free and open-source ZIP program that allows you to create and unzip archive files, also the RAR format is supported. It helps us to compress files and documents as well as unpack compressed folders. 7-Zip supports 7z, ZIP, RAR, GZIP, BZIP2, TAR, CAB, ISO, ARJ, LZH, CHM, Z, CPIO, RPM, DEB, and NSIS formats. However, it achieves the highest compression rate with the in-house 7z format. With the 7z format, you can even create self-extracting archives. In addition to the graphical interface, 7-Zip has a powerful command-line version.
Steps to install 7-Zip on Ubuntu 22.04 LTS Linux
The steps given here can be used for other Ubuntu versions such as 20.04/18.04 including Debian, Linux Mint, POP_OS, Elementary OS, and other similar Linux.
Perform a System update
In this tutorial we will use the APT package manager and system default source repository, hence first, run the system update command to refresh and rebuild its cache.
sudo apt updateInstall 7-zip on Ubuntu 22.04 LTS
#For the latest version:
Those who are looking for the latest existing version of 7-Zip Linux can download it directly from its official website. So, visit and right-click on the Download link of the version you want to install. As shown in the screenshot:
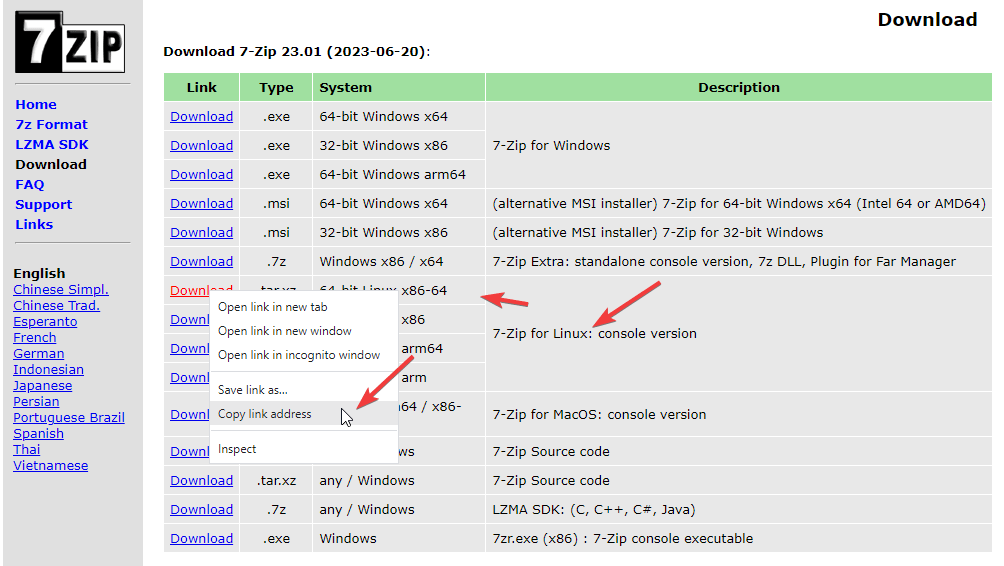
After that go to your Ubuntu command terminal and use the wget tool and the copied link to download it.
Syntax:
wget -O 7z paste-the-link
Example:
wget -O 7z.tar.xz https://www.7-zip.org/a/7z2301-linux-x64.tar.xzOnce downloaded, extract the files reside inside the folder:
tar -xf 7z.tar.xz --one-top-levelNow, switch to the folder and move the executable to /usr/local/bin folder
cd 7zcopy the executable file:
sudo cp 7zz /usr/local/bin/7zNow to check the version type:
7z -h
#For the version available through the default system repository:
The installation of 7-zip doesn’t require any third-party repository; we can install it using Ubuntu’s default repo but unfortunately, the version through is not the latest one. Hence, just run the given command that uses the APT package manager to install the 7-zip complete package.
sudo apt install p7zip-fullTo check its version and options to use, we can use:
7z -h
7Zip Command line to compress files
7-zip offers a quick command-line method to create archive files in the terminal using 7Zip will be:
7z a folder-name.7z folder-name
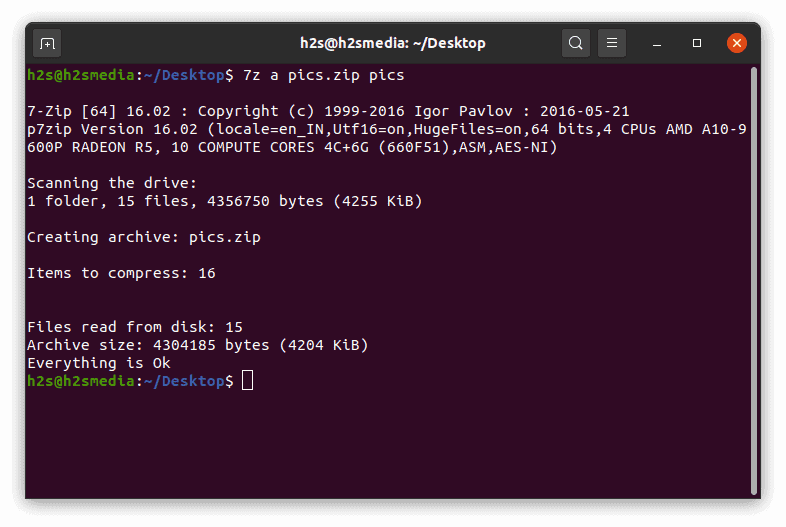
Therefore, for example, if we say the folder name that we want to compress is “pics” then the command will be like this
7z a pics.7z pics
To use any other archive format use that extension, for example, to get the archive in zipped format, the command will be like this way:
7z a pics.zip pics
Here is the output:
To List the content of the file
If you want to see what is inside some archive but without extracting it, then that is possible using the given command syntax:
7z l Archive-file-Name
Export files
If you want all files to be exported to a folder without keeping the folder structure, the following command can be used.
7z e -y ArchivName.7z -o [TargetFolder]
Creating an archive – Example of highest compression:
Those who want to control the compression level of the file can go for the given 7-zip command syntax.
7z u -mx=9 ArchivName.7z FolderToCompress/*
-mx=9, the number 9 is the level of compression that you can reduce if needed.
Create an Archive with a password
Do you want to create a password for the file or folder you are compressing? Then that can be possible as well using 7-zip. Here is the command syntax:
7z a archivefile.7z target-folder -p
Note:
archivefile.7z – It is the file name that you want to use for your compressed folder, replace it with whatever you want with 7z other supported extensions by 7-zip.
Target folder – It is the folder or file on your system that you want to compress or create an archive.


