Learn the steps to make a bootable USB drive of Ubuntu 22.04 LTS Jammy JellyFish on Windows 10 or 11 using a popular free tool called Rufus.
Days are gone when we require bootable CD/DVD for installing operating systems, now users have moved to USB. Hence, there are few free software to easily create a bootable USB drive using the ISO or IMG file of an OS. This will let us install any popular OS on a PC or laptop. However, those who do not want to install OS on a PC can go for Virtual machines without creating a bootable USB drive.
Apart from the small size benefit, the USB drive can also rewrite multiple times or use for creating multiple bootable operating systems.
Steps to create Ubuntu 22.04 bootable USB drive
1. Download Ubuntu 22.04 LTS ISO
First, download the ISO files of the Ubuntu Linux that you want to install. Here we are using version 22.04 but the method and steps will be the same for others as well. If you don’t have the ISO image of this Linux distro already then go to the official page and grab its copy.
2. Get Rufus, a bootable USB creator
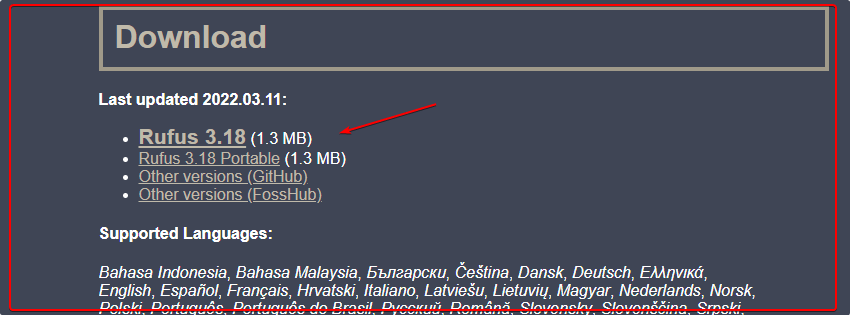
To create a bootable USB drive on Windows 11 or 10, Rufus is one of the best and most easy-to-use software. We can download its portable executable file easily from the website called Rufus. ie, yes we don’t need to install it just download the setup, double-click on it and you are good to go.
3. Run Rufus and select Ubuntu 22.04 ISO
As Rufus gets opened you will see a couple of options, however, only a few things need to be set up:
• First, select the USB drive attached to your system that you want to use.
• The second step is to choose the downloaded ISO file of Jammy JellyFish.
• After that simply click on the Start button. For more clear idea see the below screenshot.
Note: If your ISO size is over 4GB then select NTFS instead FAT32, if the software doesn’t do it automatically.
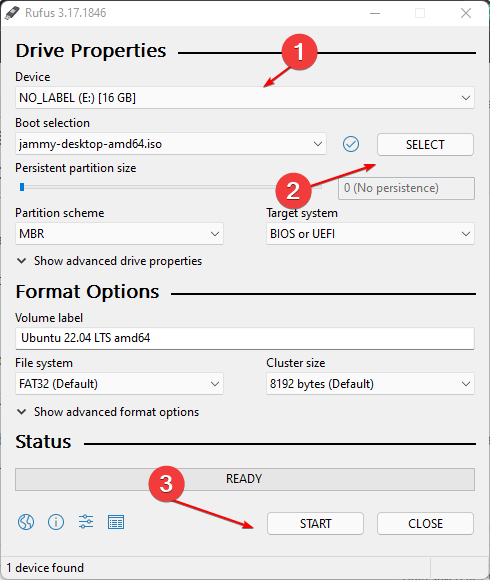
Let the default option “Write in ISO Image mode (Recommended)” be selected and move forward.
4. Downloads Dependencies
As you start writing USB using Rufus it may ask you to download the required files for that a few Kbs, if so, click the Yes button and let it download the required dependencies to start the process of creating a bootable Ubuntu 22.04 USB drive.
Note: you will also get a warning that the data of the USB drive will be deleted to write the OS files. Hence, make sure you don’t have any important data on your Pen drive.
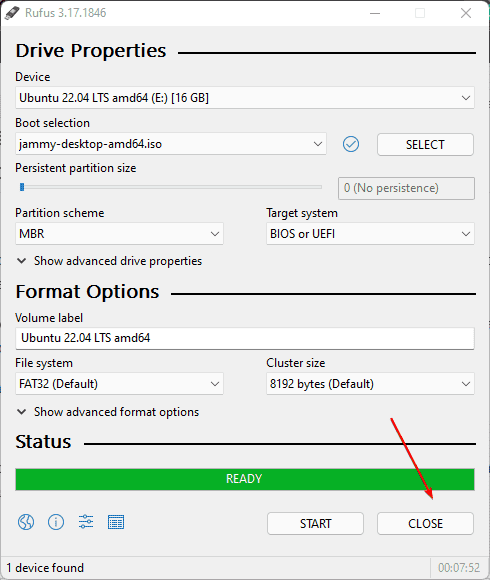
After that wait for a few minutes, once the USB drive becomes bootable Rufus will show “Ready” on the screen. Finally, click on the Close button.
Now, eject and insert the Ubuntu 22.04 bootable USB drive to the system where you want to LIVE test or install it. After that boot, the PC opens the Boot menu either using Esc, Del, or the key set by your motherboard BIOS manufacturer. When you have the boot menu, select the attached USB drive you have just created.
Other Articles:
• Create an Elementary OS 6 bootable USB drive using Rufus
• How to create Rocky Linux 8 bootable USB drive
• How to create Live Ubuntu 20.04 USB using Rufus
• Create MX Linux 21 bootable USB Drive
• How to create AlmaLinux 8 Bootable USB Drive




will not work. Ubuntu 22.04 iso is over 4GB, which means it will not be supported by FAT32
Earlier it was around 3.4 GB.