Install Unattended upgrades on Ubuntu 22.04 jammy jellyfish to update and upgrade it automatically without manually running any command.
If you are Ubuntu 22.04, especially the Server edition of it then make sure your system is up to date timely. It is because to patch any security loophole as soon as developers find it and release some patch for that. Keeping the system up to date not only reduces the chances of attack but also ensures the installed packages have their newer versions. Well, who doesn’t want his system to be in its latest state but manually running a command for it every time could be a difficult task especially, if the server is on some remote location and every time you have long it using SSH. In such as situation, we can use the Debian tool called unattended-upgrades that allows users to easily download security updates and upgrades automatically after a set interval of time without any human interaction.
However, we recommend it only to automate the security updates installation because sometimes you may not want to upgrade every package of the system.
Steps to install and use Unattended Upgrades on Ubuntu 22.04
The command given here to install, enable and configure unattended-upgrades on Ubuntu 22.04 can be used for Ubuntu 20.04 Focal, Debian, and other similar Linux systems.
Run system update
The Unattended upgrade tool is available through the Ubuntu repo, hence we can use the APT package manager to install it. However, before that run the system update command manually to refresh the APT package index cache.
sudo apt updateInstall Unattended Upgrades on Ubuntu 22.04
As we have apprised before that we don’t need any third-party repository to install this tool that helps us to automate the upgrade process on Ubuntu. Hence, on your Terminal, run the given command:
sudo apt install unattended-upgradesCheck Service status
Once the installation is completed or it already has been on your system; check whether the service of this tool is running properly in the background or not.
systemctl status unattended-upgrades --no-pager -l
For knowledge: To start and stop the service, we can use –
To stop:
sudo systemctl stop unattended-upgradesTo Start:
sudo systemctl start unattended-upgradesConfigure Unattended-Upgrades on Ubuntu 22.04
There are two configuration files available to customize and control the working of the Unattended-Upgrades tool. One is 20auto-upgrades and the other is 50unattended-upgrades
20auto-upgrades
The file is present at “/etc/apt/apt.conf.d/20auto-upgrades”
sudo nano /etc/apt/apt.conf.d/20auto-upgradeswith the following contents:
APT::Periodic::Update-Package-Lists "1";
APT::Periodic::Unattended-Upgrade "1";
A short explanation should already be given here:
APT::Periodic::Update Package Lists “1”; – Update the package lists, it is similar to running the sudo apt update command.
APT::Periodic::Unattended Upgrade “1”; – Perform unattended upgrades, it installs the available upgrades similar to the command sudo apt upgrade…
Where the value “1″ means the setting is enabled, and if you want to disable it, just change 1 to 0. Whereas, by default, this setting will look for updates daily, if you want it to check every other day change the value to “2“.
Well, we don’t need to edit this, however, if you want to run only the sudo apt update command automatically to install updates then leave its value to 1, whereas if you don’t want to system to install upgrades for all available packages then set its value to 0. It all depends on you what exactly you want.
50unattended-upgrades
This file lets us control the behavior of the unattended-upgrades tool and allows us to tell the system what exactly it needs to upgrade automatically which packages it needs to skip when to reboot, and more…
To edit it use:
sudo nano /etc/apt/apt.conf.d/50unattended-upgrades
You will see a long list of lines, we can use them to control and automate the Updates process of Ubuntu.
Here are some examples:
Note: The system will not process the lines available in the Unattended-Upgrades configuration file with // slashes. Hence, if you want to allow some settings in the file then remove // given in front of that particular settings line whereas to disable the same you just need to put two forward slashes again //.
Update & Upgrade Origin Settings
The first area of the file is dedicated to configuring the source where you want to install the updates automatically. By Default updates for security are enabled.
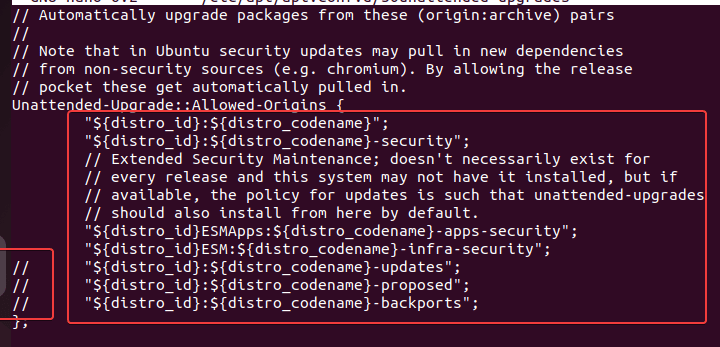
However, if you also want to include package updates then simply remove the // given in front for
"${distro_id}:${distro_codename}-updates";Apart from it there are two more origins one is to fetch and install the Proposed Updates and the other is for Backports updates.
If you want to enable them, remove // given in front of them. However, first, know what they are.
// "${distro_id}:${distro_codename}-proposed";
// "${distro_id}:${distro_codename}-backports";
“${distro_id}:${distro_codename}-proposed”: If you enable this then the system will also install the updates which are still in the testing phase, hence such updates could break the system.
“${distro_id}:${distro_codename}-backports”; : It provides the new release updates for the installed software on your Ubuntu. Hence, if you are using some old application that requires and is compatible with some old version of the package then enabling this update feature could stop the working of that application. Backports are considered generally safe when used as intended on an individual package basis. However, if you want to have new features then enable this one.
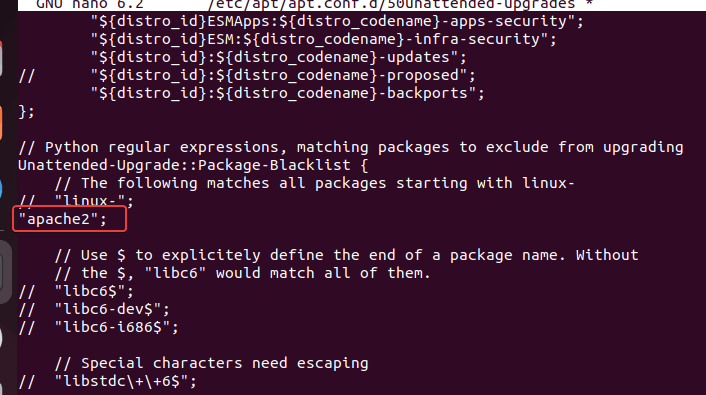
Exclude a particular package from upgrading
To Blacklist Packages from upgrading: Now, suppose you don’t want the system to automatically update any particular package on your system. In short, while updating the system, it should skip that package. Let’s say you don’t want your system to update the Apache package automatically, then add that to the file as shown.
// Python regular expressions, matching packages to exclude from upgrading
Unattended-Upgrade::Package-Blacklist {
// The following matches all packages starting with linux-
// "linux-";
"apache2";
You can see the format in which we have added the Apache2 package that automatic system updates will skip.
Similarly, you can configure and enable other setting such as :
Just remove // from Unattended-Upgrade to enable its corresponding setting.
/ Automatically reboot *WITHOUT CONFIRMATION* if
//  the file /var/run/reboot-required is found after the upgrade
//Unattended-Upgrade::Automatic-Reboot "false";

// Automatically reboot even if there are users currently logged in
// when Unattended-Upgrade::Automatic-Reboot is set to true
//Unattended-Upgrade::Automatic-Reboot-WithUsers "true";

// If automatic reboot is enabled and needed, reboot at the specific
// time instead of immediately
//  Default: "now"
//Unattended-Upgrade::Automatic-Reboot-Time "02:00";

// Use apt bandwidth limit feature, this example limits the download
// speed to 70kb/sec
//Acquire::http::Dl-Limit "70";

// Enable logging to syslog. Default is False
// Unattended-Upgrade::SyslogEnable "false";

// Specify syslog facility. Default is daemon
// Unattended-Upgrade::SyslogFacility "daemon";
Once you are done, to save the file you can use Ctrl+O, hit the Enter key, and then exit using Ctrl+X.
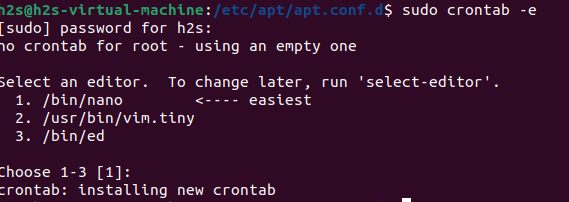
Control the Timing of your automatic upgrades
Well, by default the system will upgrade automatically after one day, or the value you have set in the 20auto-upgrade configuration file. However, we can control the timing as well by creating a Cron job file.
Here is the way to do that:
Here we are configuring the Cron job to run Unattended upgrades at 01:00 am every day of the week.
sudo crontab -eHit the Enter key or choose the editor you want to use to edit the Contrab configuration file:
After that add the following line at the end of the file:
00 01 * * */1 /usr/bin/unattended-upgrade -vSave it using Ctrl+O, hit the Enter key, and exit Ctrl+X.
Test unattended-upgrades
You can test your config with a dry run.
sudo unattended-upgrades --dry-run --debug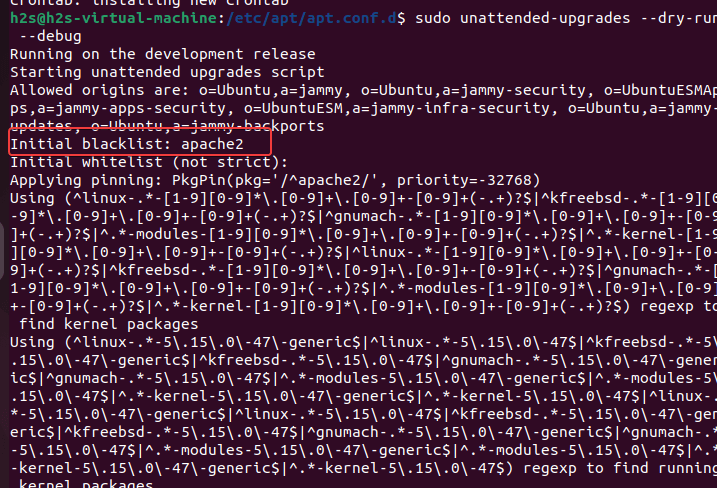
That’s it, now the system will automatically check and update your Ubuntu 22.04 using the Unattended upgrades tool. If you want to confirm later whether it has been working fine, you can check the logs.
cd /var/log/unattended-upgradestail unattended-upgrades.logKnow more about this tool at Debian Wiki.
Other Articles:
Create a New User in Ubuntu 22.04 or 20.04 using GUI or Terminal
How to Install KiCad Ubuntu 22.04 or 20.04 LTS
How to install VSFTPD to Setup FTP Server on Ubuntu 22.04
Install Foxit PDF Reader on Ubuntu 22.04 LTS Linux


