Let’s see how to use a PPA repository on Ubuntu 24.04, 22.04, or 20.04 to install Python version 3.13, 3.12, or 3.11 using the command terminal.
While doing this article, the latest version of the Python programming language was 13.12; however, 13.13 was available as a pre-release. The new versions always have several new features, improvements, and optimizations. Therefore, it is important to update the existing version of Python on your Ubuntu Linux to include new features, security improvements, and bug fixes. Python versions are typically numbered in a Major.Minor.Patch.
Let’s see the steps to install Python 3.13 or 3.12 on Ubuntu 24.04, 22.04, or 20.04 with the help of this guide:
1. Start with the Ubuntu Update
We all know the best way to install packages on Linux is by using its default package manager. Therefore, before proceeding, why not make sure our system is up to date?
sudo apt update && sudo apt upgrade -y2. Check the Current Python Version
It is also important to know what the current version of Python is available on our Ubuntu system so that after installing the new one, we will have a better understanding of the existing version on our system.
While doing this tutorial, on our Ubuntu 24.04 or 22.04 system, we have Python 3.10.12 by default.
python -V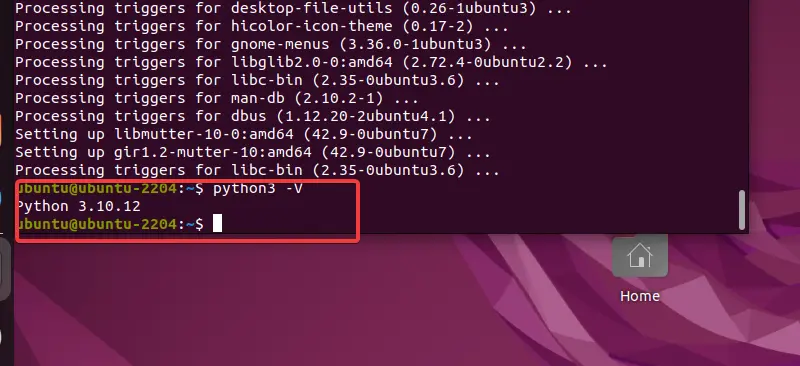
3. Add DeadSnake Python PPA
We cannot have the latest versions of Python by using Ubuntu Linux’s default system repository. Therefore, we need to manually download the version we want from the official website and then configure it (manually) or use a third-party repository. Perhaps the third-party repo method is easier and quicker for most users when getting the newer Python versions. Therefore, we are adding the popular DeadSnake PPA to get the newer and older versions of Python, such as 3.9, 3.8, and 3.7.
sudo apt install software-properties-common
sudo add-apt-repository ppa:deadsnakes/ppa
4. Installing Python 3.13, 3.12 or 3.11 on Ubuntu
Now, after adding the PPA repository, it is possible to install the latest versions of Python on Ubuntu. To check whether the version we want is available through the added repo, we can use the given command syntax.
Let’s say we want to check the availability of Python 13.12
sudo apt-cache policy python3.12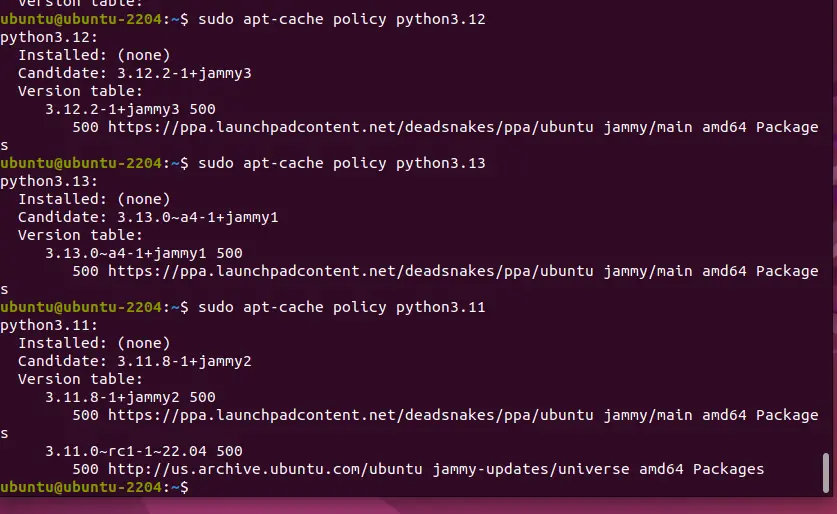
Similarly, you can check for other versions as well… Now, to install them, the syntax will be:
sudo apt install python(version)For example, Commands to install the latest versions of Python on Ubuntu:
To install Python 3.13
sudo apt install python3.13Python 3.12 installation
sudo apt install python 3.12Similarly, Python 3.11 installation on Ubuntu:
sudo apt install python3.115. How to install Python Modules
Well, if you want to install some particular Python version module, let’s say we want to have a Python3.12 venv module, then the command will be like this:
sudo apt install python3.12-venvSimilarly, we can install other versions of modules as well.
For the common module examples, change #.# with a version of the Python you want to install.
python#.#-dev: includes development headers for building C extensionspython#.#-venv: provides the standard libraryvenvmodulepython#.#-distutils: provides the standard librarydistutilsmodulepython#.#-lib2to3: provides the2to3-#.#utility, as well as the standard librarylib2to3modulepython#.#-gdbm: provides the standard librarydbm.gnumodulepython#.#-tk: provides the standard librarytkintermodule
6. How to Set the default Python version
In many cases, especially if you are a developer, you might want to have multiple versions of Python on Ubuntu to fulfill the requirements of various projects. However, in that scenario, how will you set the required version of Python as the system’s default one? For that, here is the command—we can use Update-Alternatives.
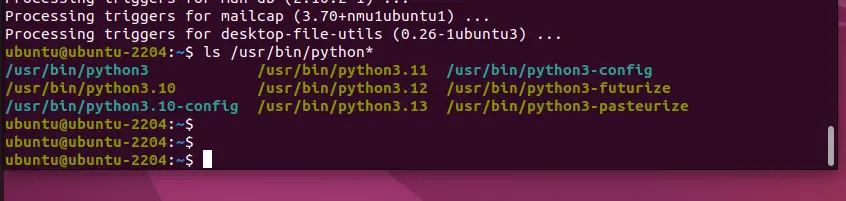
List all Python versions are available on your systems:
ls /usr/bin/python*We have four versions, but you may have fewer or more depending on how many you have installed so far.
To know whether any version is configured as Python alternatives or not, run:
sudo update-alternatives --list pythonIf the output is:
“update-alternatives: error: no alternatives for python”This means no alternatives have been configured for Python, so let’s do something.
Here, we are setting all the available versions installed recently as alternatives; later, we will be able to choose between them and set one of them as the system’s default one. Furthermore, the values 1, 2, 3, and 4 given at the end of each command (below) are used to set the priority of the versions. But you can interchange them if you want.
sudo update-alternatives --install /usr/bin/python python /usr/bin/python3.10 1sudo update-alternatives --install /usr/bin/python python /usr/bin/python3.11 2sudo update-alternatives --install /usr/bin/python python /usr/bin/python3.12 3sudo update-alternatives --install /usr/bin/python python /usr/bin/python3.13 4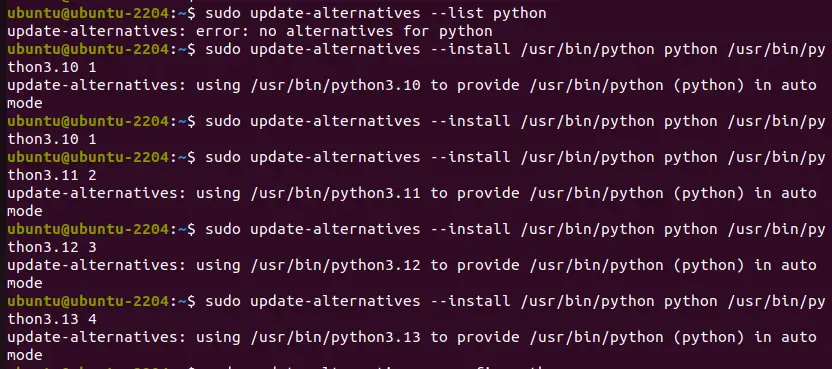
We have configured the available versions to use as alternatives against each other; now, if we want to change the current one and set some other version as the default one, use the given command:
sudo update-alternatives --config pythonEnter the Python version you want to set as the system-wide default on Ubuntu. For example, in the given screenshot, you can see the system automatically used the latest version, but we want to set Python 3.12 as the default one. So, for that, we type its selection number, which is– 2, and then hit the Enter key.
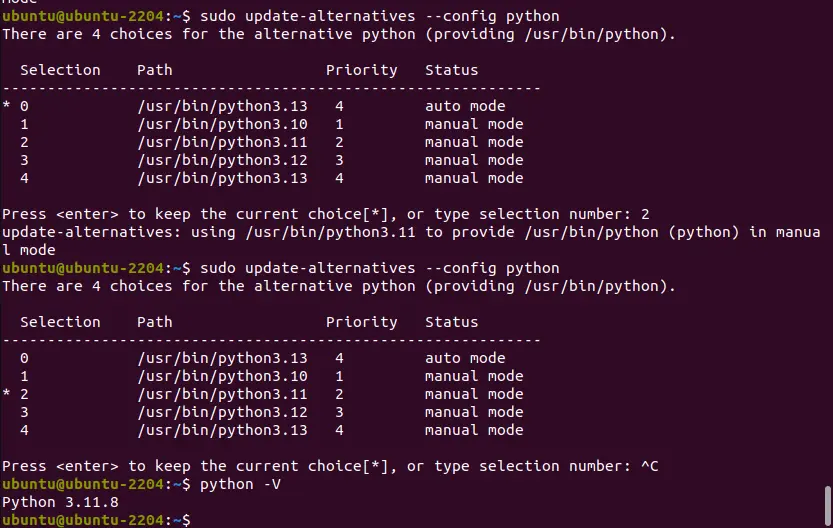
To check the version, we can again use:
python -V7. How to install Pip3 (optional)
Well, those who require the Python package manager, PIP, can use the command given to install it if they don’t already have it.
sudo apt install python3-pip8. Uninstall Python and PPA (optional)
Sometimes, we don’t require the older version of Python on our Ubuntu system, if that is the case with you as well, then we can use the given command to remove any installed Python version:
Let’s say we want to remove Python3.12, then the command will be like this:
sudo apt remove --purge python3.12If you want the latest updates for Python versions that are not available through Ubuntu’s default system repos, don’t remove the PPA. However, if you want to use the default version that comes with Ubuntu, you would like to remove the Deadsnake PPA as well.
To remove PPA:
sudo add-apt-repository --remove ppa:deadsnakes/ppaOther Articles:
- Install Python 3.9 or 3.8 on Ubuntu 22.04 LTS Jammy JellyFish
- 8 Best Ubuntu Screen Recorder Apps to Install in 2024
- How to install vokoscreenNG screen recorder on Ubuntu Linux
- ShellGPT- Install and use ChatGPT in Ubuntu Linux terminal
- 4 Different commands to Check the Ubuntu Server Version via Terminal