In this tutorial, we will learn how to install PostgreSQL Database Client and Server on Ubuntu 22.04 LTS Jammy JellyFish using the command terminal.
PostgreSQL Database is a object-relational database management system (ORDBMS). It differs from relational database management systems such as MySQL in that even complex data objects can be stored relationally in the database. It is distributed under a free BSD license and can be used platform-independently. PostgreSQL is a free database management system that appeared in 1996.
Steps to install PostgreSQL Database on Ubuntu 22.04 LTS Linux
The steps given here can be used for other Ubuntu or Debian-based systems such as Elementary OS, Linux Mint, MX Linux, POP_OS, and more…
1. Perform a system update
In this tutorial, we will use the system’s default repository. Hence to update the APT package manager package index, run the system update command, once.
sudo apt update && sudo apt upgrade
2. Install PostgreSQL Server on Ubuntu 22.04
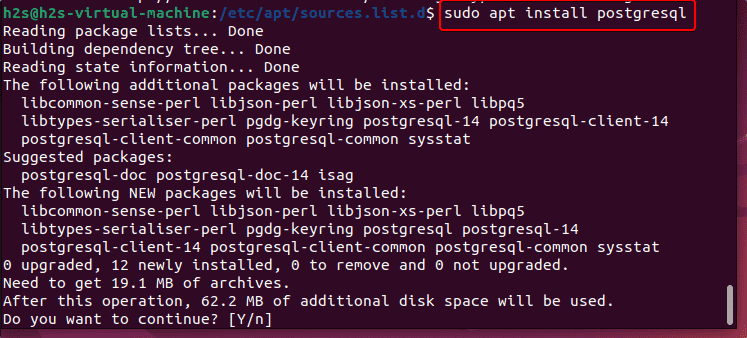
Well, the latest version of PostgreSQL is available to install using the Ubuntu 22.04 LTS Jammy JellyFish default repository. Hence, to install it just use the APT command given below:
sudo apt install postgresql

The above command will install the latest stable version of PostgreSQL, if you want to install some old version of it then you have to mention the same in the command.
For example, to install PostgreSQL version 12, the command will be:
sudo apt install postgresql-12
3. Check Service Status and Port
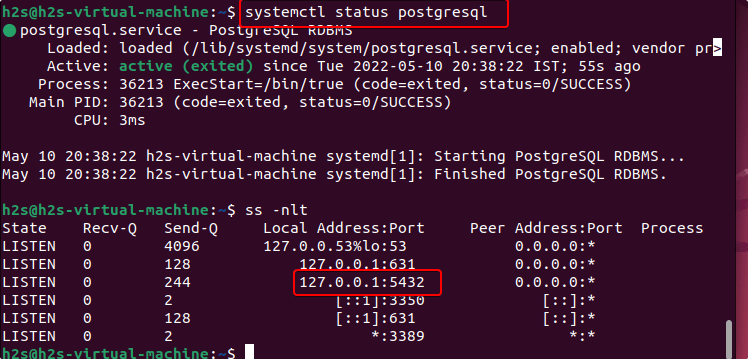
Once the installation is completed, let’s check whether the service of PostgreSQL is running without any error but on which port.
systemctl status postgresql
By default, the Database listens to 5432 for incoming connections.
ss -nlt

Just for knowledge: To manage its service, you can use:
To restart:
sudo systemctl restart postgresql
To stop:
sudo systemctl stop postgresql
To disable at startup:
sudo systemctl disable postgresql
To enable again:
sudo systemctl enable postgresql
5. Install only PostgreSQL Client
Those who don’t want the PostgreSQL Database server and just looking for the client to connect to some remote Database server can go for the given command:
sudo apt install postgresql-client
Once the installation is completed, you can use the command-line tool of the client to establish a connection with the remote server:
To access created database on localhost, you can use the following command syntax:
psql -h localhost -d DB-name -U DB-User
Replace DB-name and DB -User with the one you want to connect.
Now, change the bold values in the below command to connect remote PostgreSQL running server.
psql -h server-ip-address -d DB-name -U DB-User
6. Secure PostgreSQL default Database
To make sure our PostgreSQL is secured with a strong password, set a password for its system user and then change the default database admin user account using the below-given commands-
Change user password
sudo passwd postgres
Login using Postgres system account-
su - postgres
Now, change the Admin database password-
psql -c "ALTER USER postgres WITH PASSWORD 'your-password';"
Note: Replace your-password in the above with a secure password that you want to set for the admin database user.
7. How to create a new database
Let’s say you want to create a database on PostgreSQL to use with some application, then here are the commands to follow-
Login with Postgre system user-
su - postgres
psql
Create a new user. Here we are creating a demo user protected by a password. Change them.
CREATE USER demo WITH PASSWORD 'password';
Create new PostgreSQL database-
CREATE DATABASE h2sdb;
Now, let’s Grant all rights or privileges on created database to the user:
GRANT ALL ON DATABASE h2sdb TO demo;
However, the owner of the Database still will be the default Admin user of PostgreSQL to change that you can use the command-
Syntax:

ALTER DATABASE database_name OWNER TO user-name;

Example:

ALTER DATABASE h2sdb OWNER TO demo;
To check and confirm whether the database has been created or not simply type
\l
8. Configure PostgreSQL to access remotely
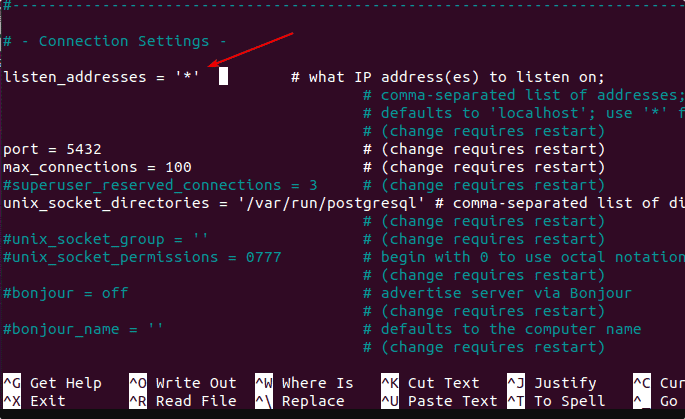
By default, this database server will listen only to the localhost, to access it remotely, we need to perform some changes in its configuration file. We can limit it to some particular IP address or open it for all.
sudo nano /etc/postgresql/14/main/postgresql.conf
If you are using some other version of the Database then change number 14 with that in the above command.
In the Configuration file, find – listen_addresses and first, remove the # given in front of it. After that replace localhost with * sign to allow all Ip-address to connect to the Database server, whereas to limit it to some particular Ip-addresses then type them instead of ‘*‘. Multiple addresses need to be separated with commas.
Save the file by pressing Ctrl+X, Y, and hitting the Enter key.

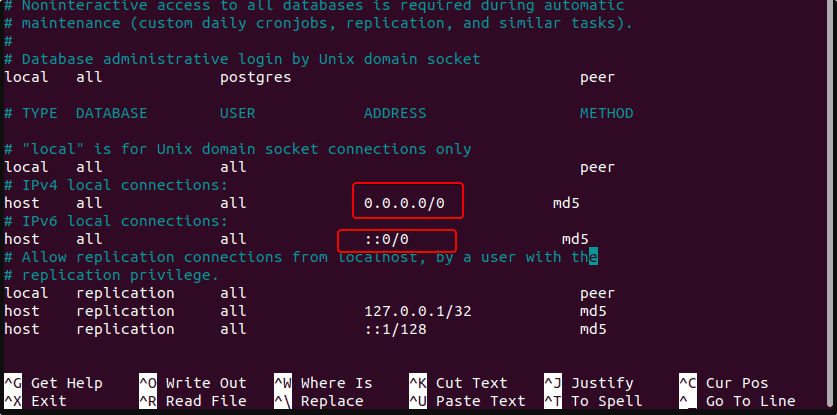
Edit pg_hba.conf
sudo nano /etc/postgresql/14/main/pg_hba.conf
Change the host value as shown in the below screenshot.
host        all           all              0.0.0.0/0             md5

host        all            all             ::0/0                 md5
Save the file Ctrl+X, Y, and press the Enter key.

Restart the Database server to apply the changes:
sudo systemctl restart postgresql
Check whether it listening for all addresses or not, for that you can run:
sudo apt install net-tools

sudo netstat -antup | grep 5432
output:
tcp 0 0 0.0.0.0:5432    0.0.0.0:*    LISTEN 11568/postgres
tcp6 0 0 :::5432        :::*         LISTEN 11568/postgres
Finally, open port ‘5432’ in the firewall:
sudo ufw allow 5432
9. Uninstall or remove PostgreSQL – Ubuntu 22.04
If you don’t require the Database server or client anymore on your system then we can completely remove it. However, note this will also remove all the Databases created using PostgreSQL from your system. Hence, make sure to take a backup.
sudo apt remove postgresql*
For some specific version removal, you have to mention the same. For example, you have multiple versions of the PostgreSQL installed and want to remove only 12.
sudo apt remove postgresql-12*
For only client:
sudo apt remove postgresql-client
Other Articles:
• How to Install FileZilla FTP Client on Ubuntu 22.04
• How to install Thunderbird on Ubuntu 22.04 LTS
• Enable or disable the firewall on Ubuntu 22.04 LTS
• How to Install SQLite 3 on Ubuntu 22.04


